Connectors – PagerDuty

API Fortress + PagerDuty Integration Benefits:

  • Notify on-call responders based on failures in your API Fortress tests.
  • Send critical information on the failure as well as a link to the test report from the failed test.
  • Create high and low urgency incidents based on the severity of the failure via dynamic tags in the test.
Below is a quick guide to setting up and using the PagerDuty connector.

Note: this connector does not come pre-loaded out of the box, and will need to be loaded separately. To learn how to load the connector into your API Fortress instance click here.

This connector is built and supported by API Fortress. If you need any help with this connector please reach out to API Fortress support at support@apifortress.com.

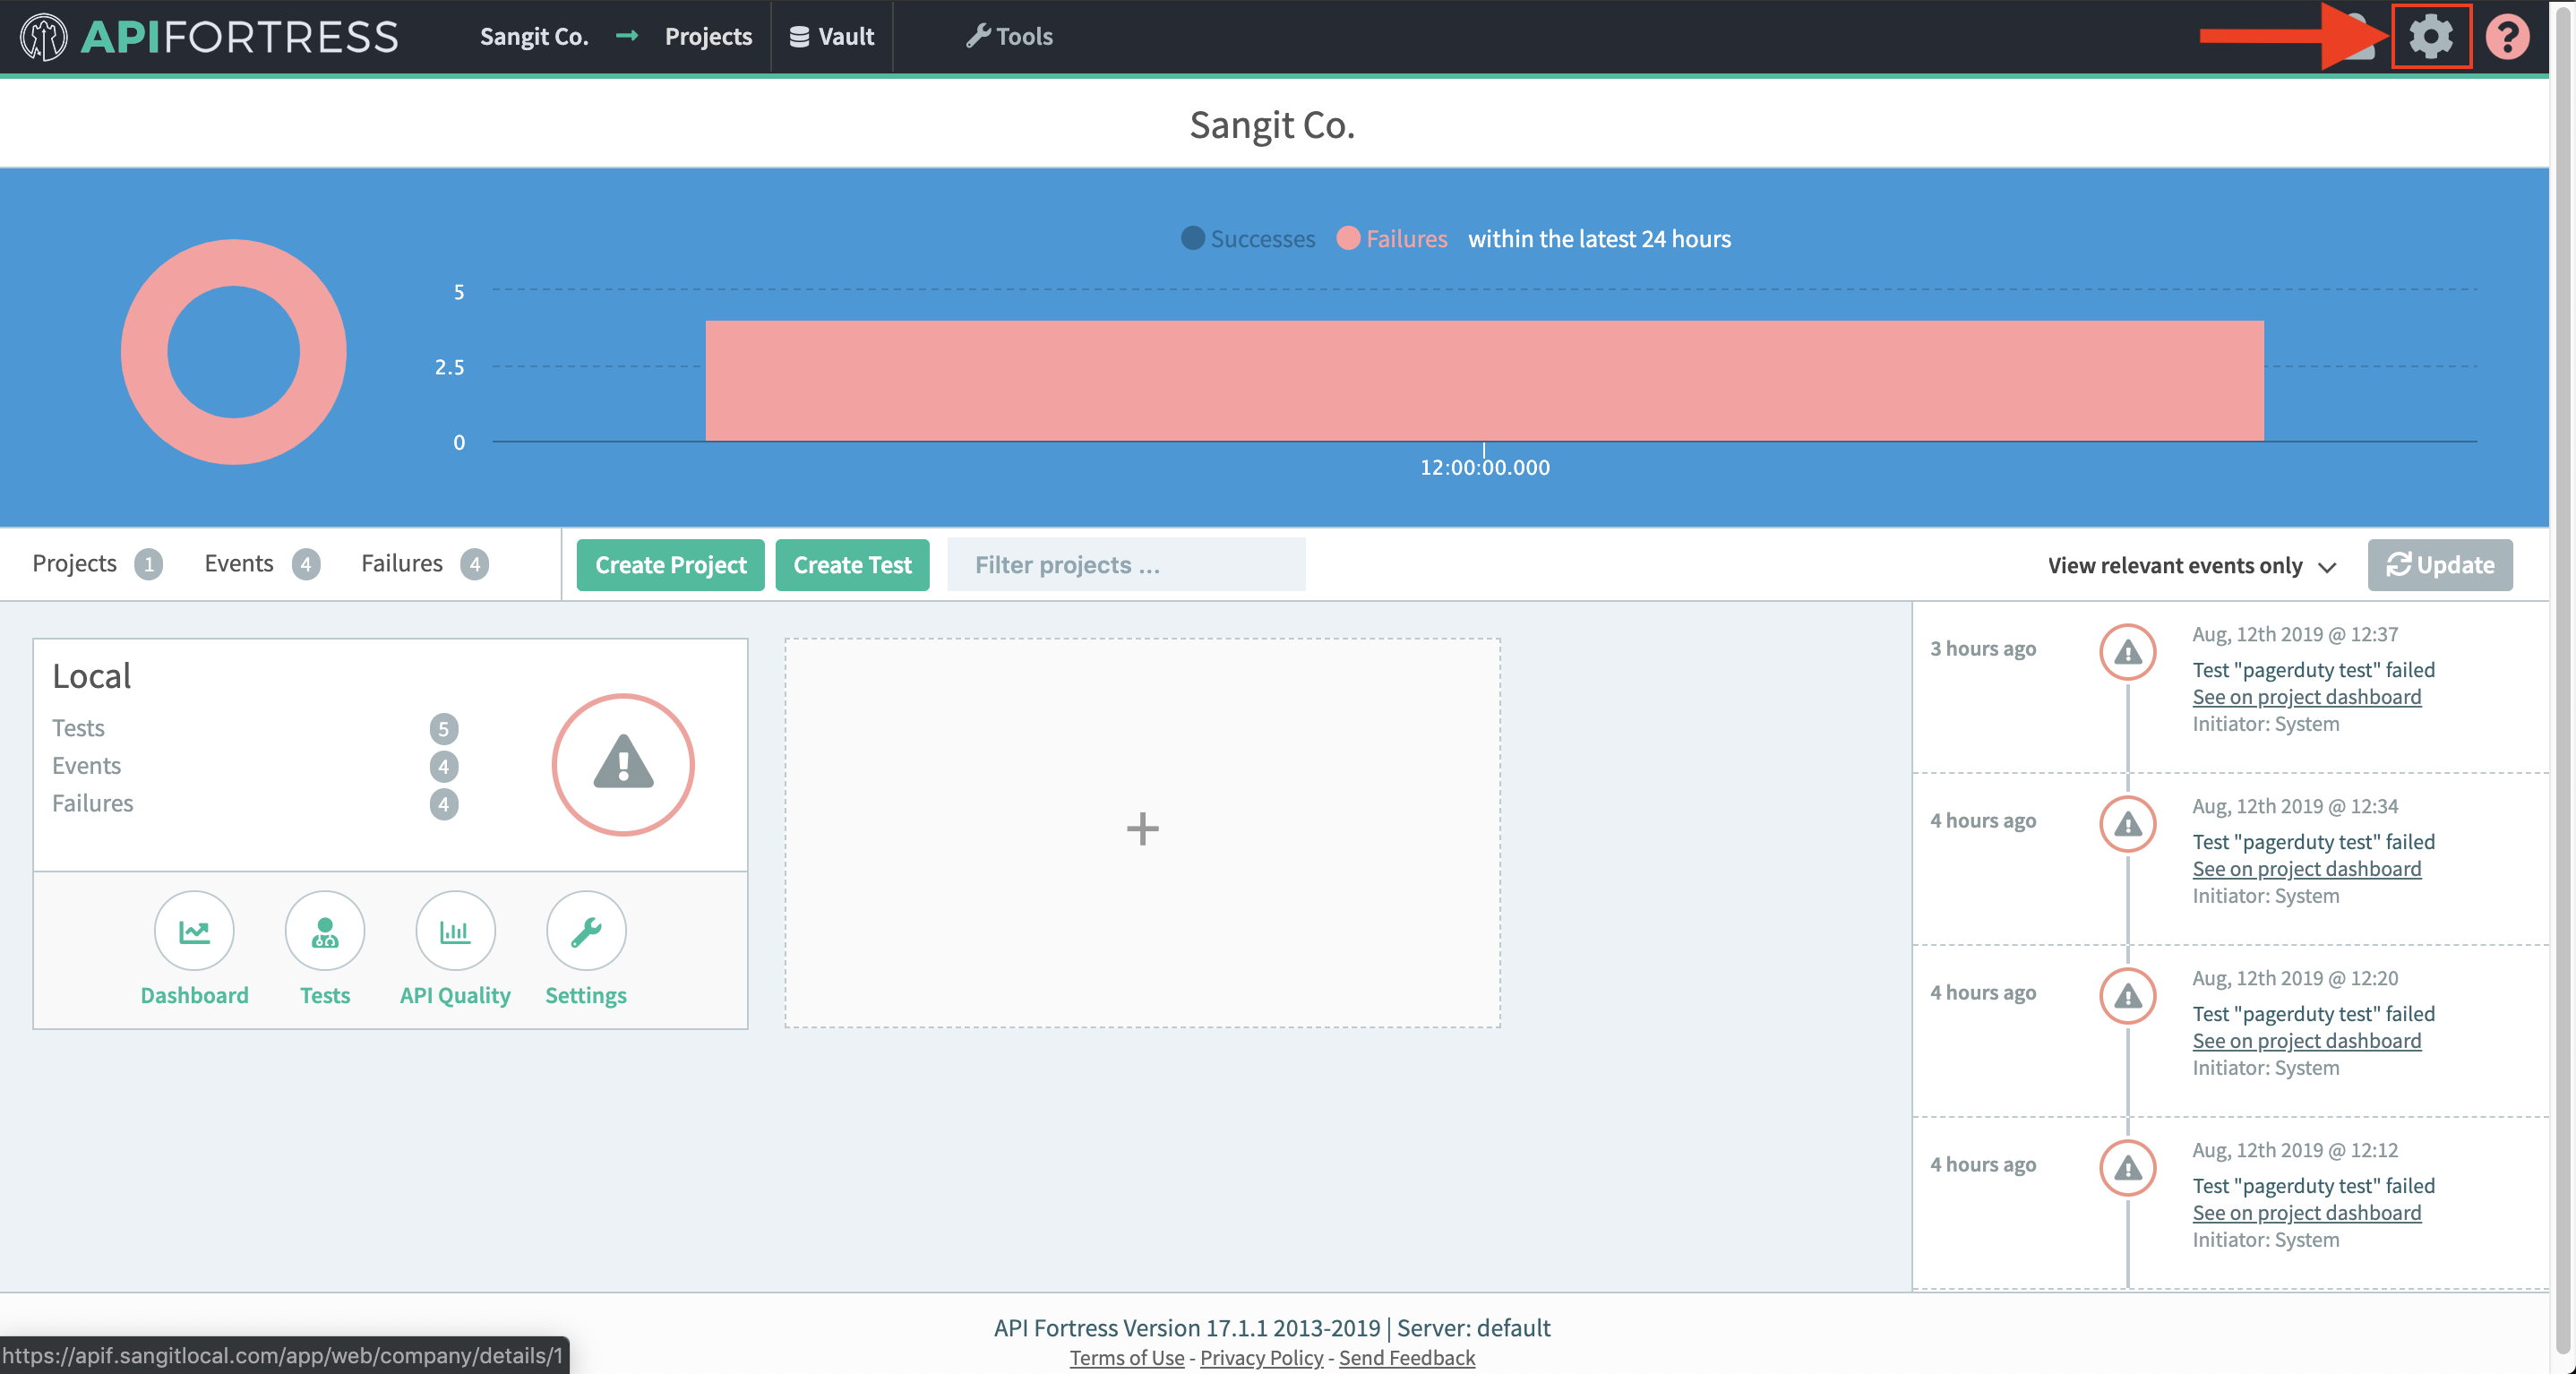
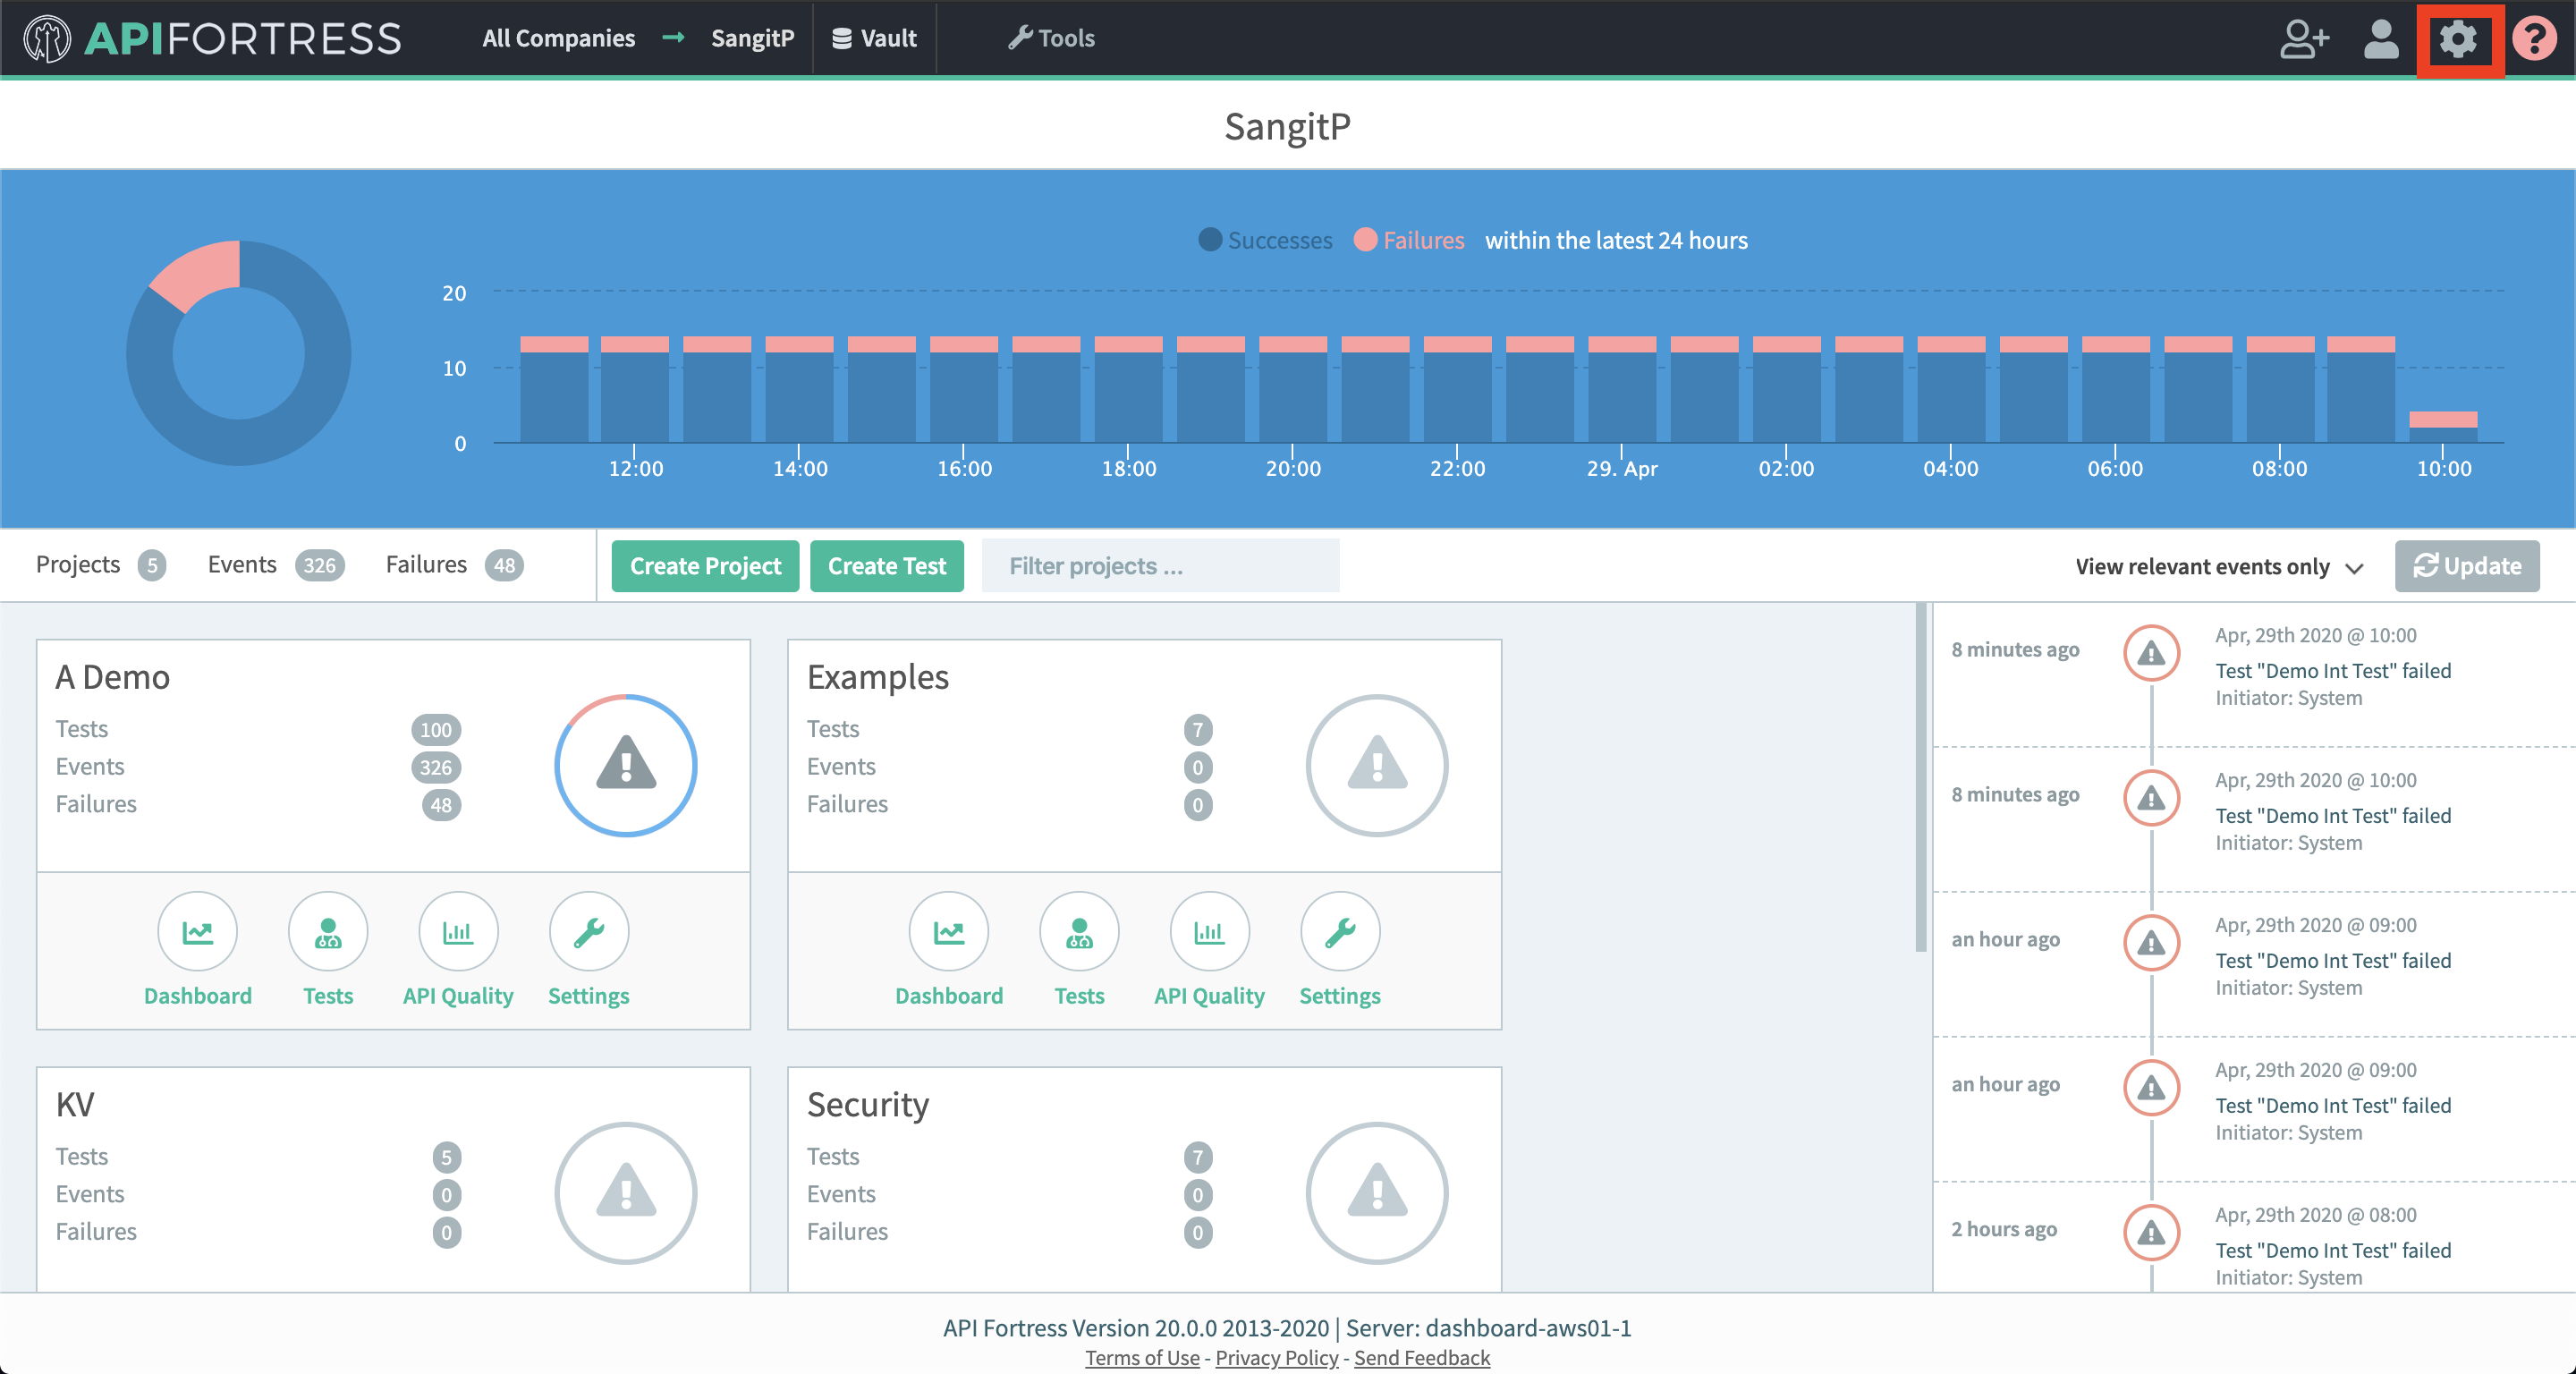
  1. Go to settings page
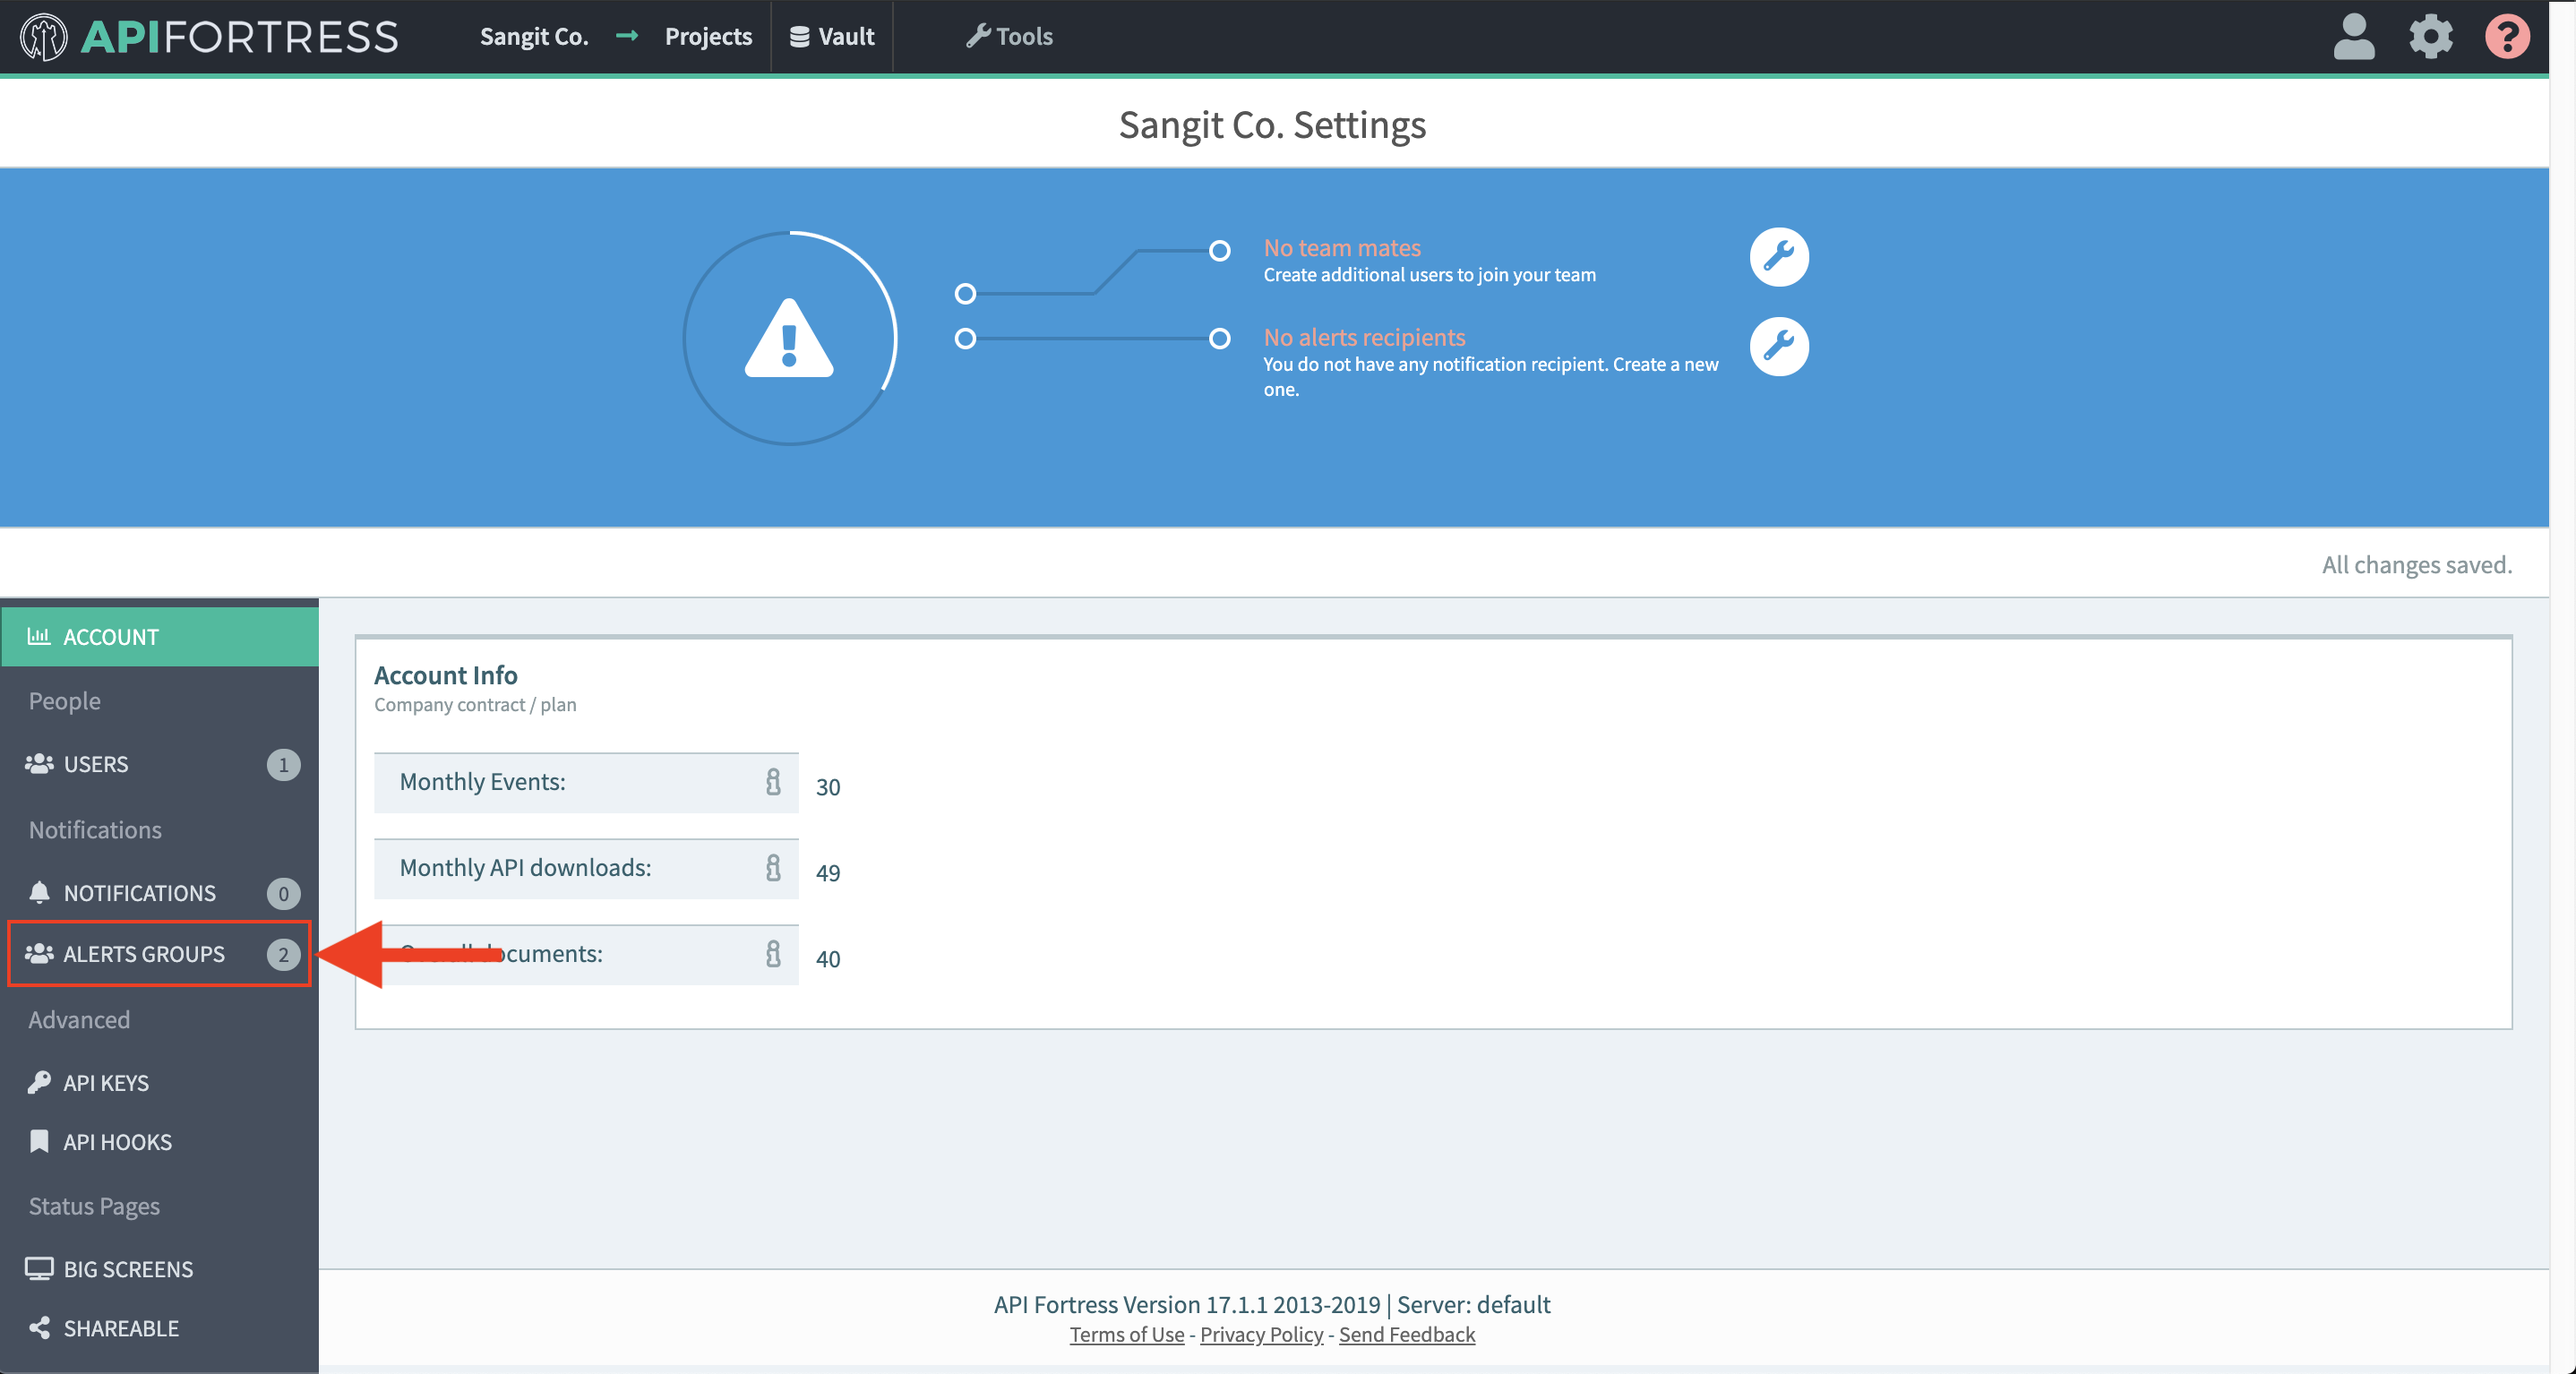
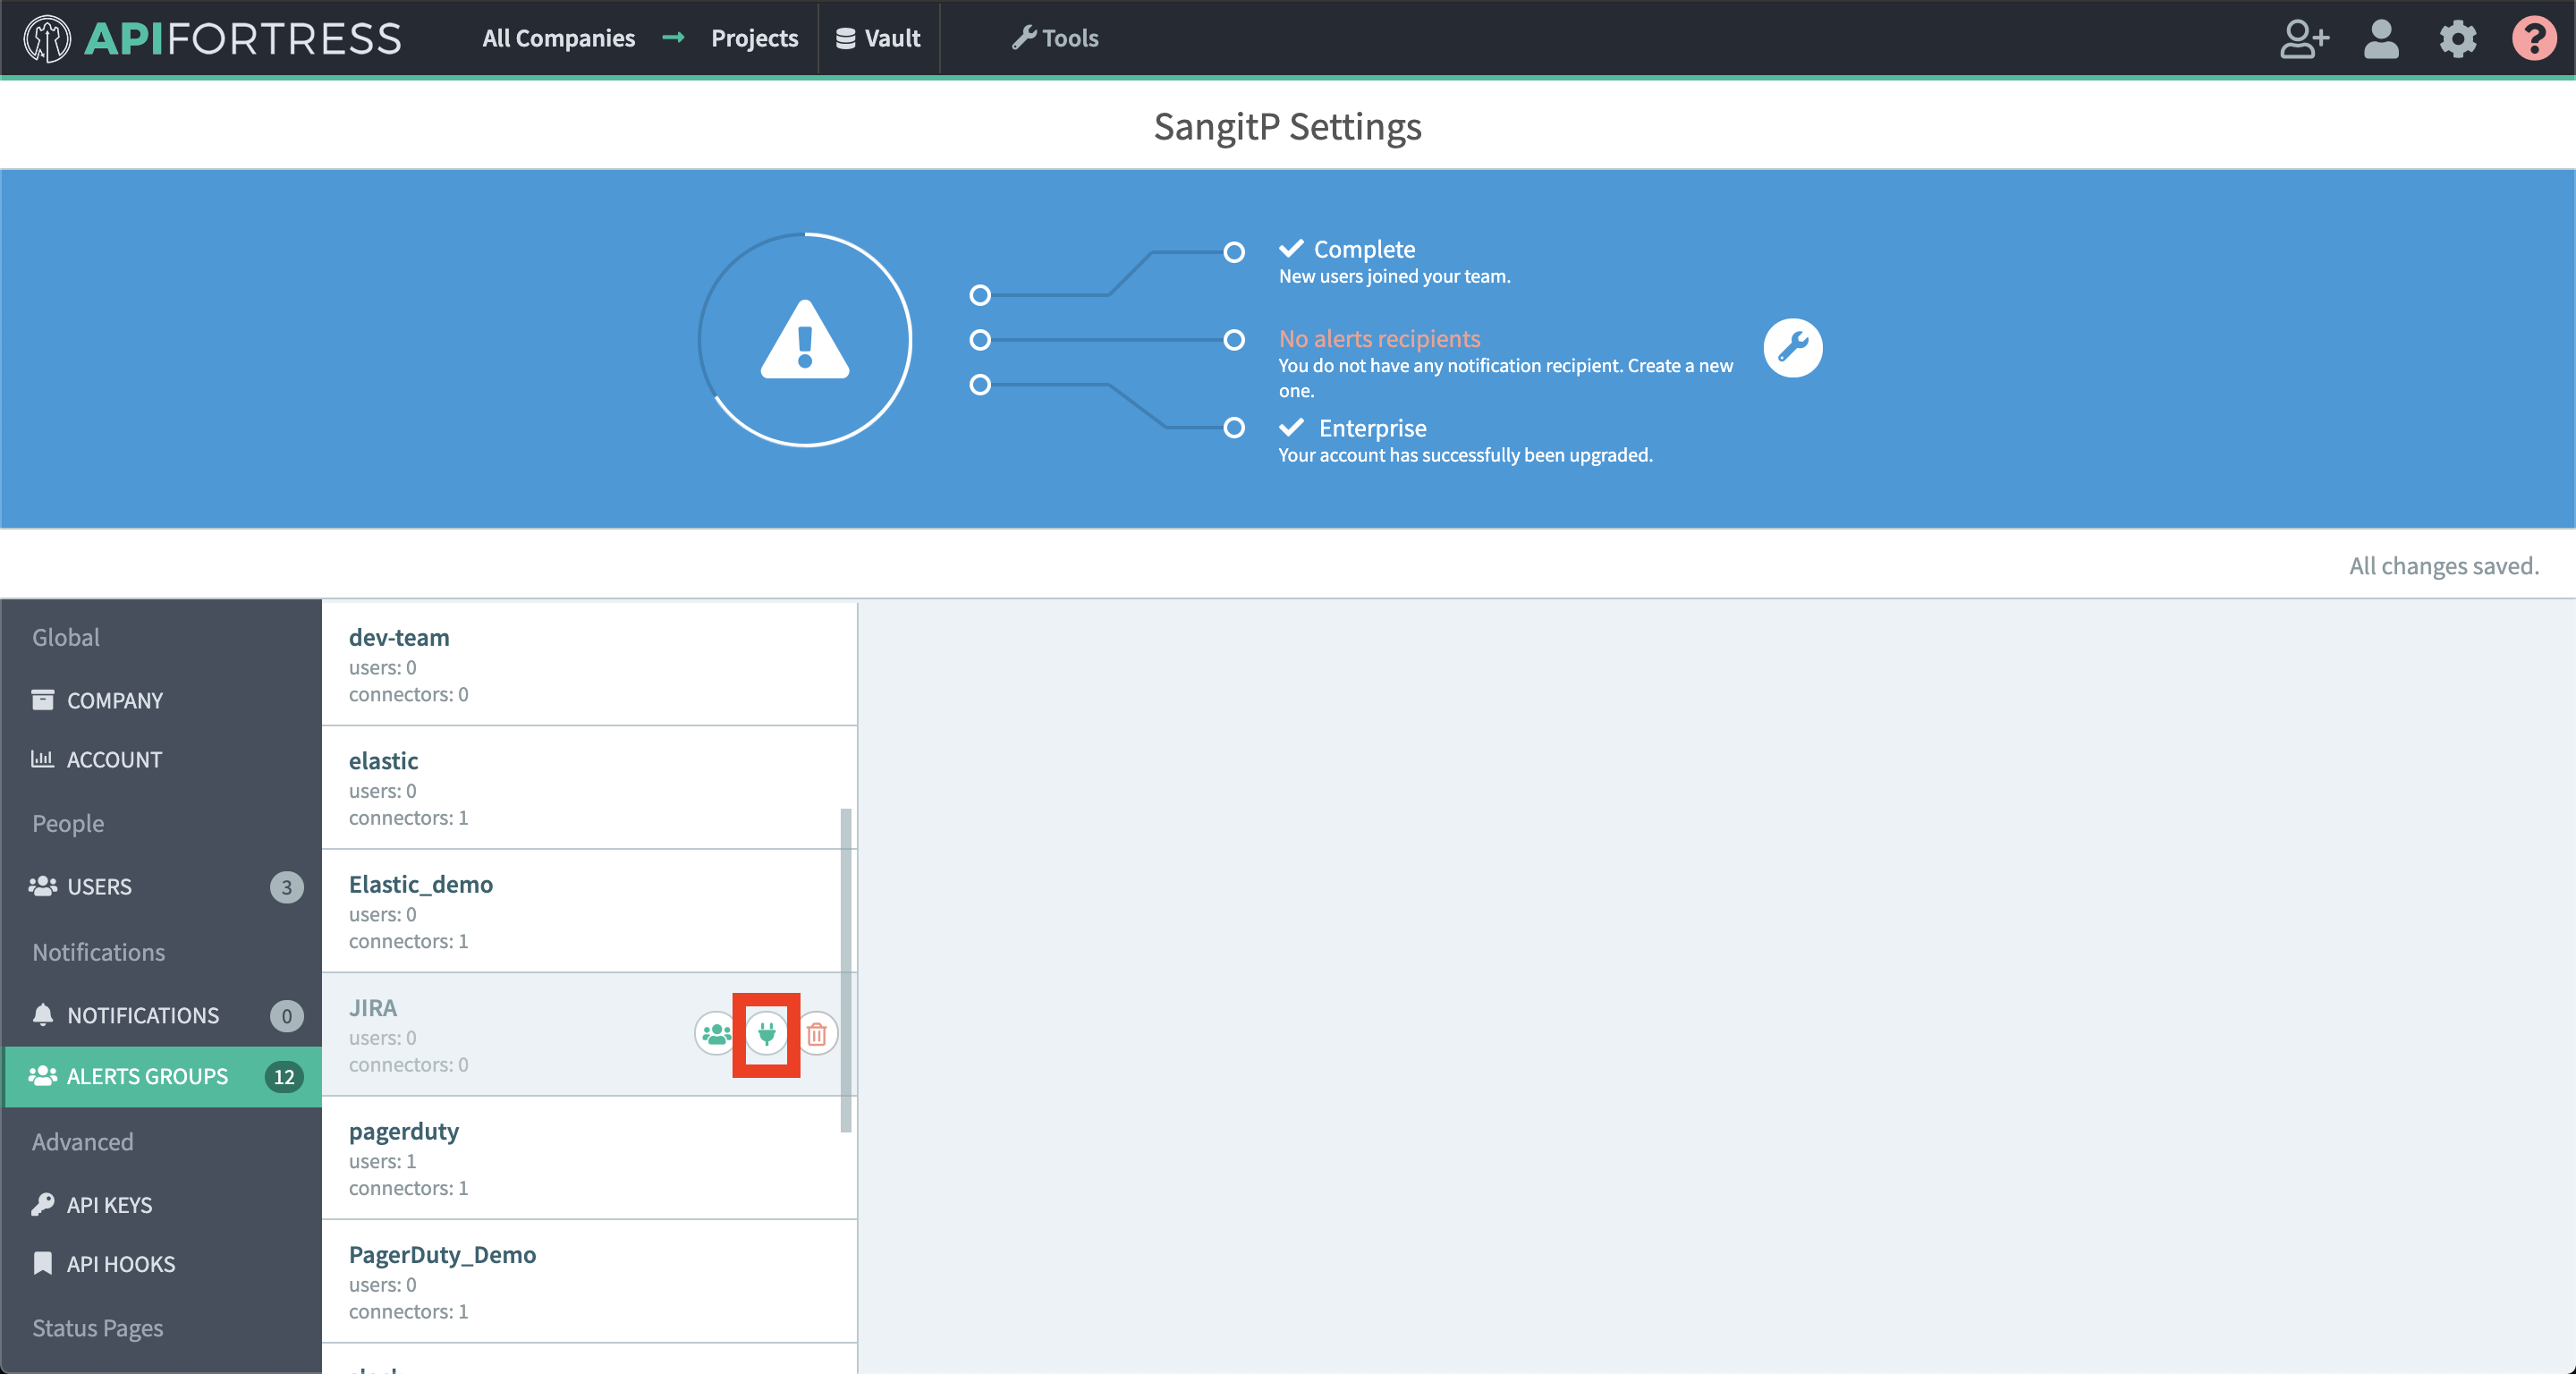
  2. Click on “Alert Groups”
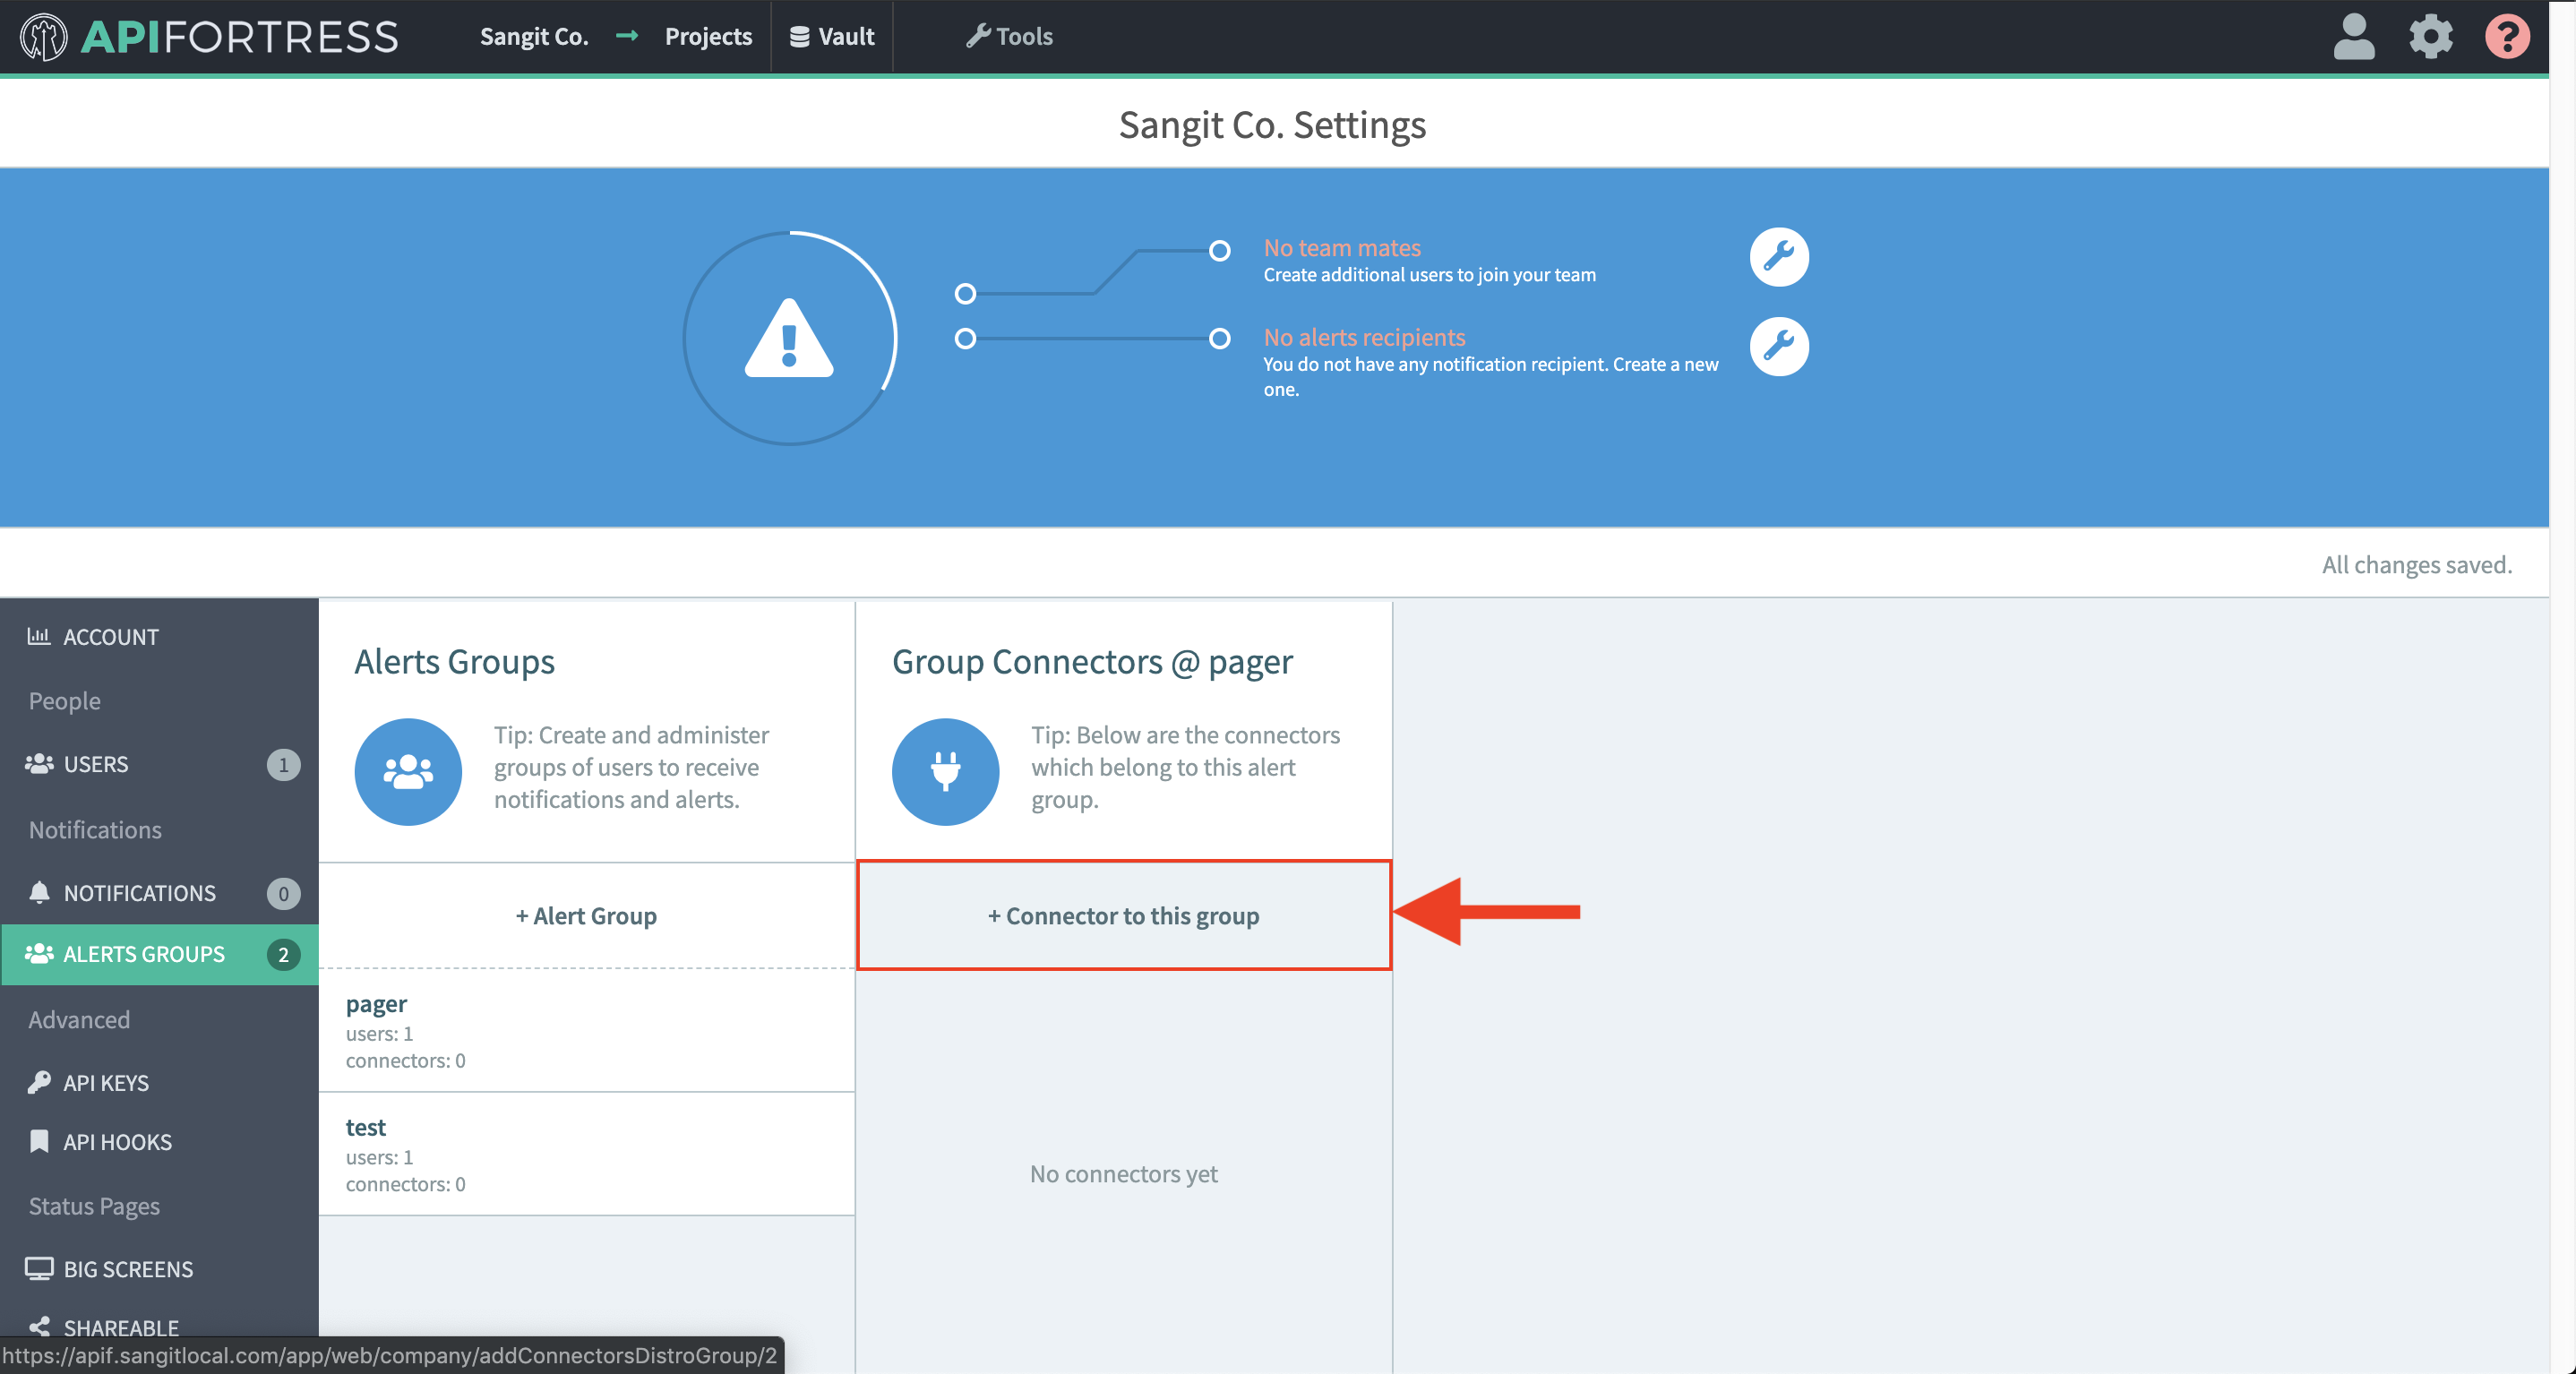
  3. Create a new group or add a connector to an existing alert group
  4. Add a new connector
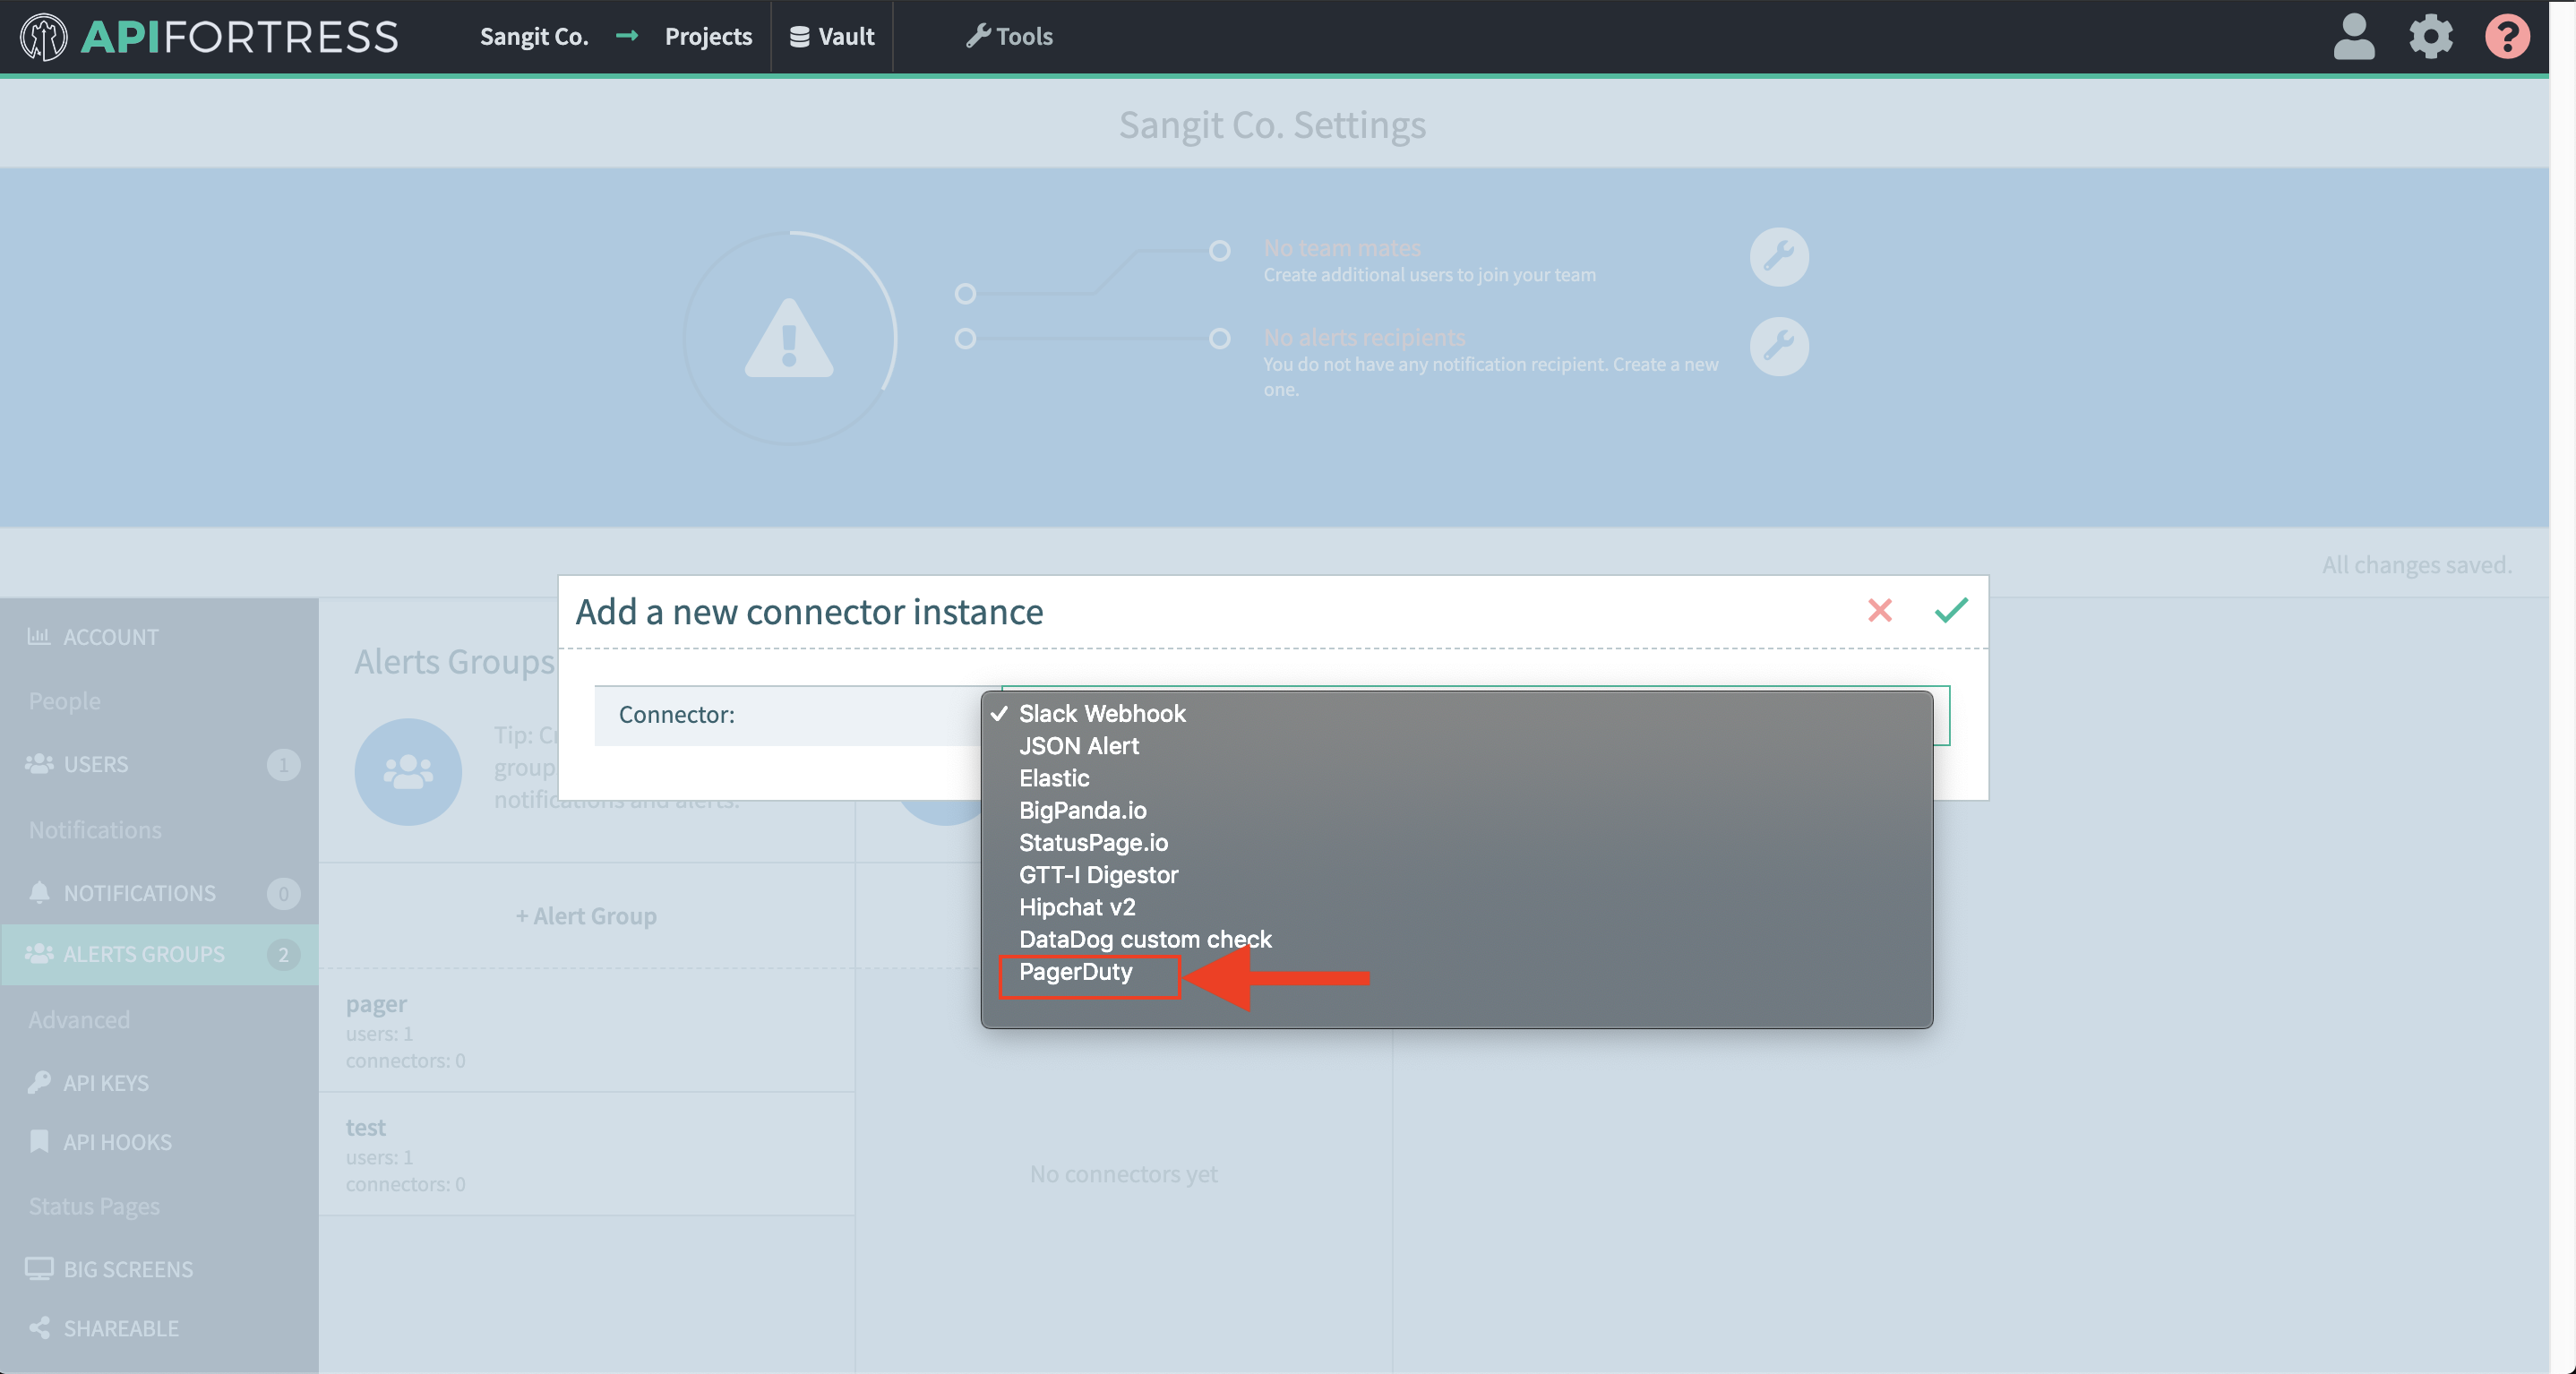
  5. Choose the PagerDuty connector
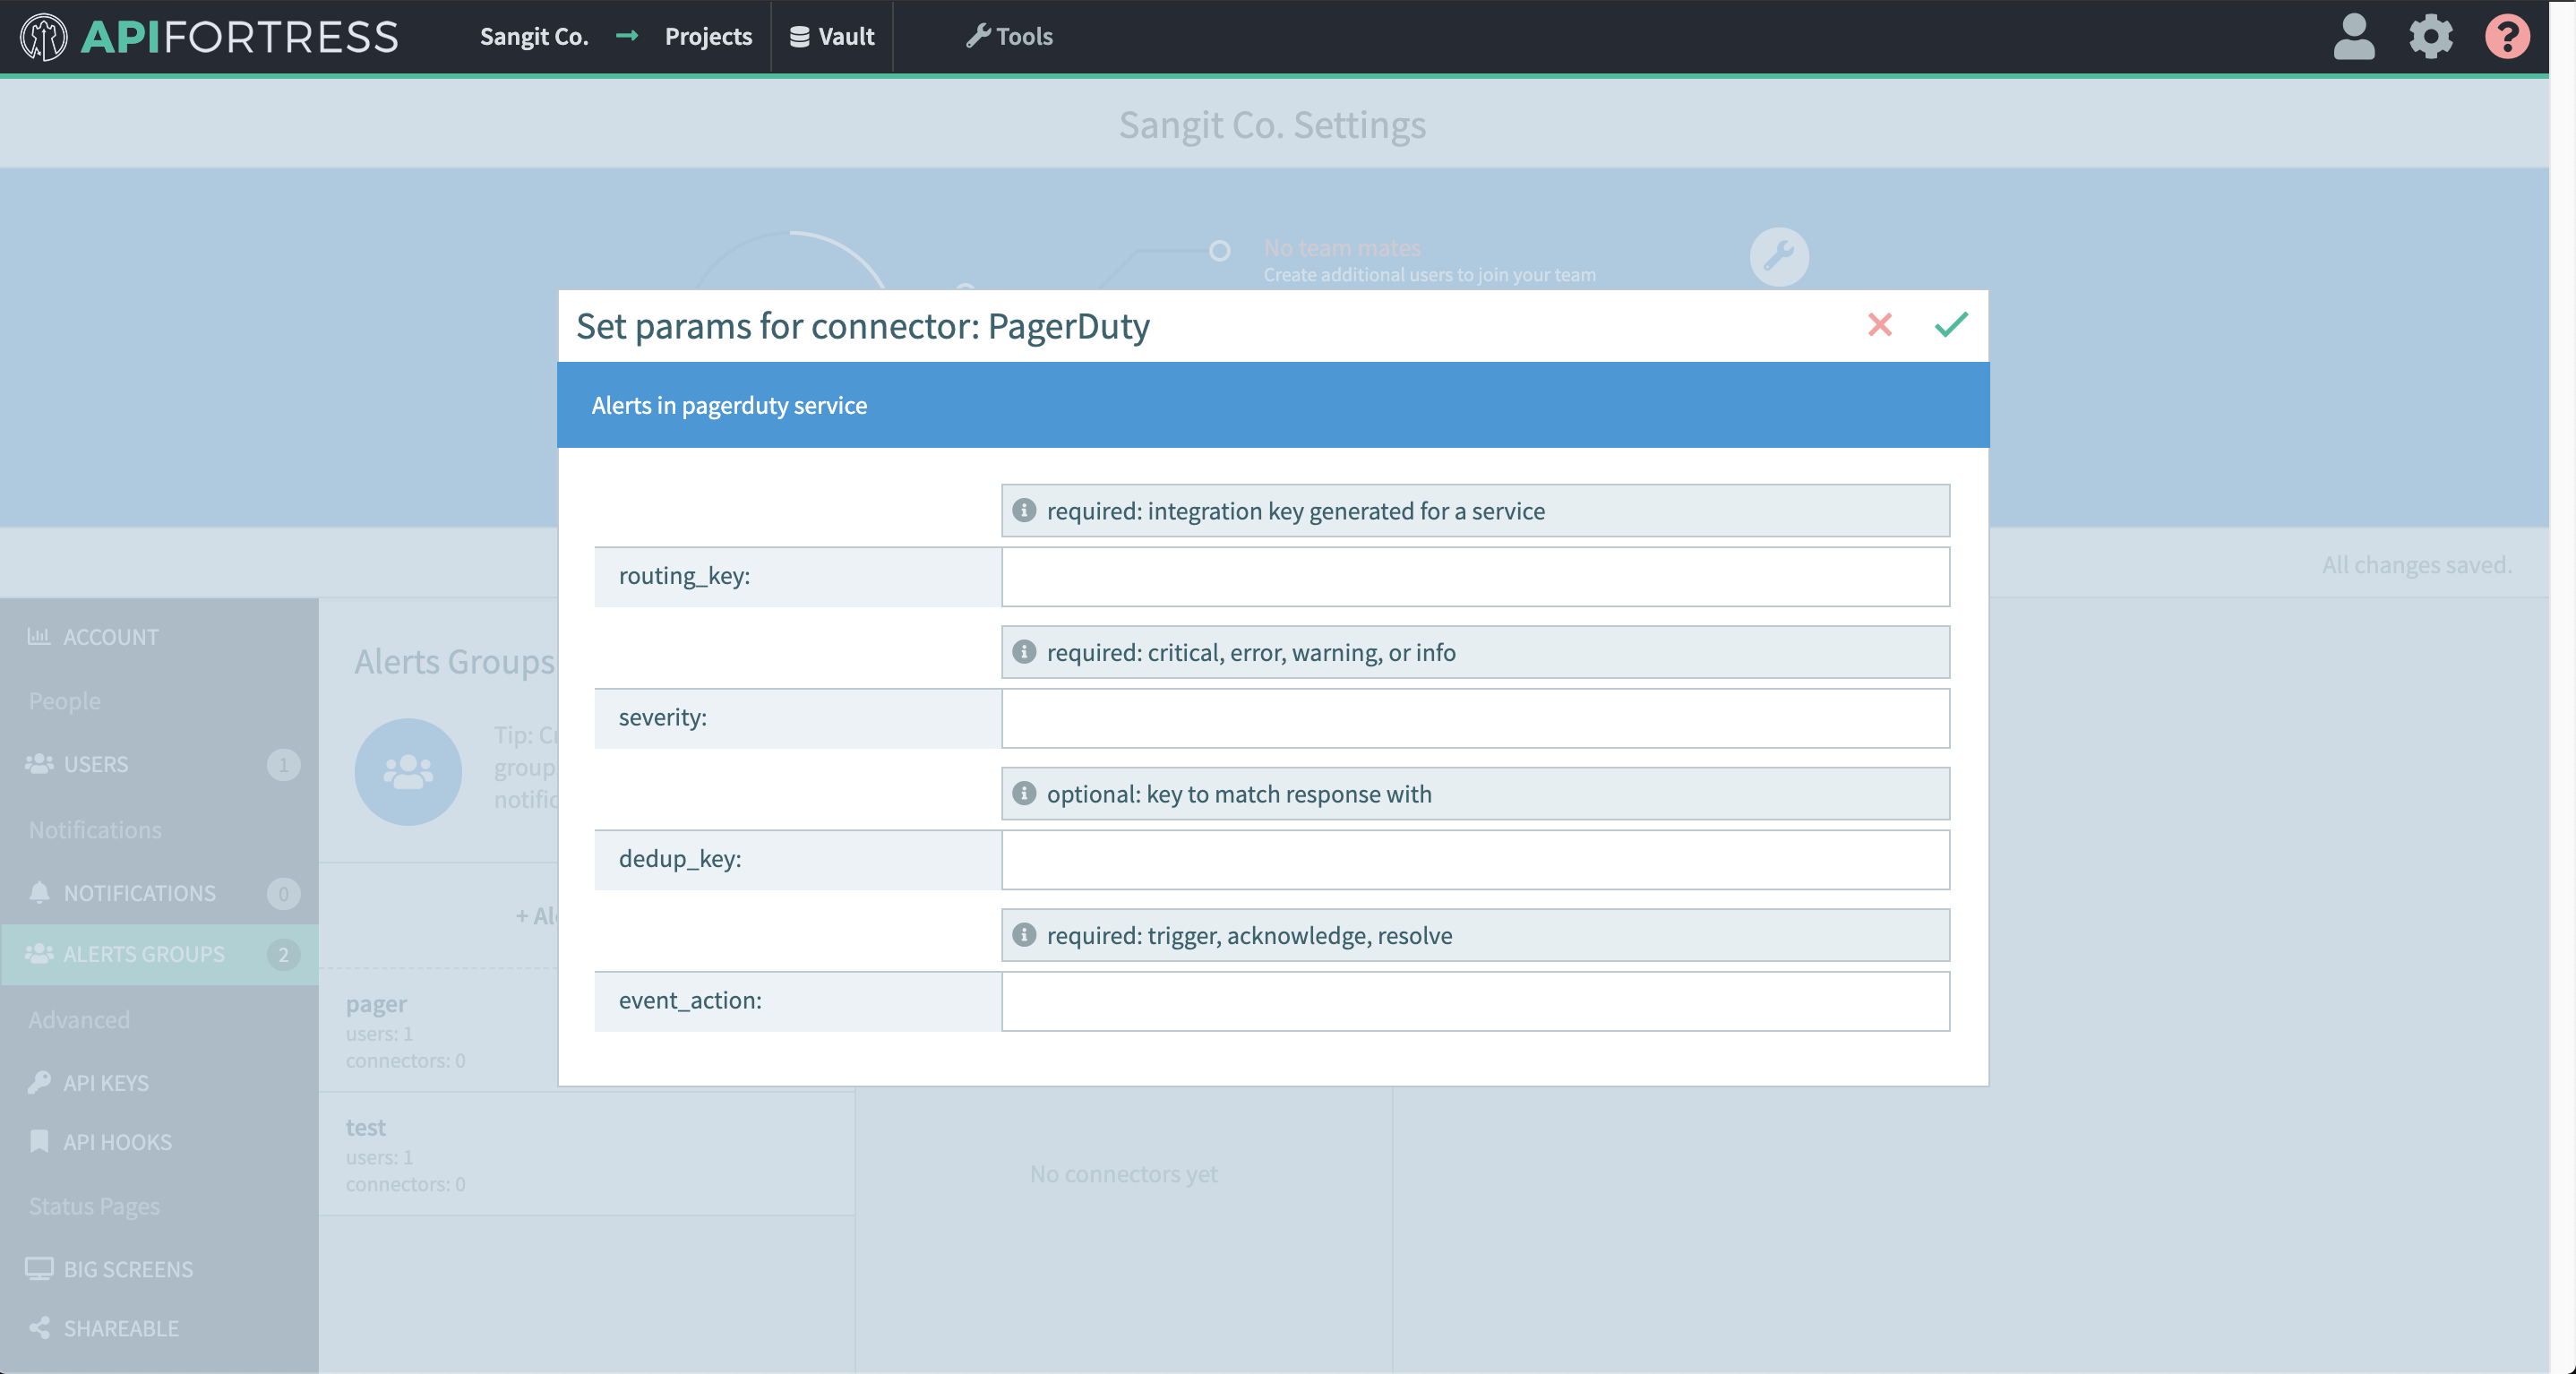
  6. Configure the connector
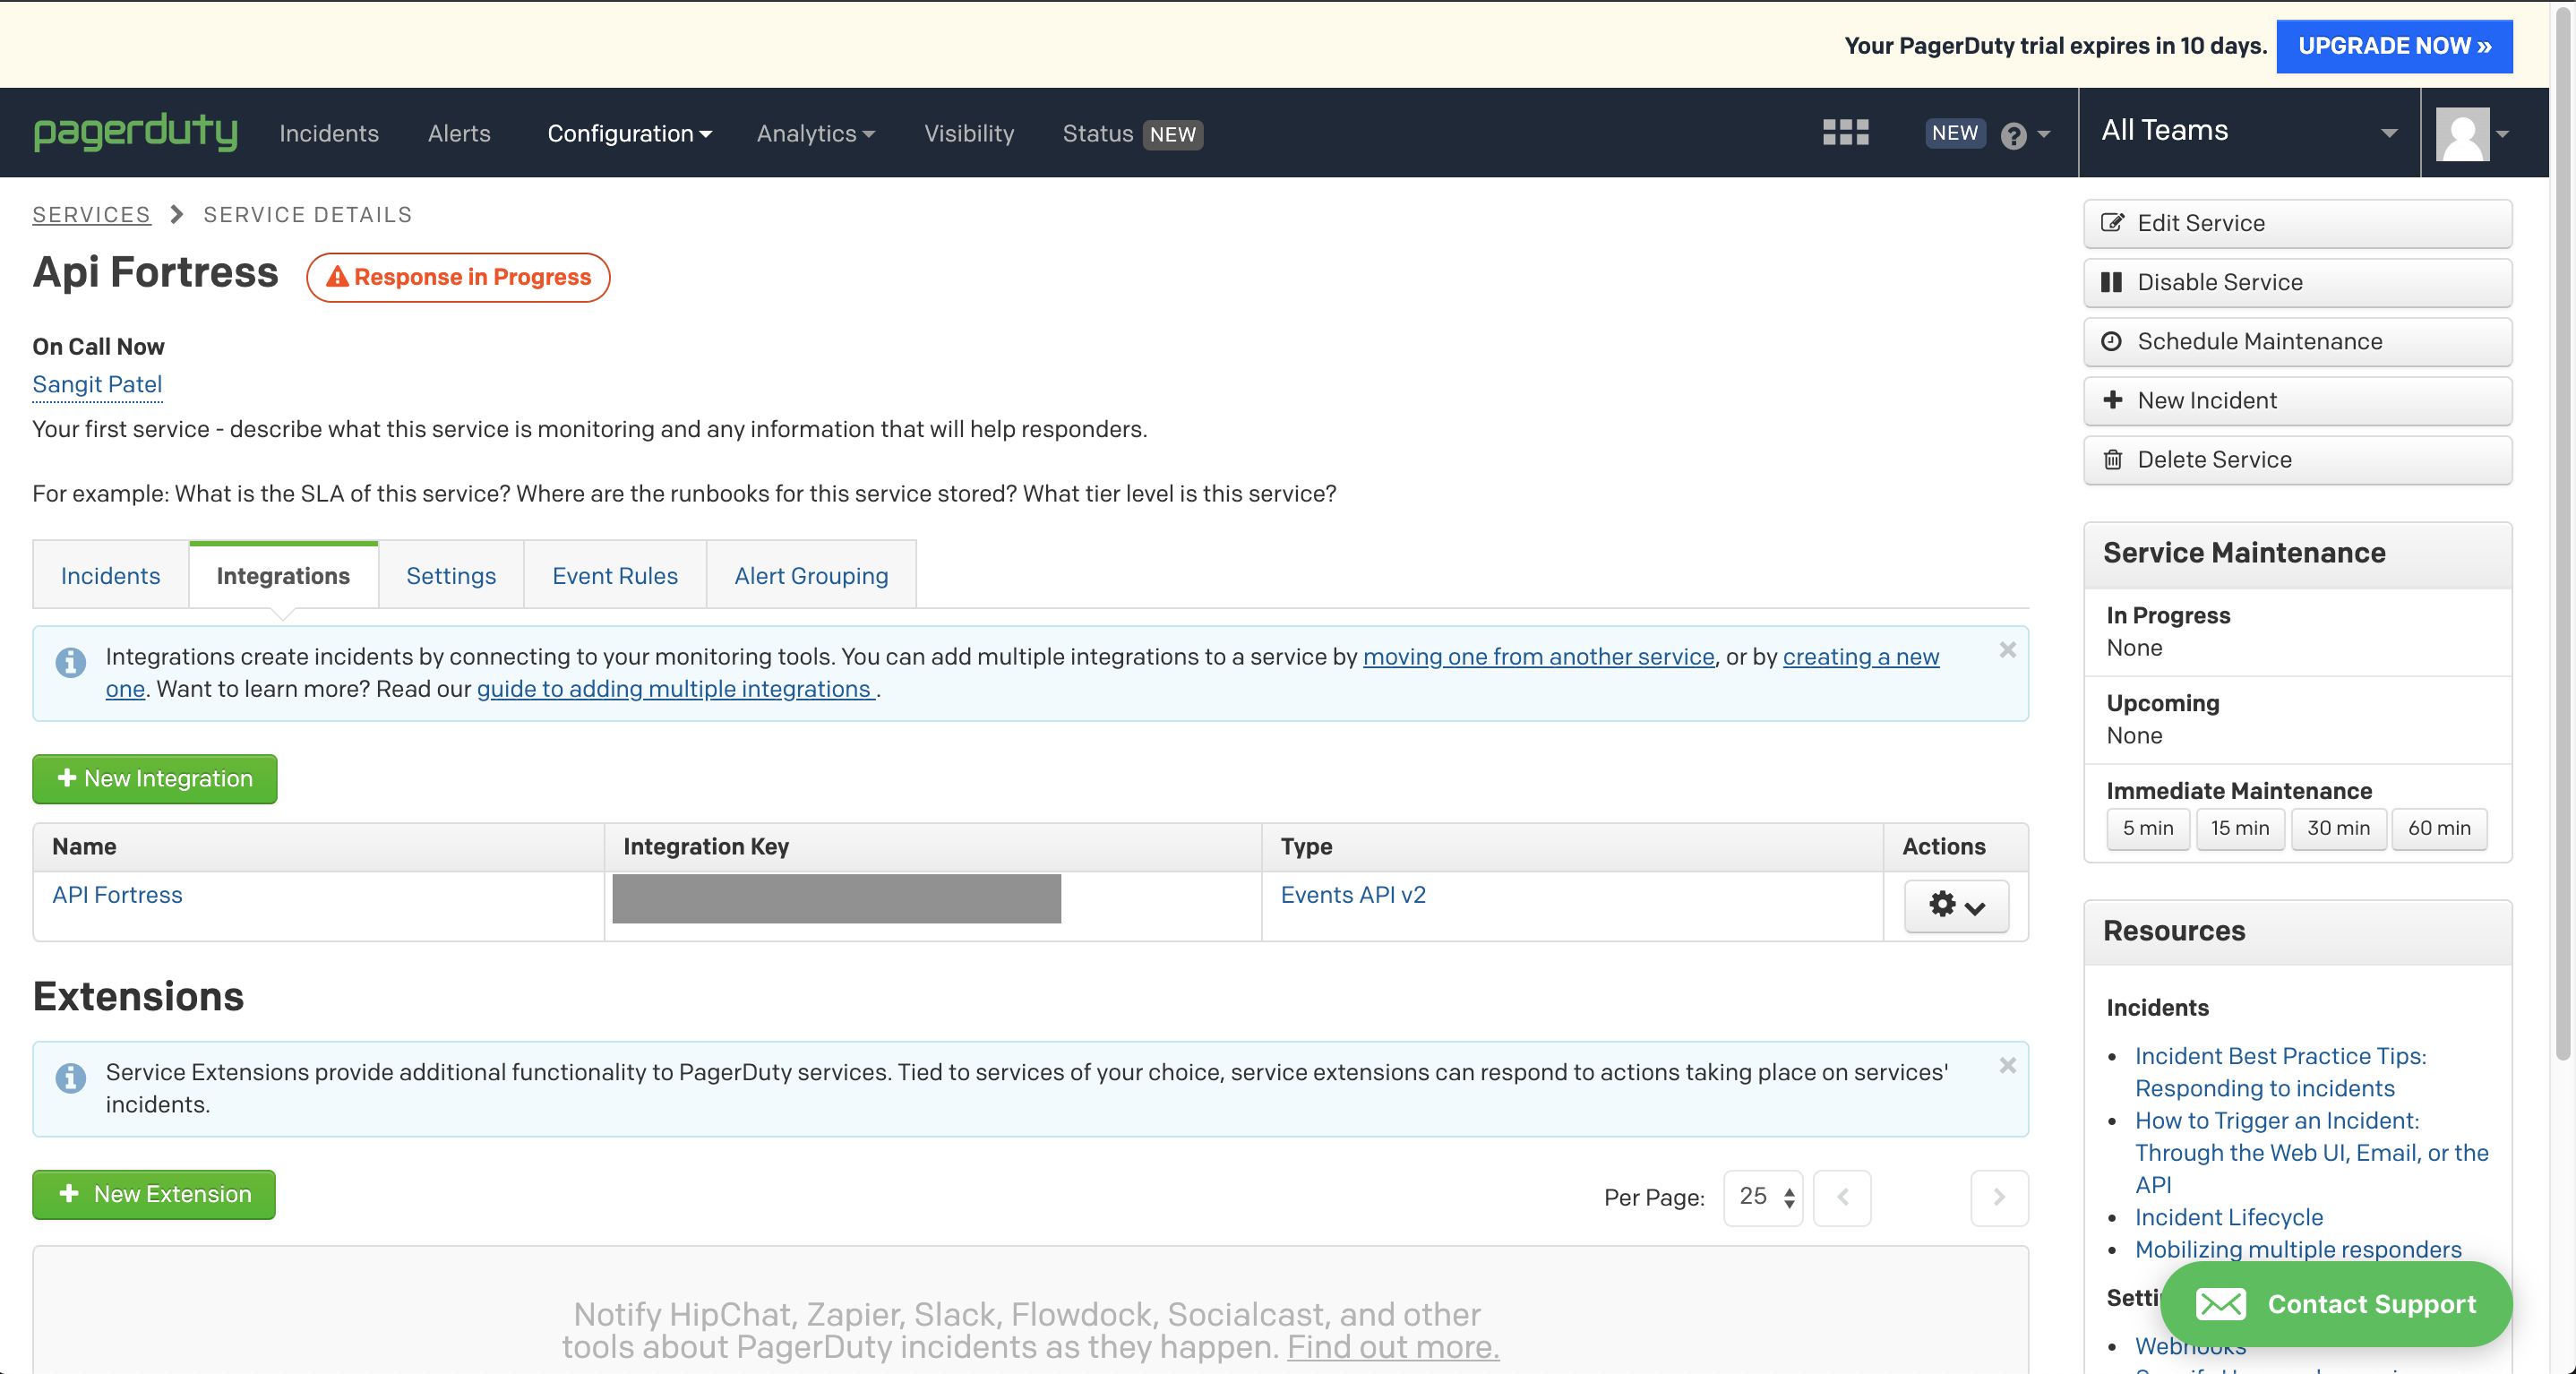
    1. routing_key is the integration key generated for a service in PagerDuty. The routing_key can be generated as such:
      1. click on the service you would like to alert, and click on the “Integrations tab”
      2. Use an existing integration or create a new one specifically for API Fortress. The integration key provided is the “routing_key”
    2. severity is the level the alert should be sent as. (critical, error, warning, and info)

    3. dedup_key is a key that will allow to you match a triggered alert with a response for that alert

    4. event_action is the action you would like the alert to take. (trigger, acknowledge, and resolve)

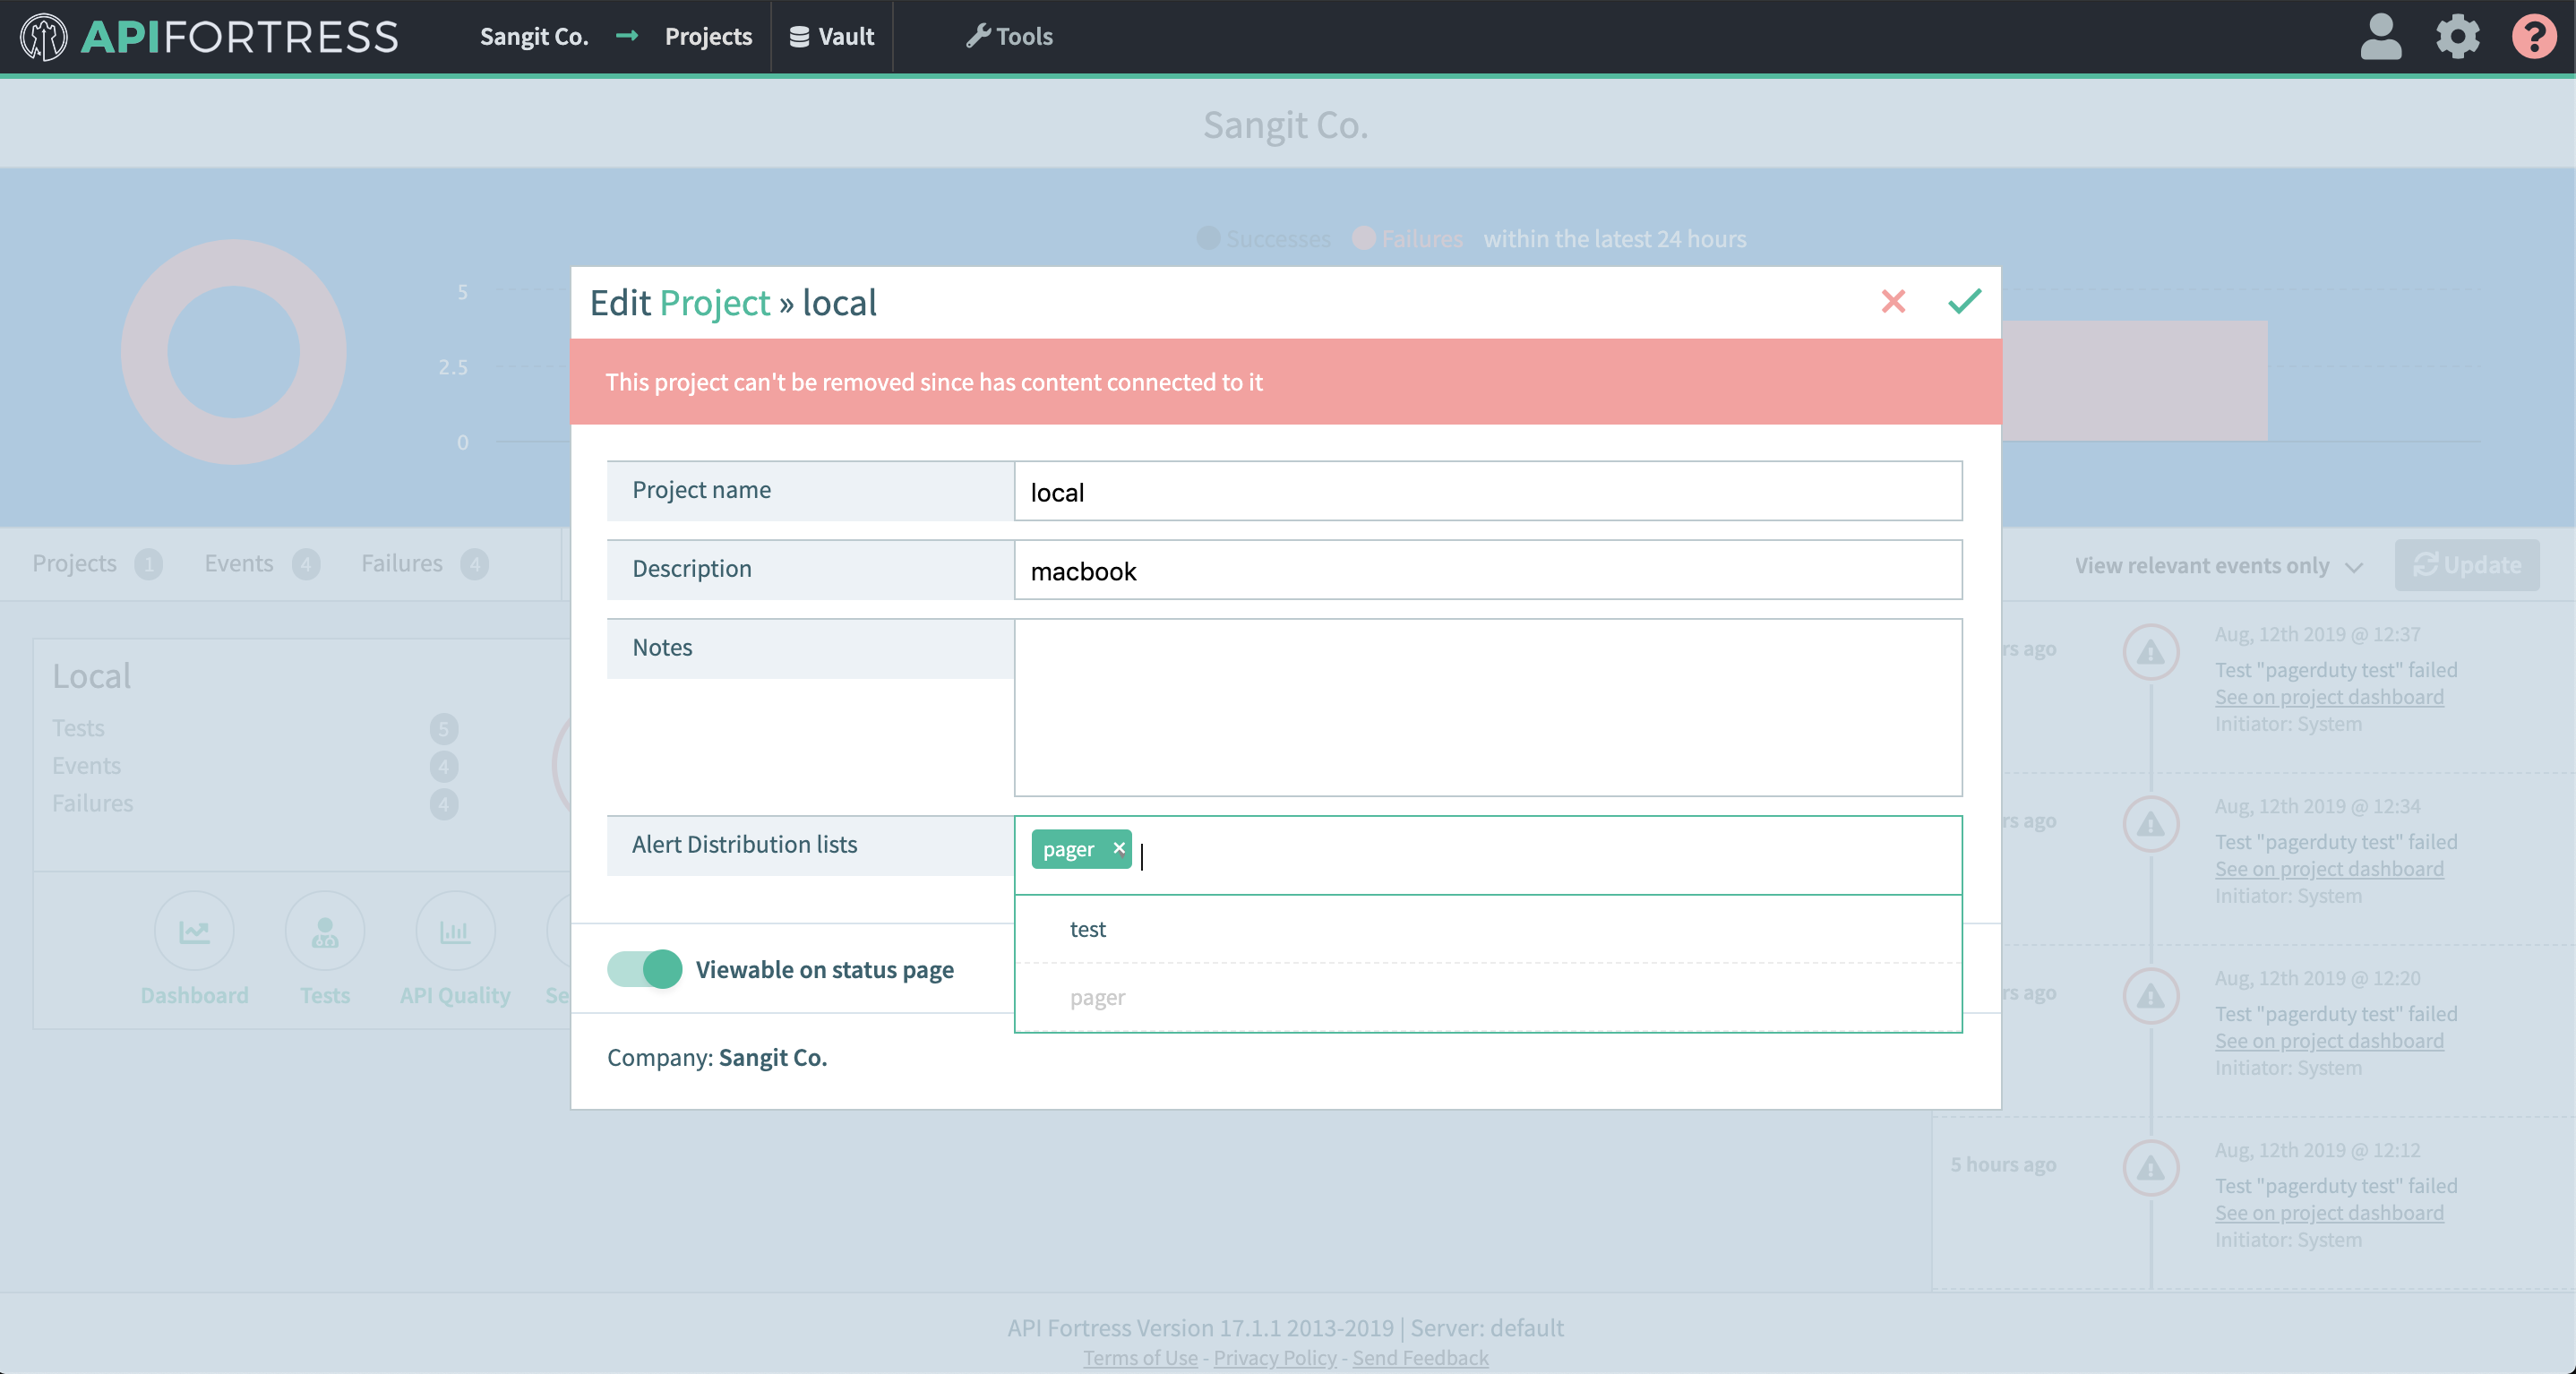
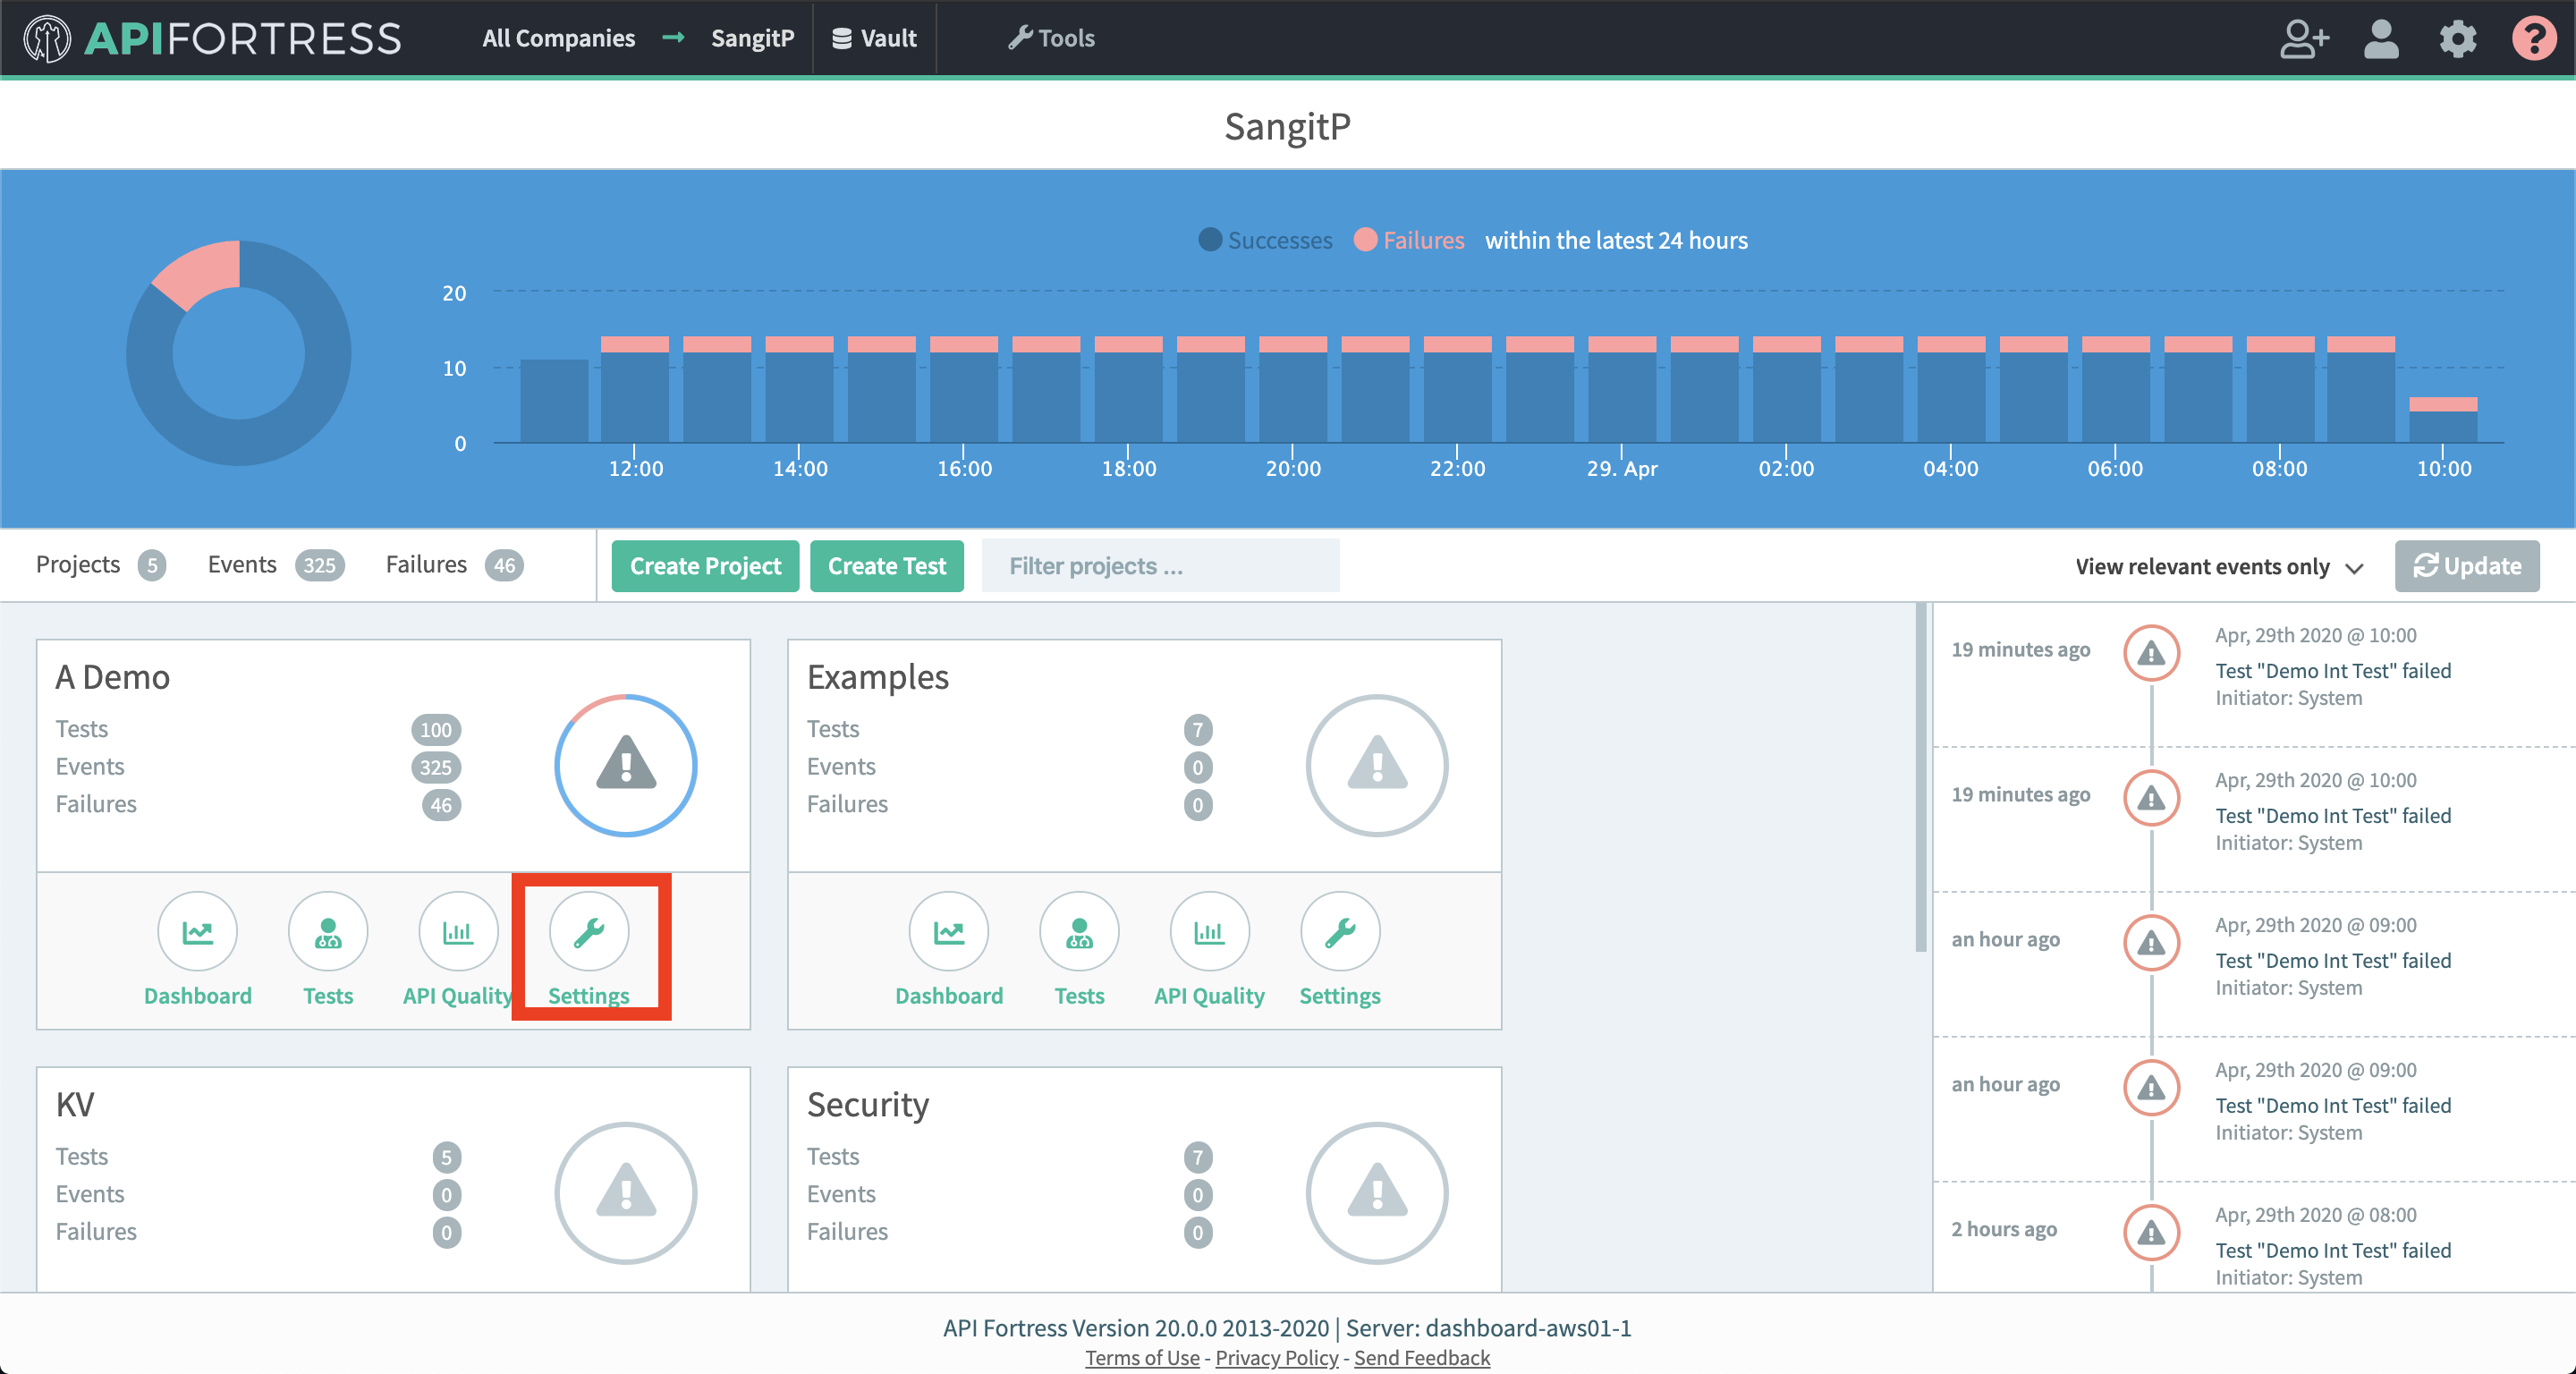
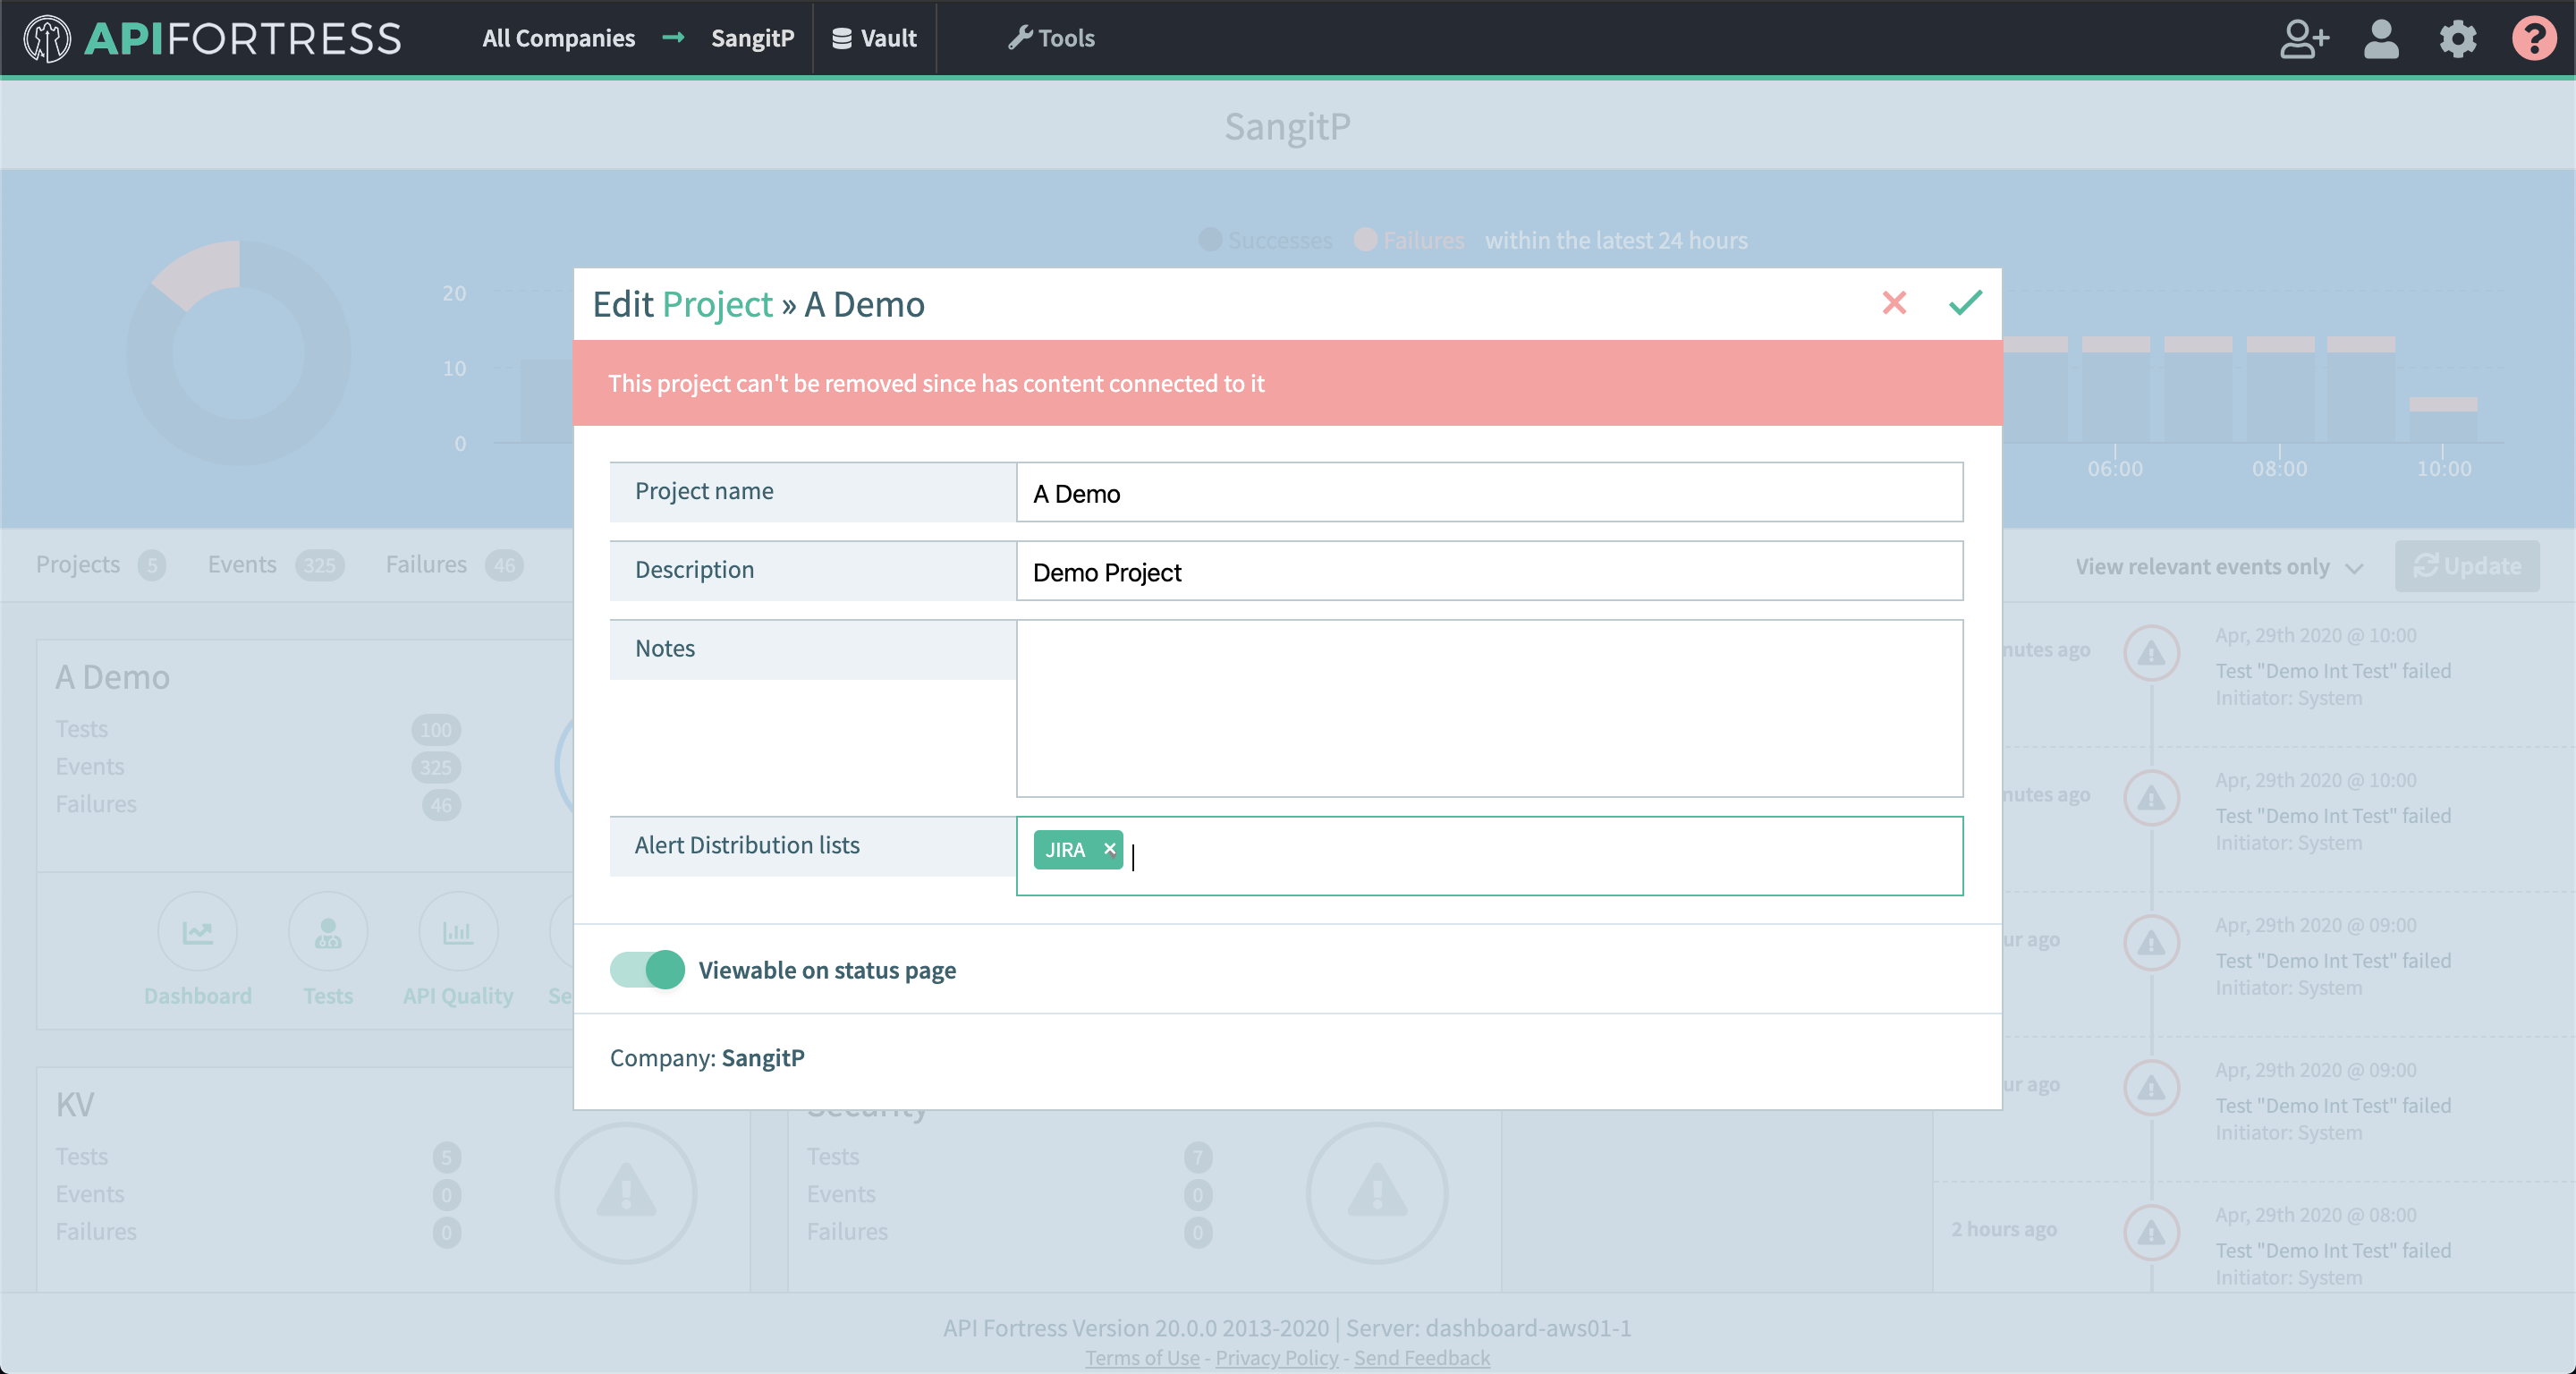
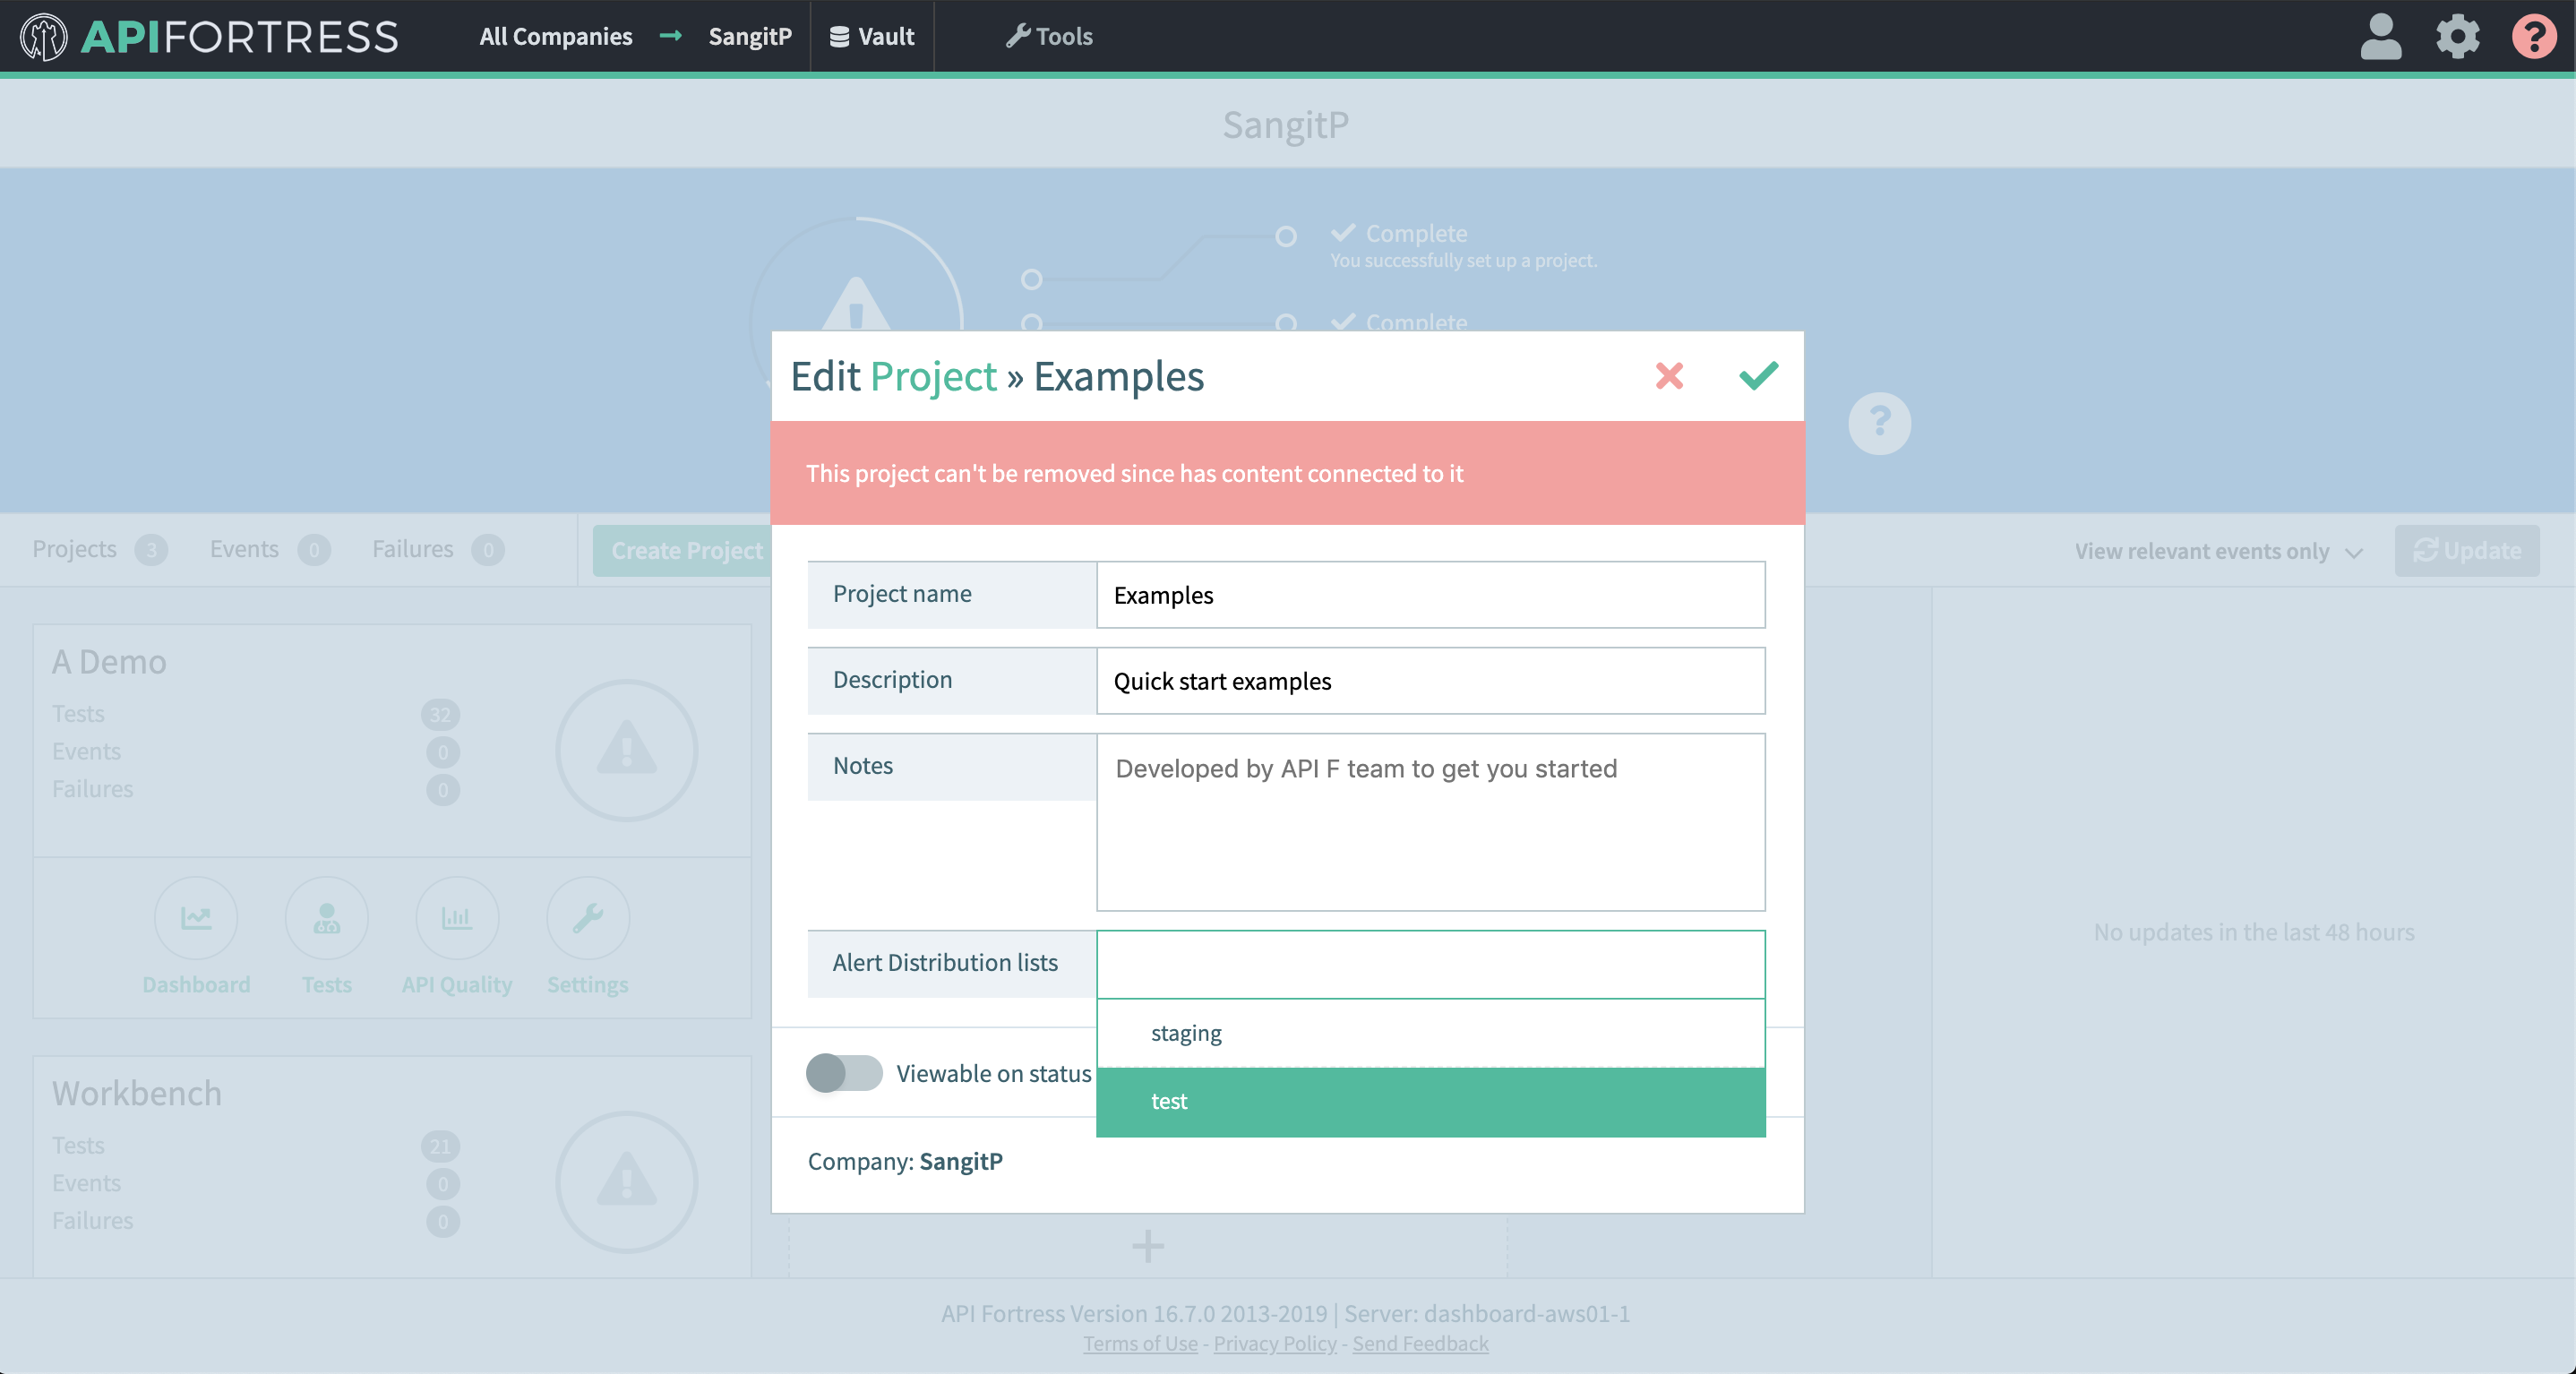
  7. Go into project settings for a project you would like PagerDuty alerts set up for
  8. Add the alert group that contains your PagerDuty connector to this project
    Watch a quick video tutorial of the integration below:


Add New Connector

Here is a quick guide to load up a new connector into your API Fortress self-hosted/on-premises deployment. You can find all the connectors here: https://github.com/apifortress/connectors
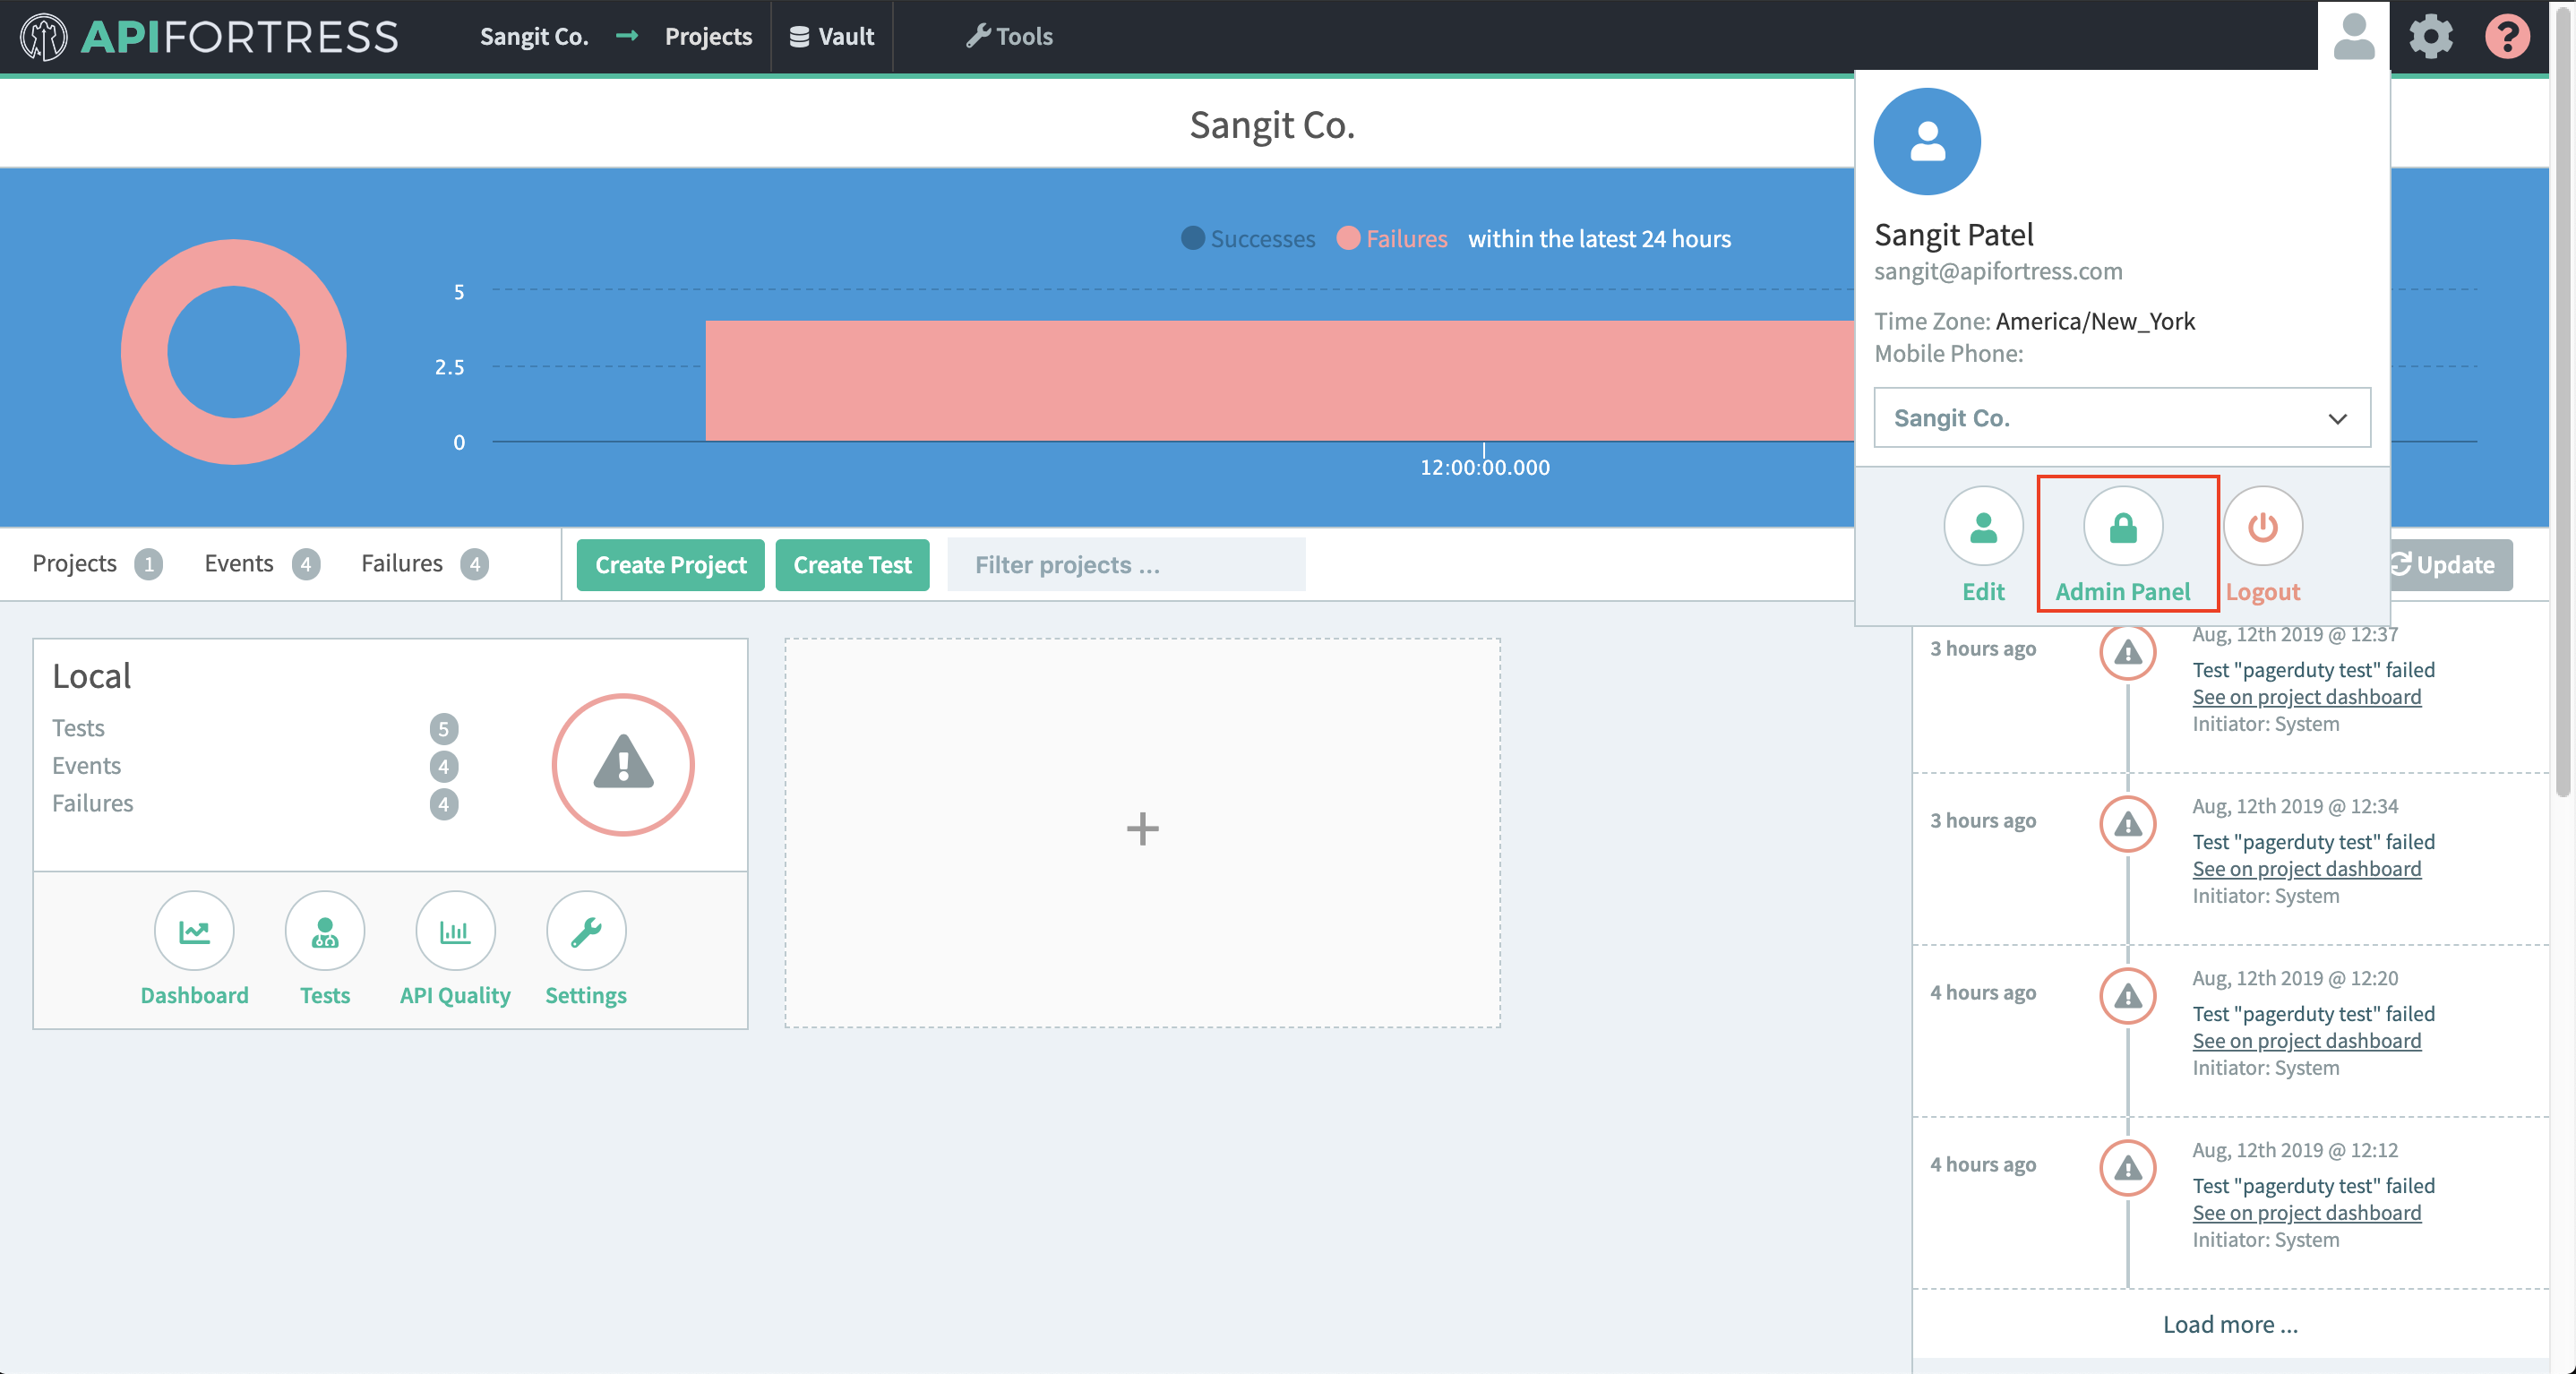
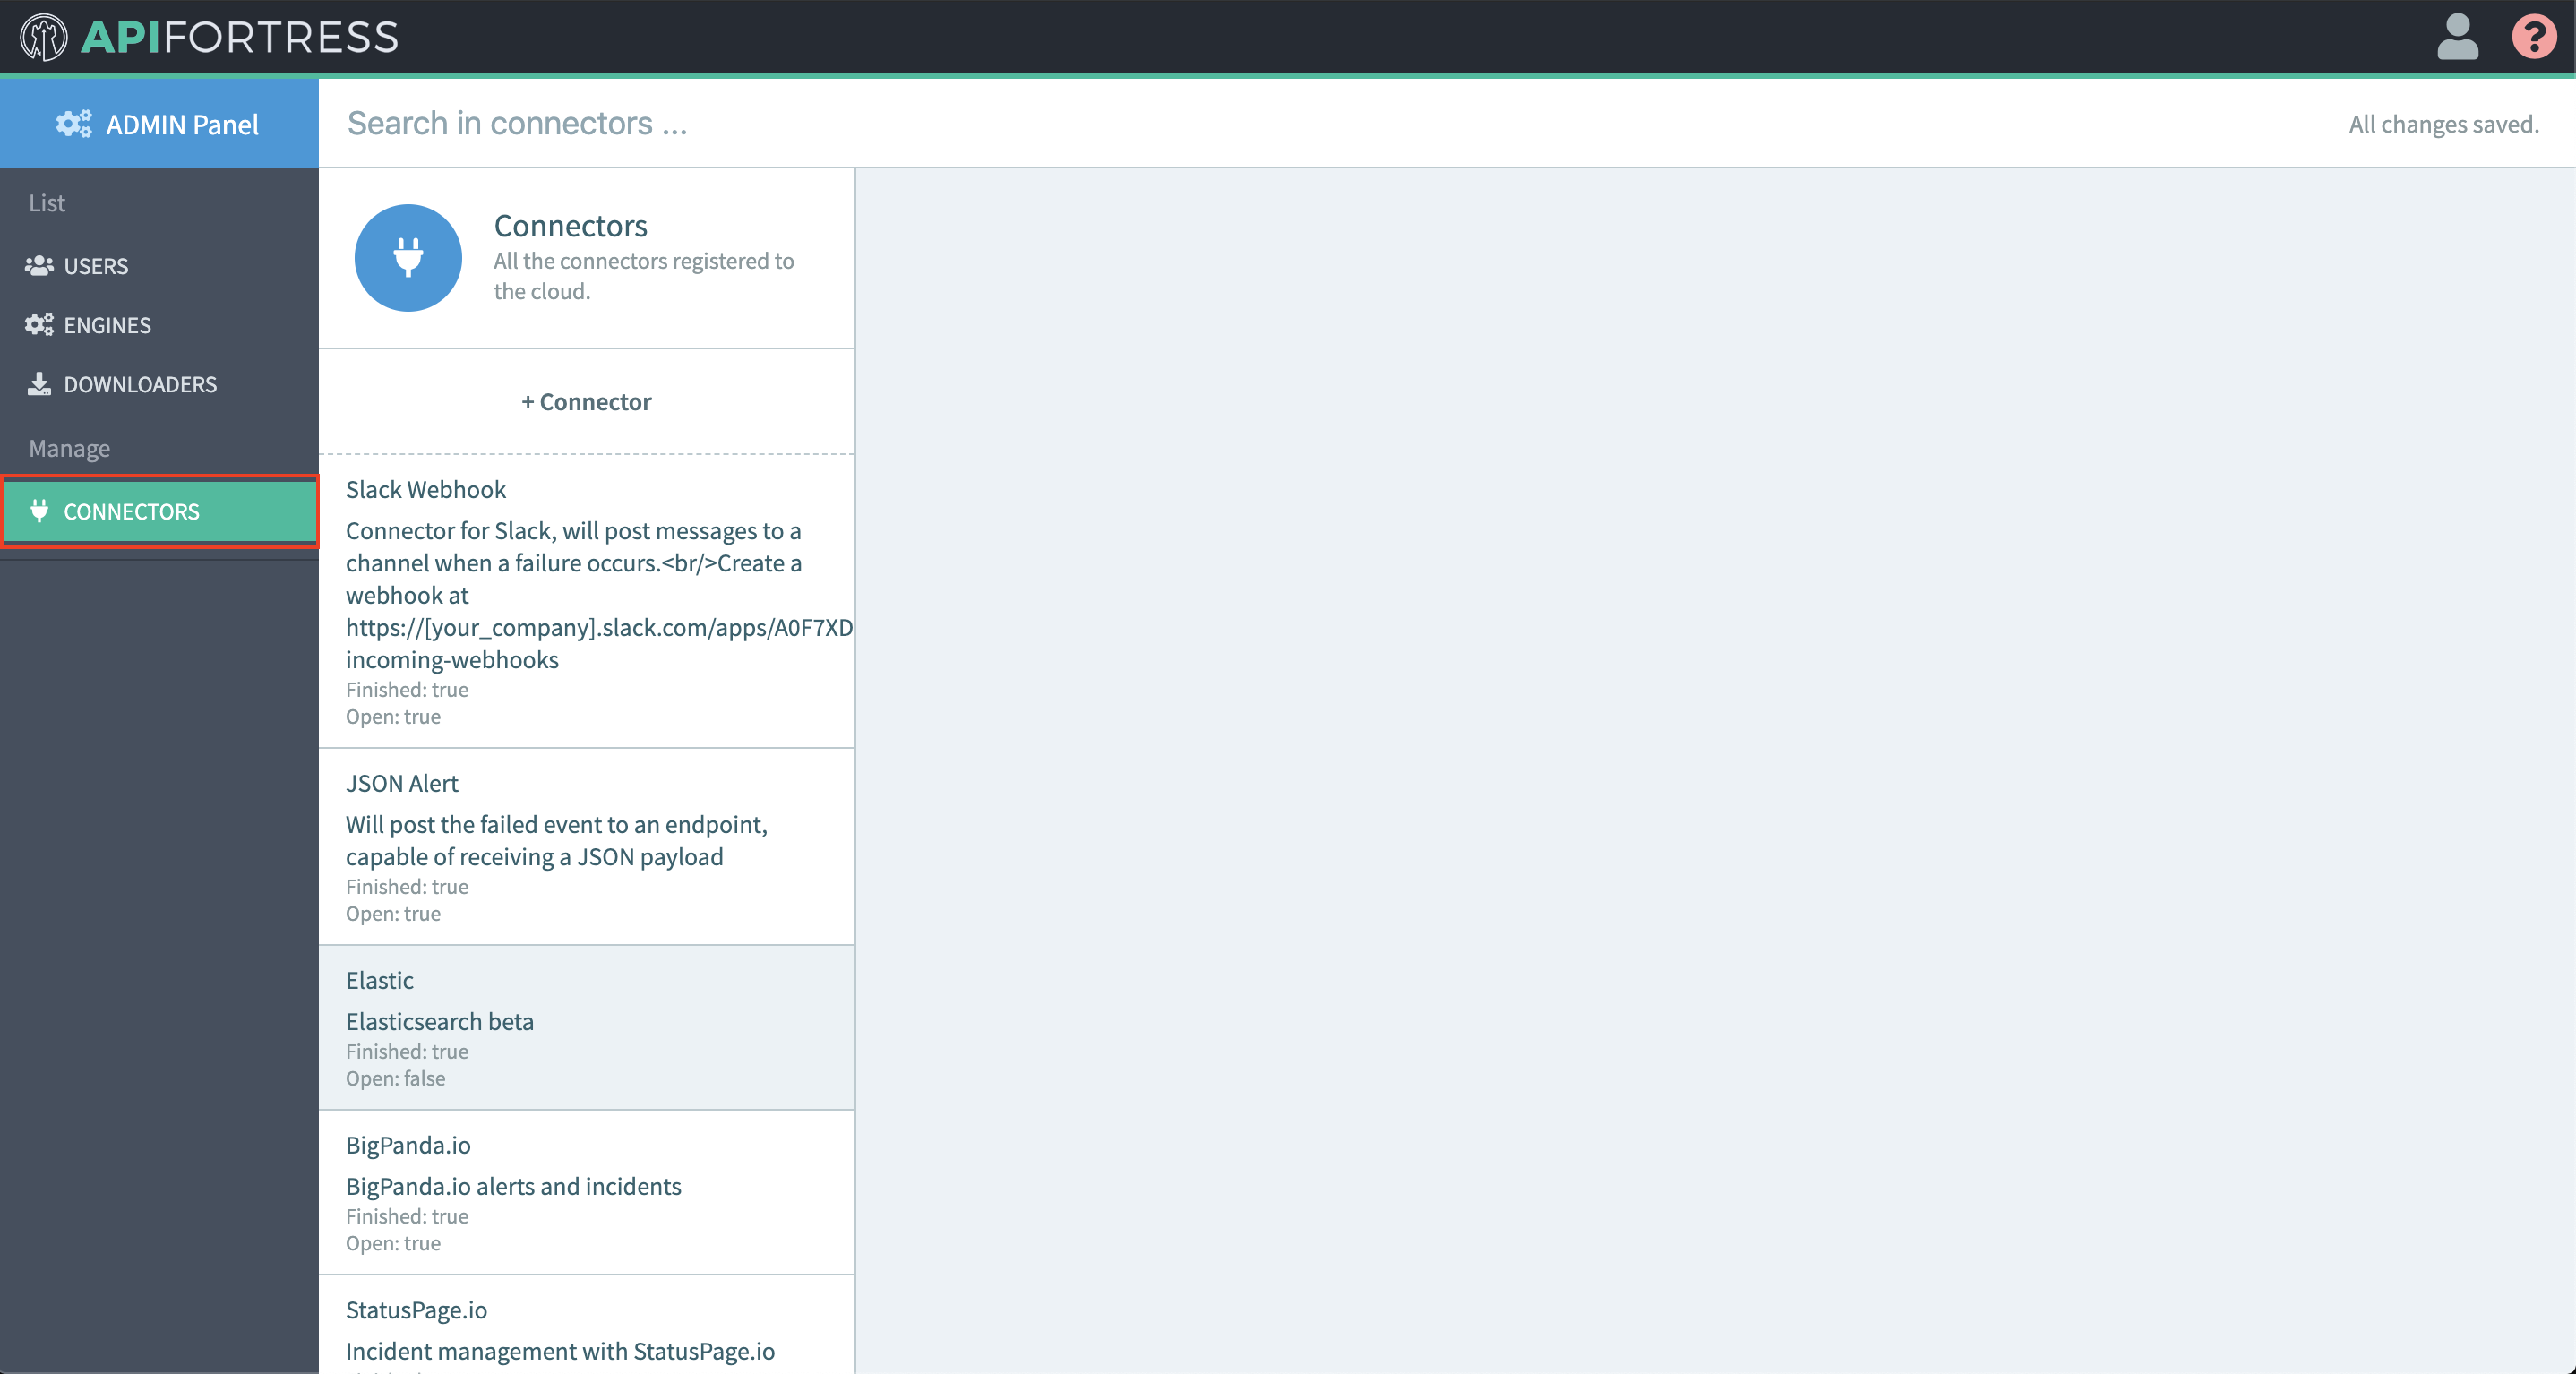
  1. Go to admin panel
  2. Click on connectors
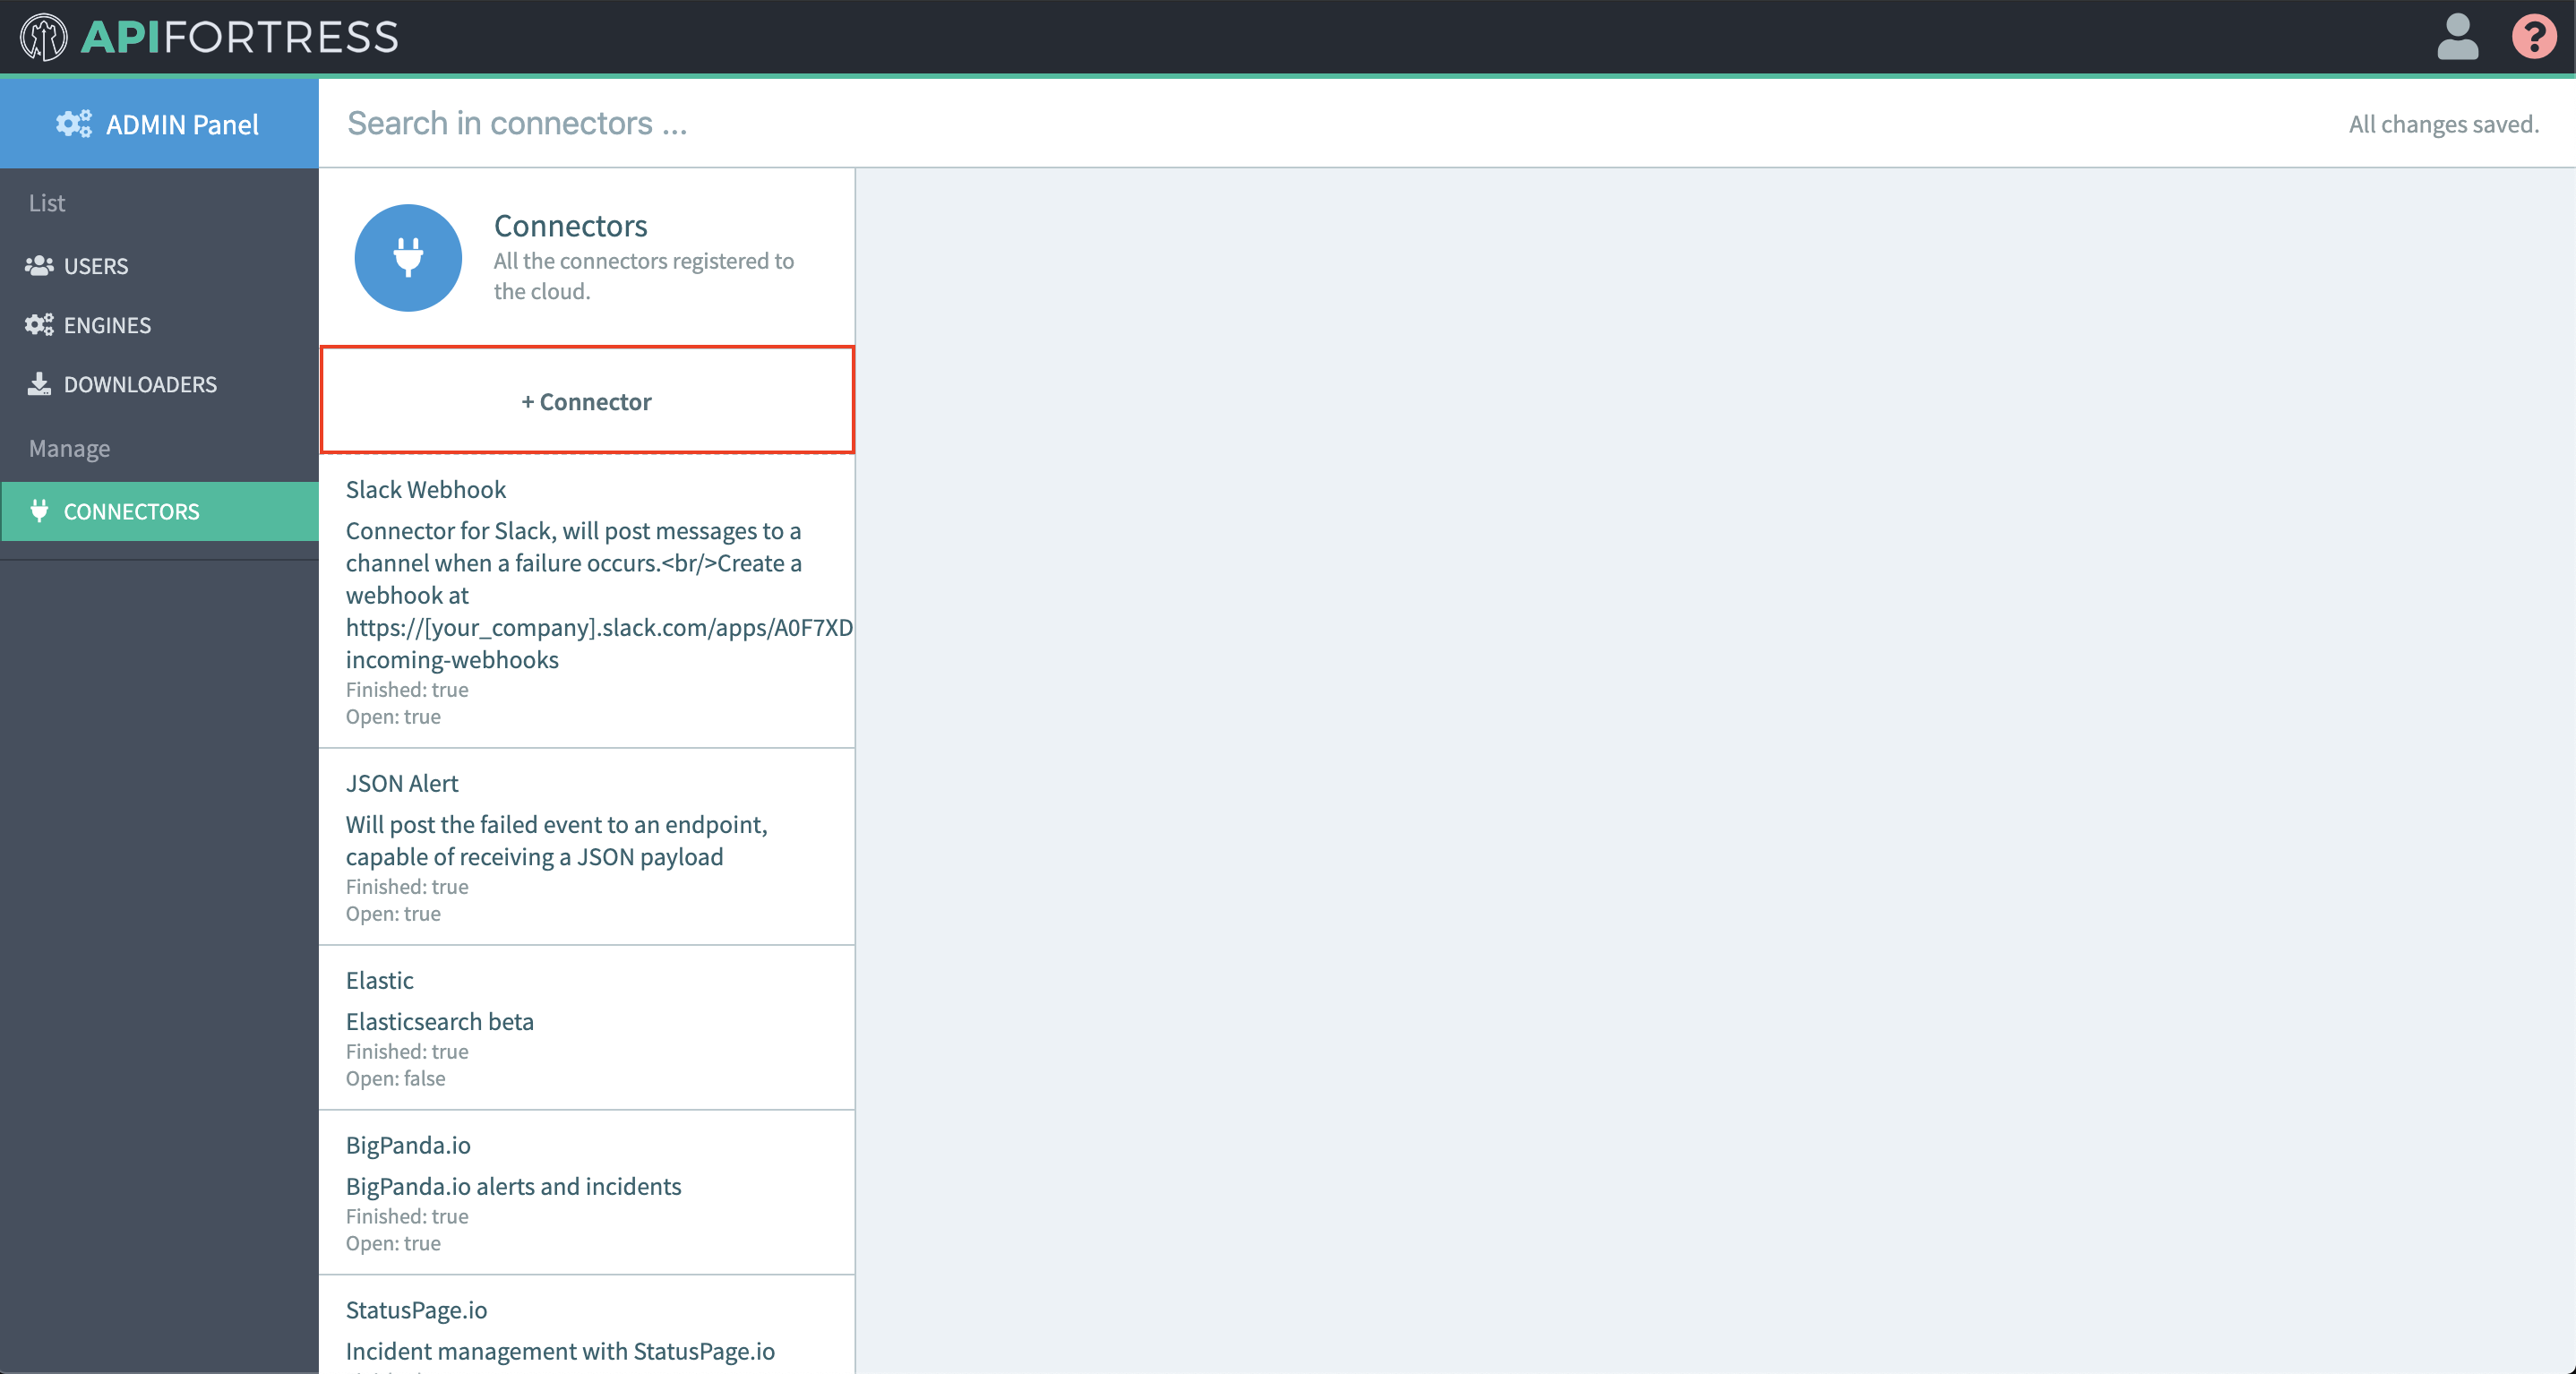
  3. Add new connector
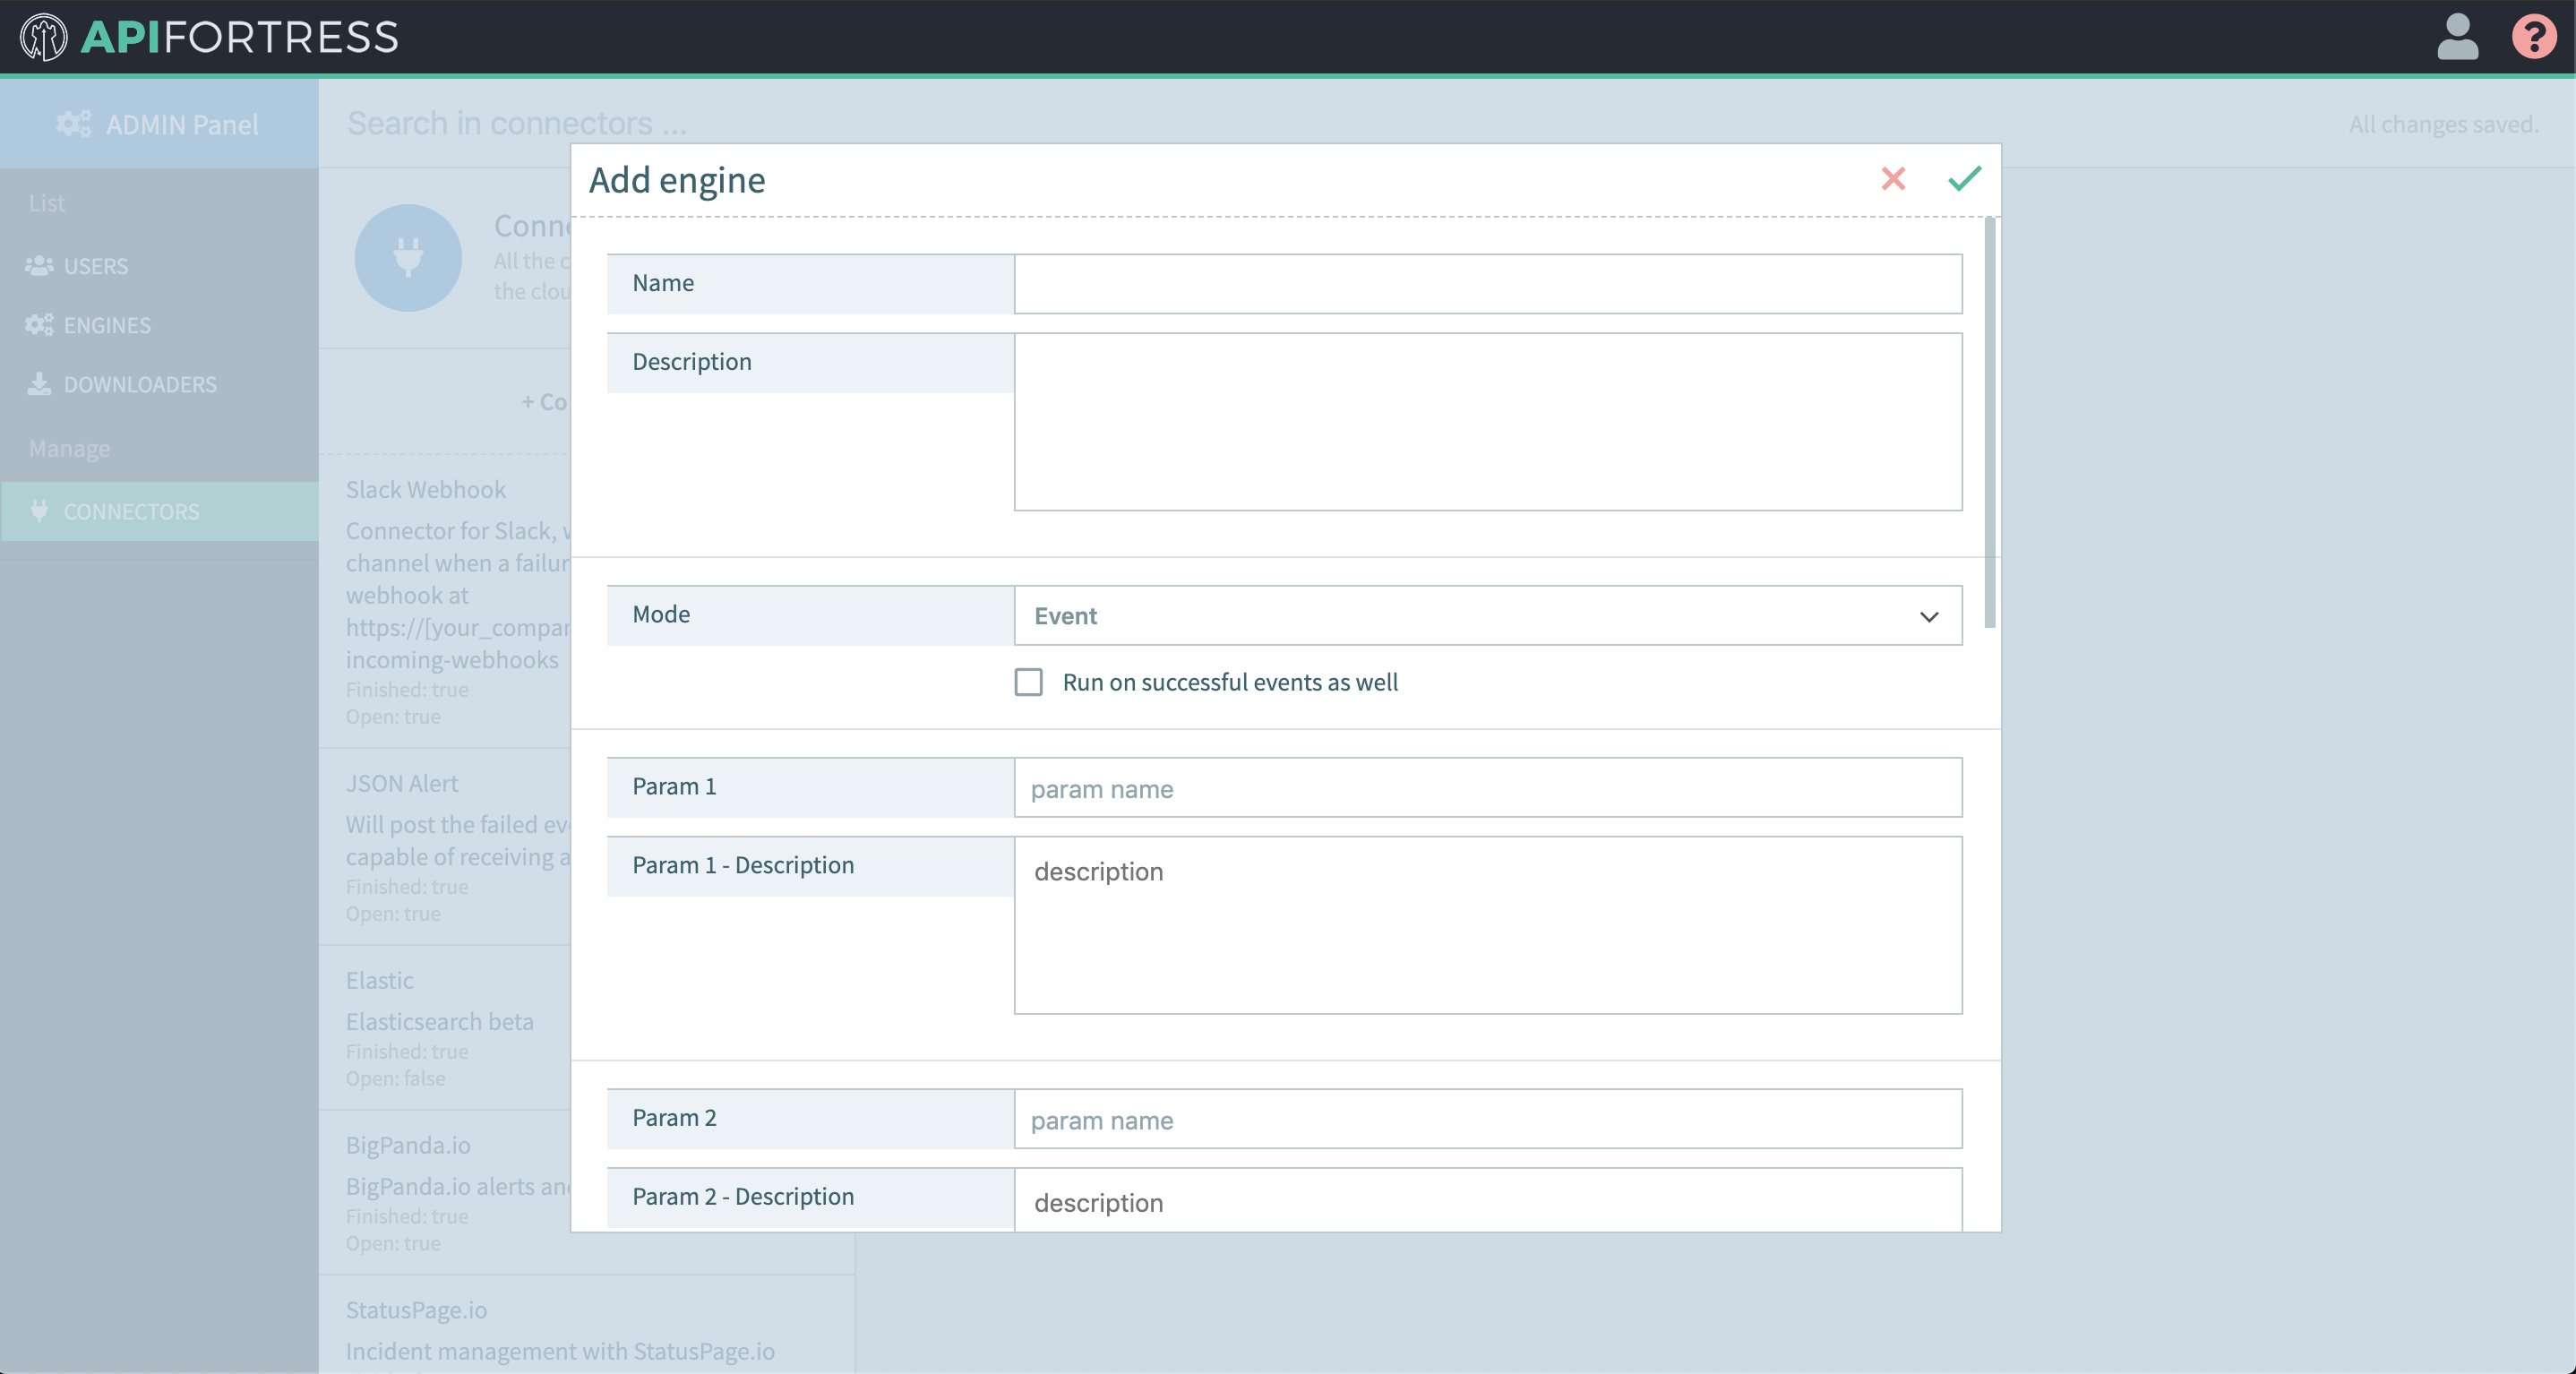
  4. Follow the README.md file for how to fill in the connector form
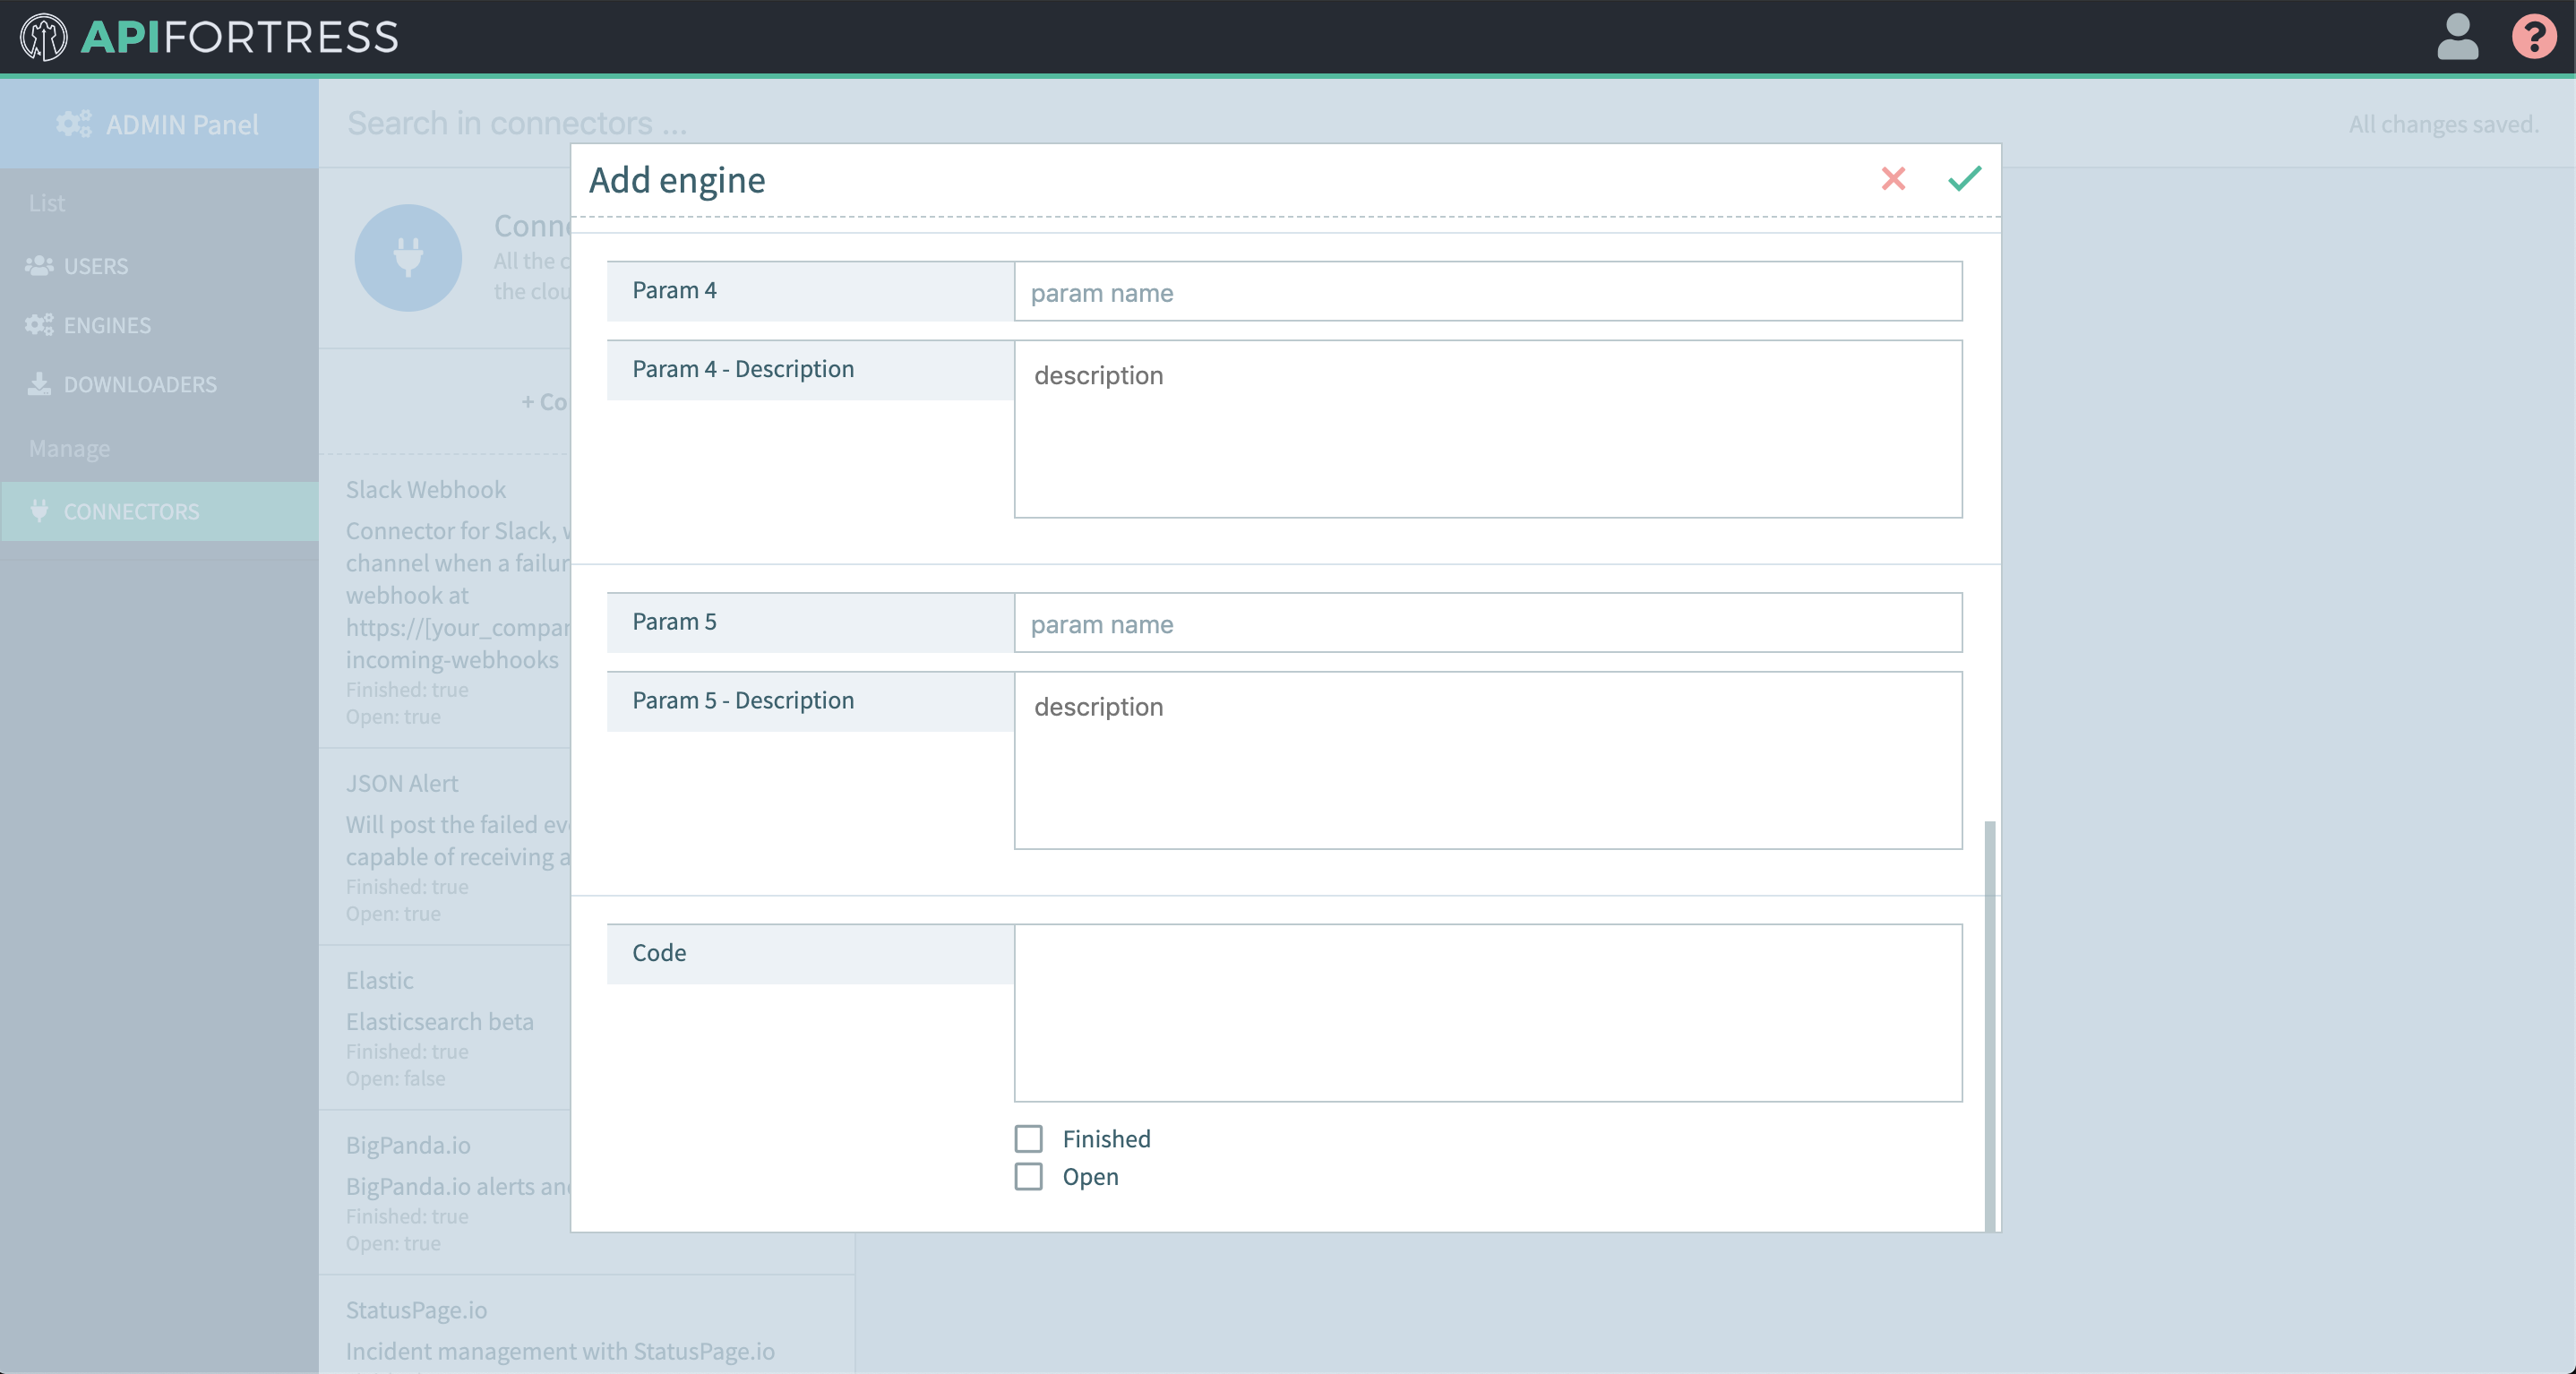
  5. Copy and Paste the code from the connector groovy file into the code section

Connectors – JIRA

API Fortress can absolutely integrate with your JIRA setup. However, because not all JIRA boards are created equal, if you would like a connector set up for your specific JIRA board please out to support@apifortress.com We will then gather the appropriate information and build you a custom connector for your JIRA setup.

Note: this connector does not come pre-loaded out of the box for self-hosted/on-premises, and will need to be loaded separately. To learn how to load the connector into your API Fortress instance click here.

If you are using the SaaS version there is a simple JIRA connector provided, below are the steps to configure it:

  1. Go to the settings page
  2. Click on “Alert Groups”
  3. Create a new group or add a connector to an existing alert group
  4. Add a new connector
  5. Choose the JIRA connector
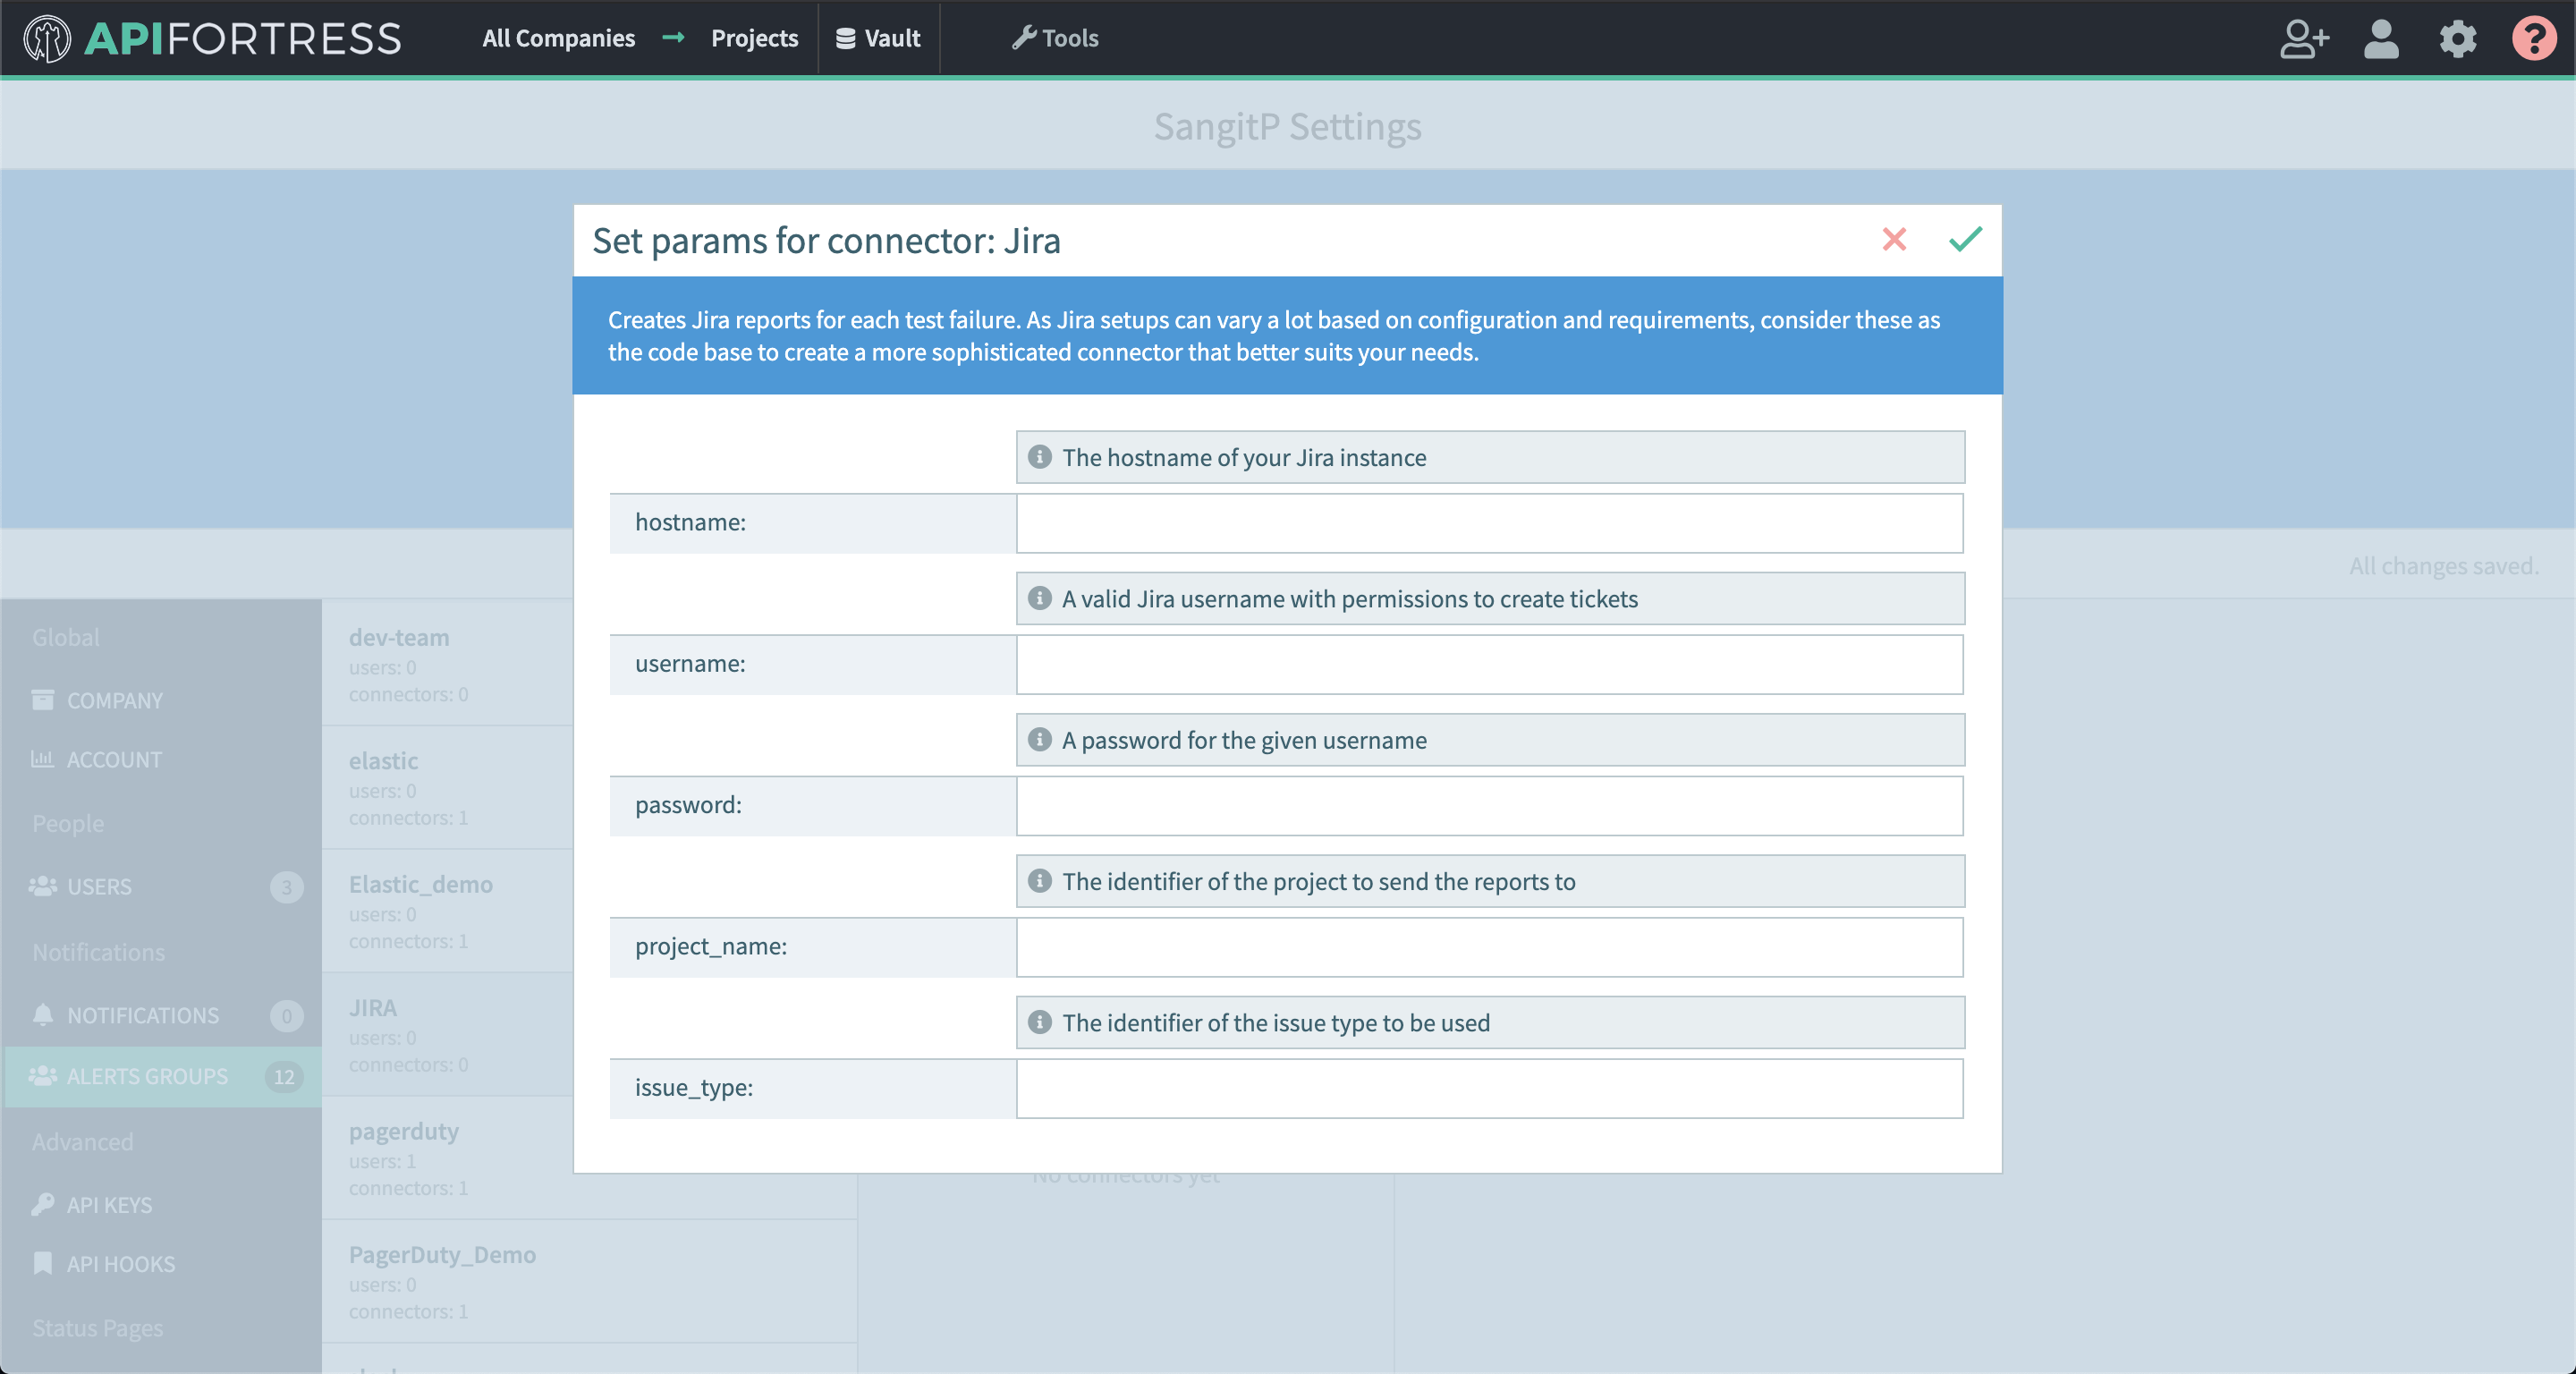
  6. Configure the connector

    1. hostname – this is the host url of your JIRA instance
    2. username – username for your JIRA instance with permissions to create tickets
    3. password – password for the given username
    4. project_name – this is the project key of the project to send reports to
    5. issue_type – identifier of the issue type to be used, i.e. Task, Bug, etc

  7. Go into project settings for a project you would like JIRA alerts set up for

  8. Add the alert group that contains your JIRA connector to this project
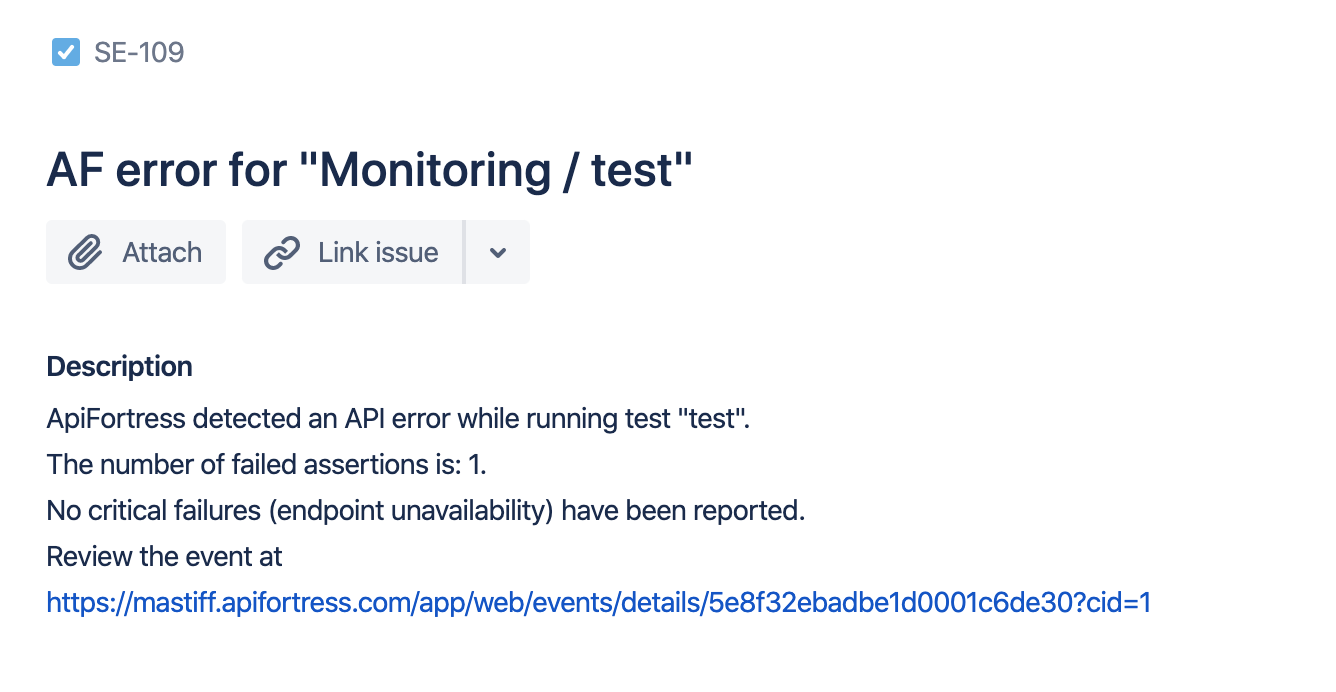
The resulting ticket in JIRA will look something like this:

Connectors – Hipchat

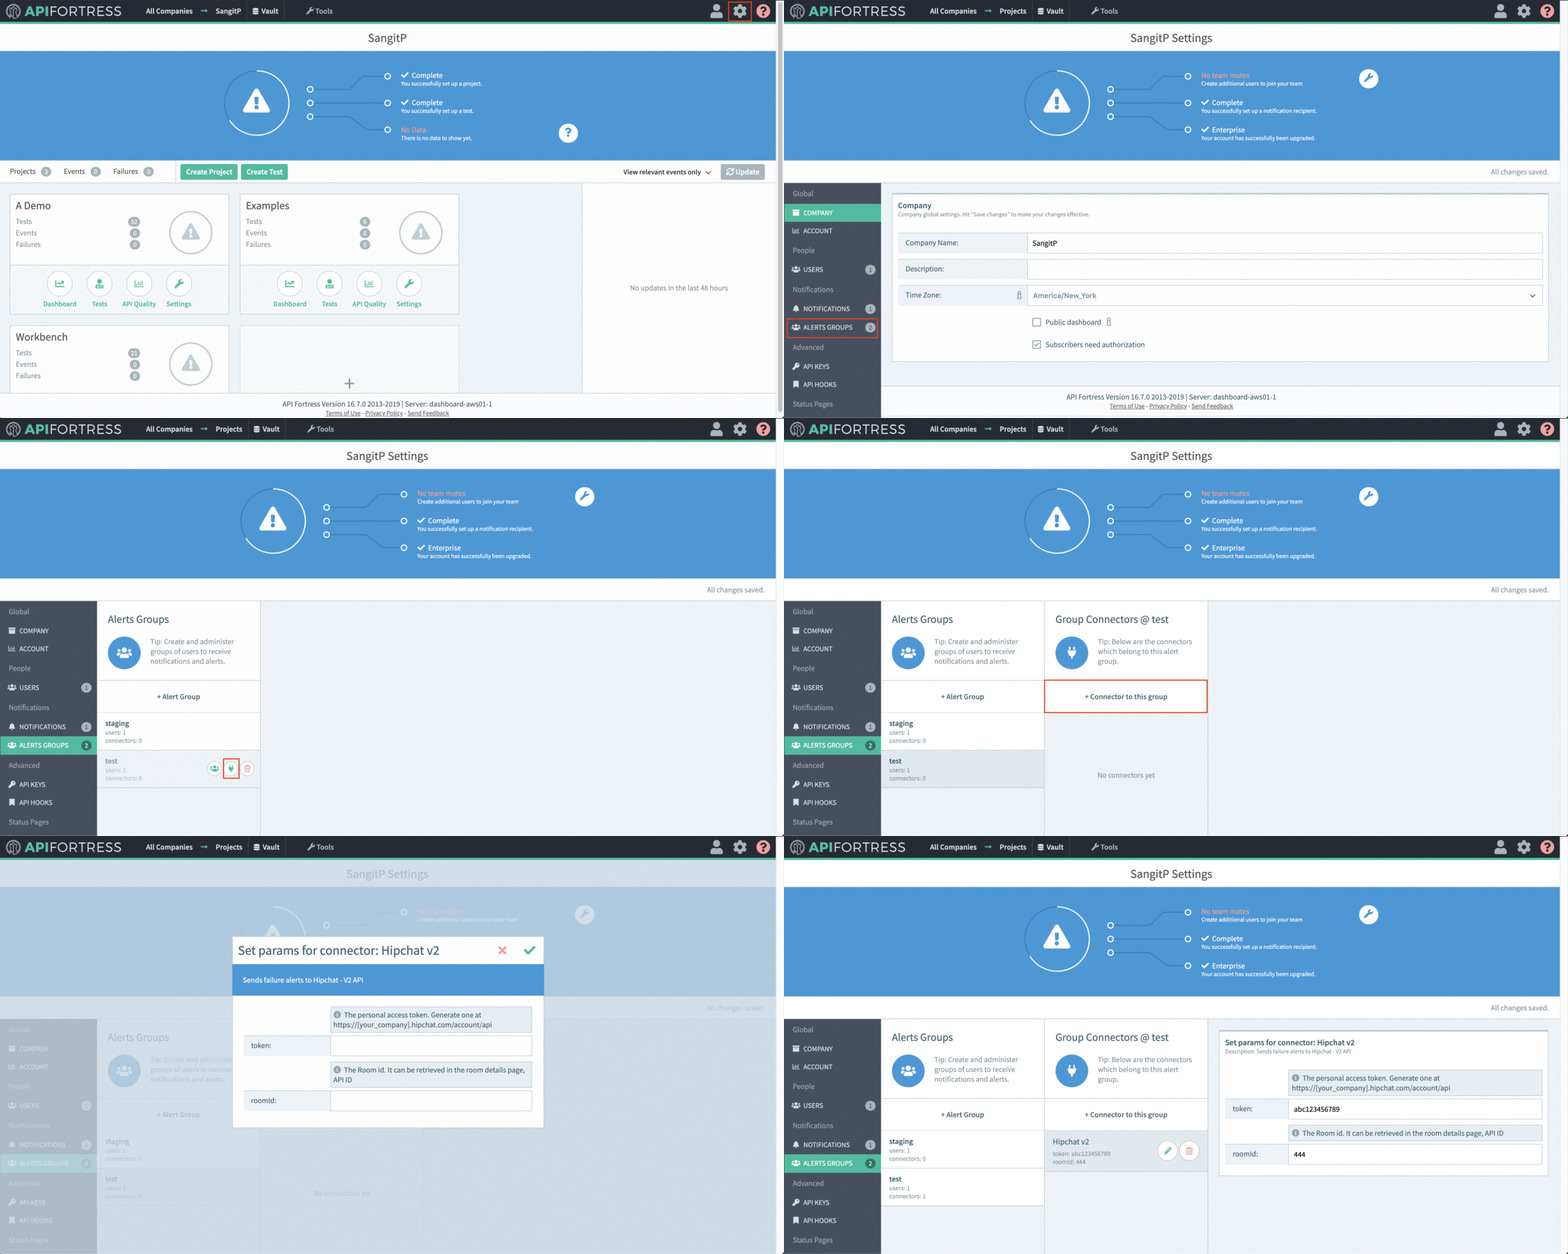
**To learn how to import a connector click here** Here is a quick guide to setting up a Hipchat integration. First generate your Hipchat personal access token. To do so go to https://[your_company].hipchat.com/account/api Then get the room id you would like to send the alerts to, it can be retrieved in the room details page “API ID” Next use these values to set up the connector in API Fortress: Finally, assign the alert group to the project for which you want alerts from: If you are migrating to Slack, we also have a connector for that! Click here to see how to set up that integration.

Version Control

There are two primary mechanisms for version control in API Fortress. The first is the Publish Test feature, which allows for the pushing of updated test-code to a live version of the test. The second mechanism for version control is the API Fortress-Git integration. The integration is powered by the API Fortress Post-Receive Git Hook, which can be found here. Documentation is located here.

Bamboo – Integrate API Tests & Results

Passing data from API Fortress to Atlassian Bamboo allows Bamboo users to include API Fortress test results in their CI/CD process.

Step 1: Generating a Webhook

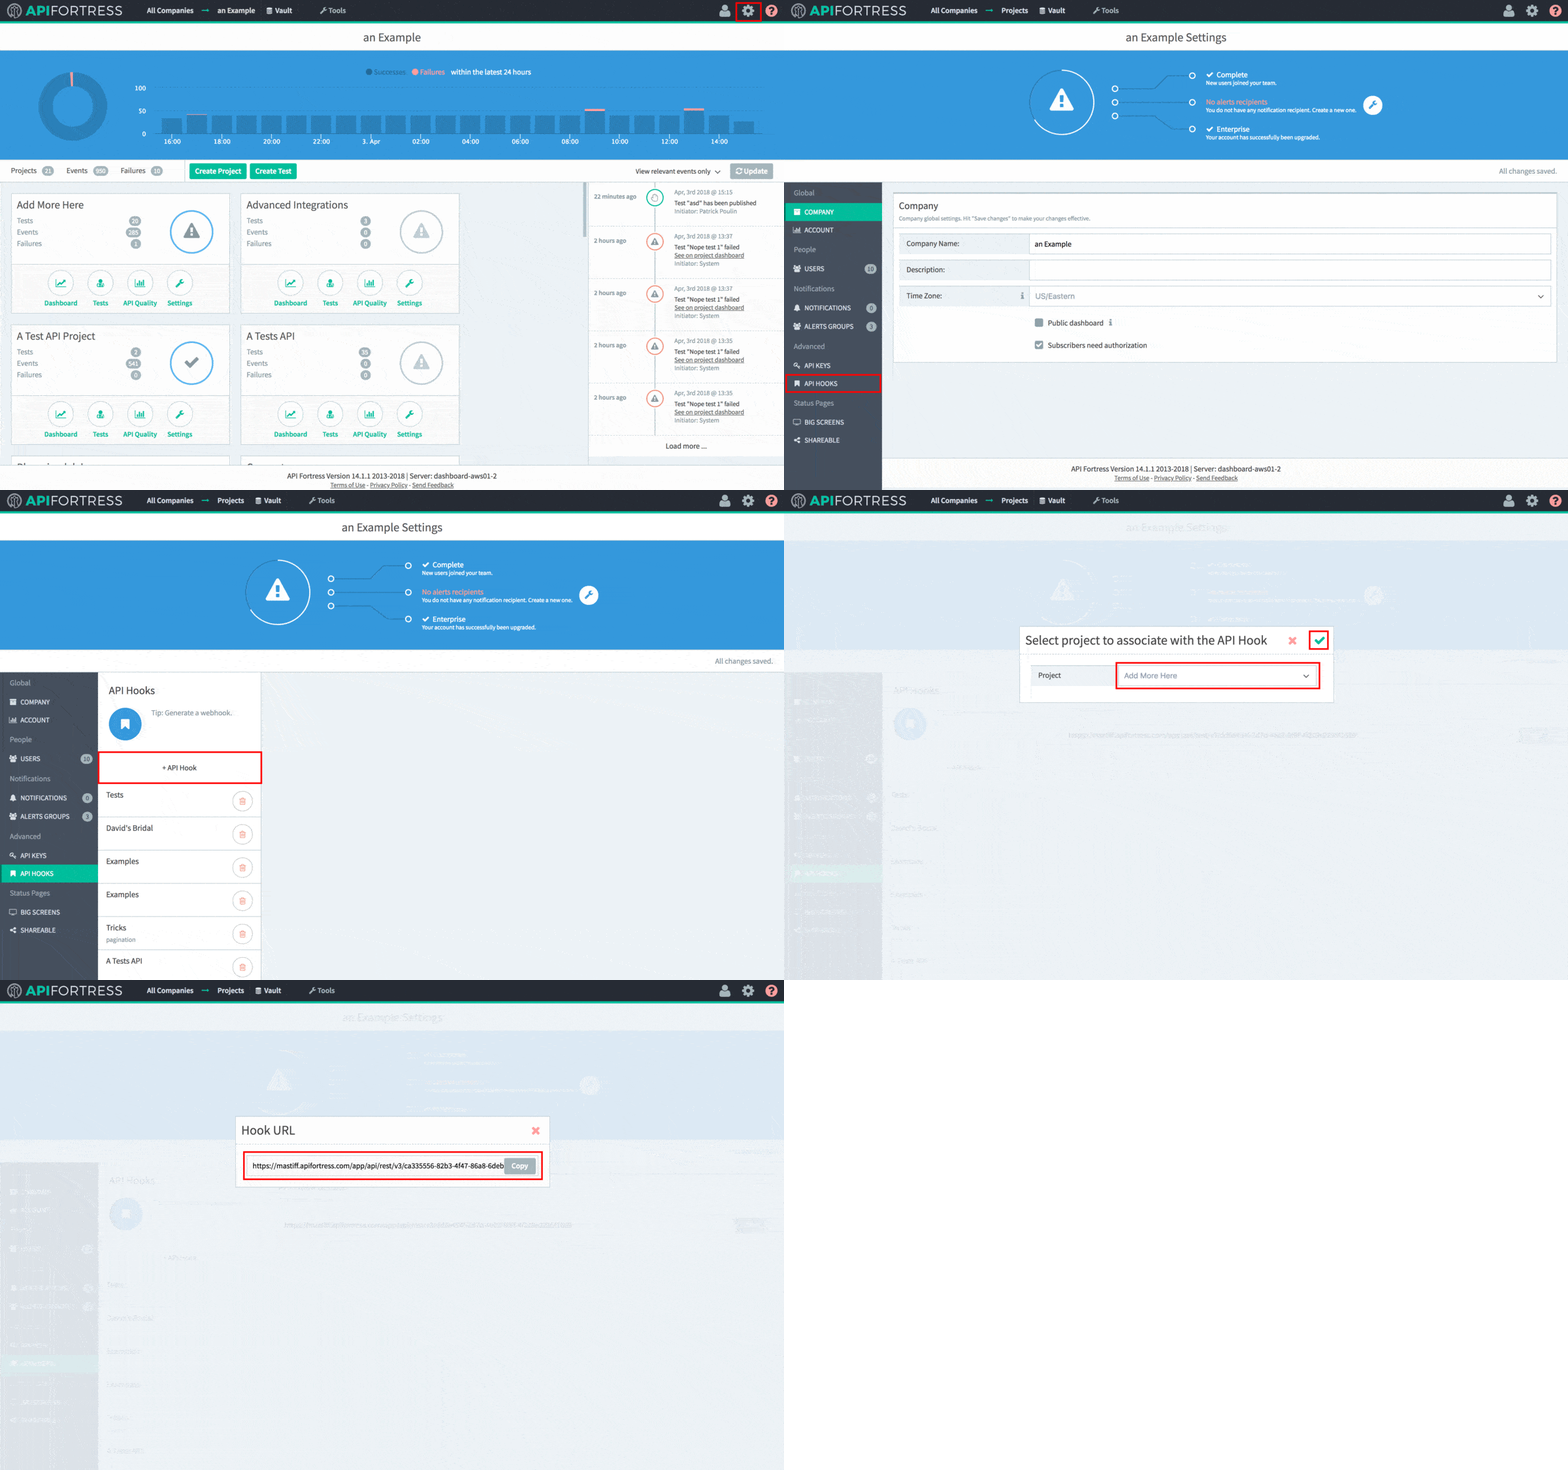
The first step to integrating API Fortress into your CI/CD process is to grab the generated API hook for the project in question. To do so, head to the Settings panel in API Fortress. This view, seen below, can be accessed from anywhere in the application by clicking the Gear icon in the top right corner of the screen. Please note you need Manager access to generate a webhook. From Settings, click the API Hooks section and generate the hook for your project. The process can be seen in detail in the .gif below. hook

Step 2: Select or Create a Bamboo Project

After we’ve created our webhook, calling it from within Bamboo is a fairly simple process. First, create a new project in Bamboo. You can also add to an existing project from this screen. project

Step 3: Adding an HTTP Call

Next, we need to add an HTTP Call component and enter the webhook we generated. Depending on what you wish the call to API Fortress to trigger, you may append different routing on to the end of the webhook. The API Fortress API Documentation is located here. httpcall

Step 4: Parsing Results

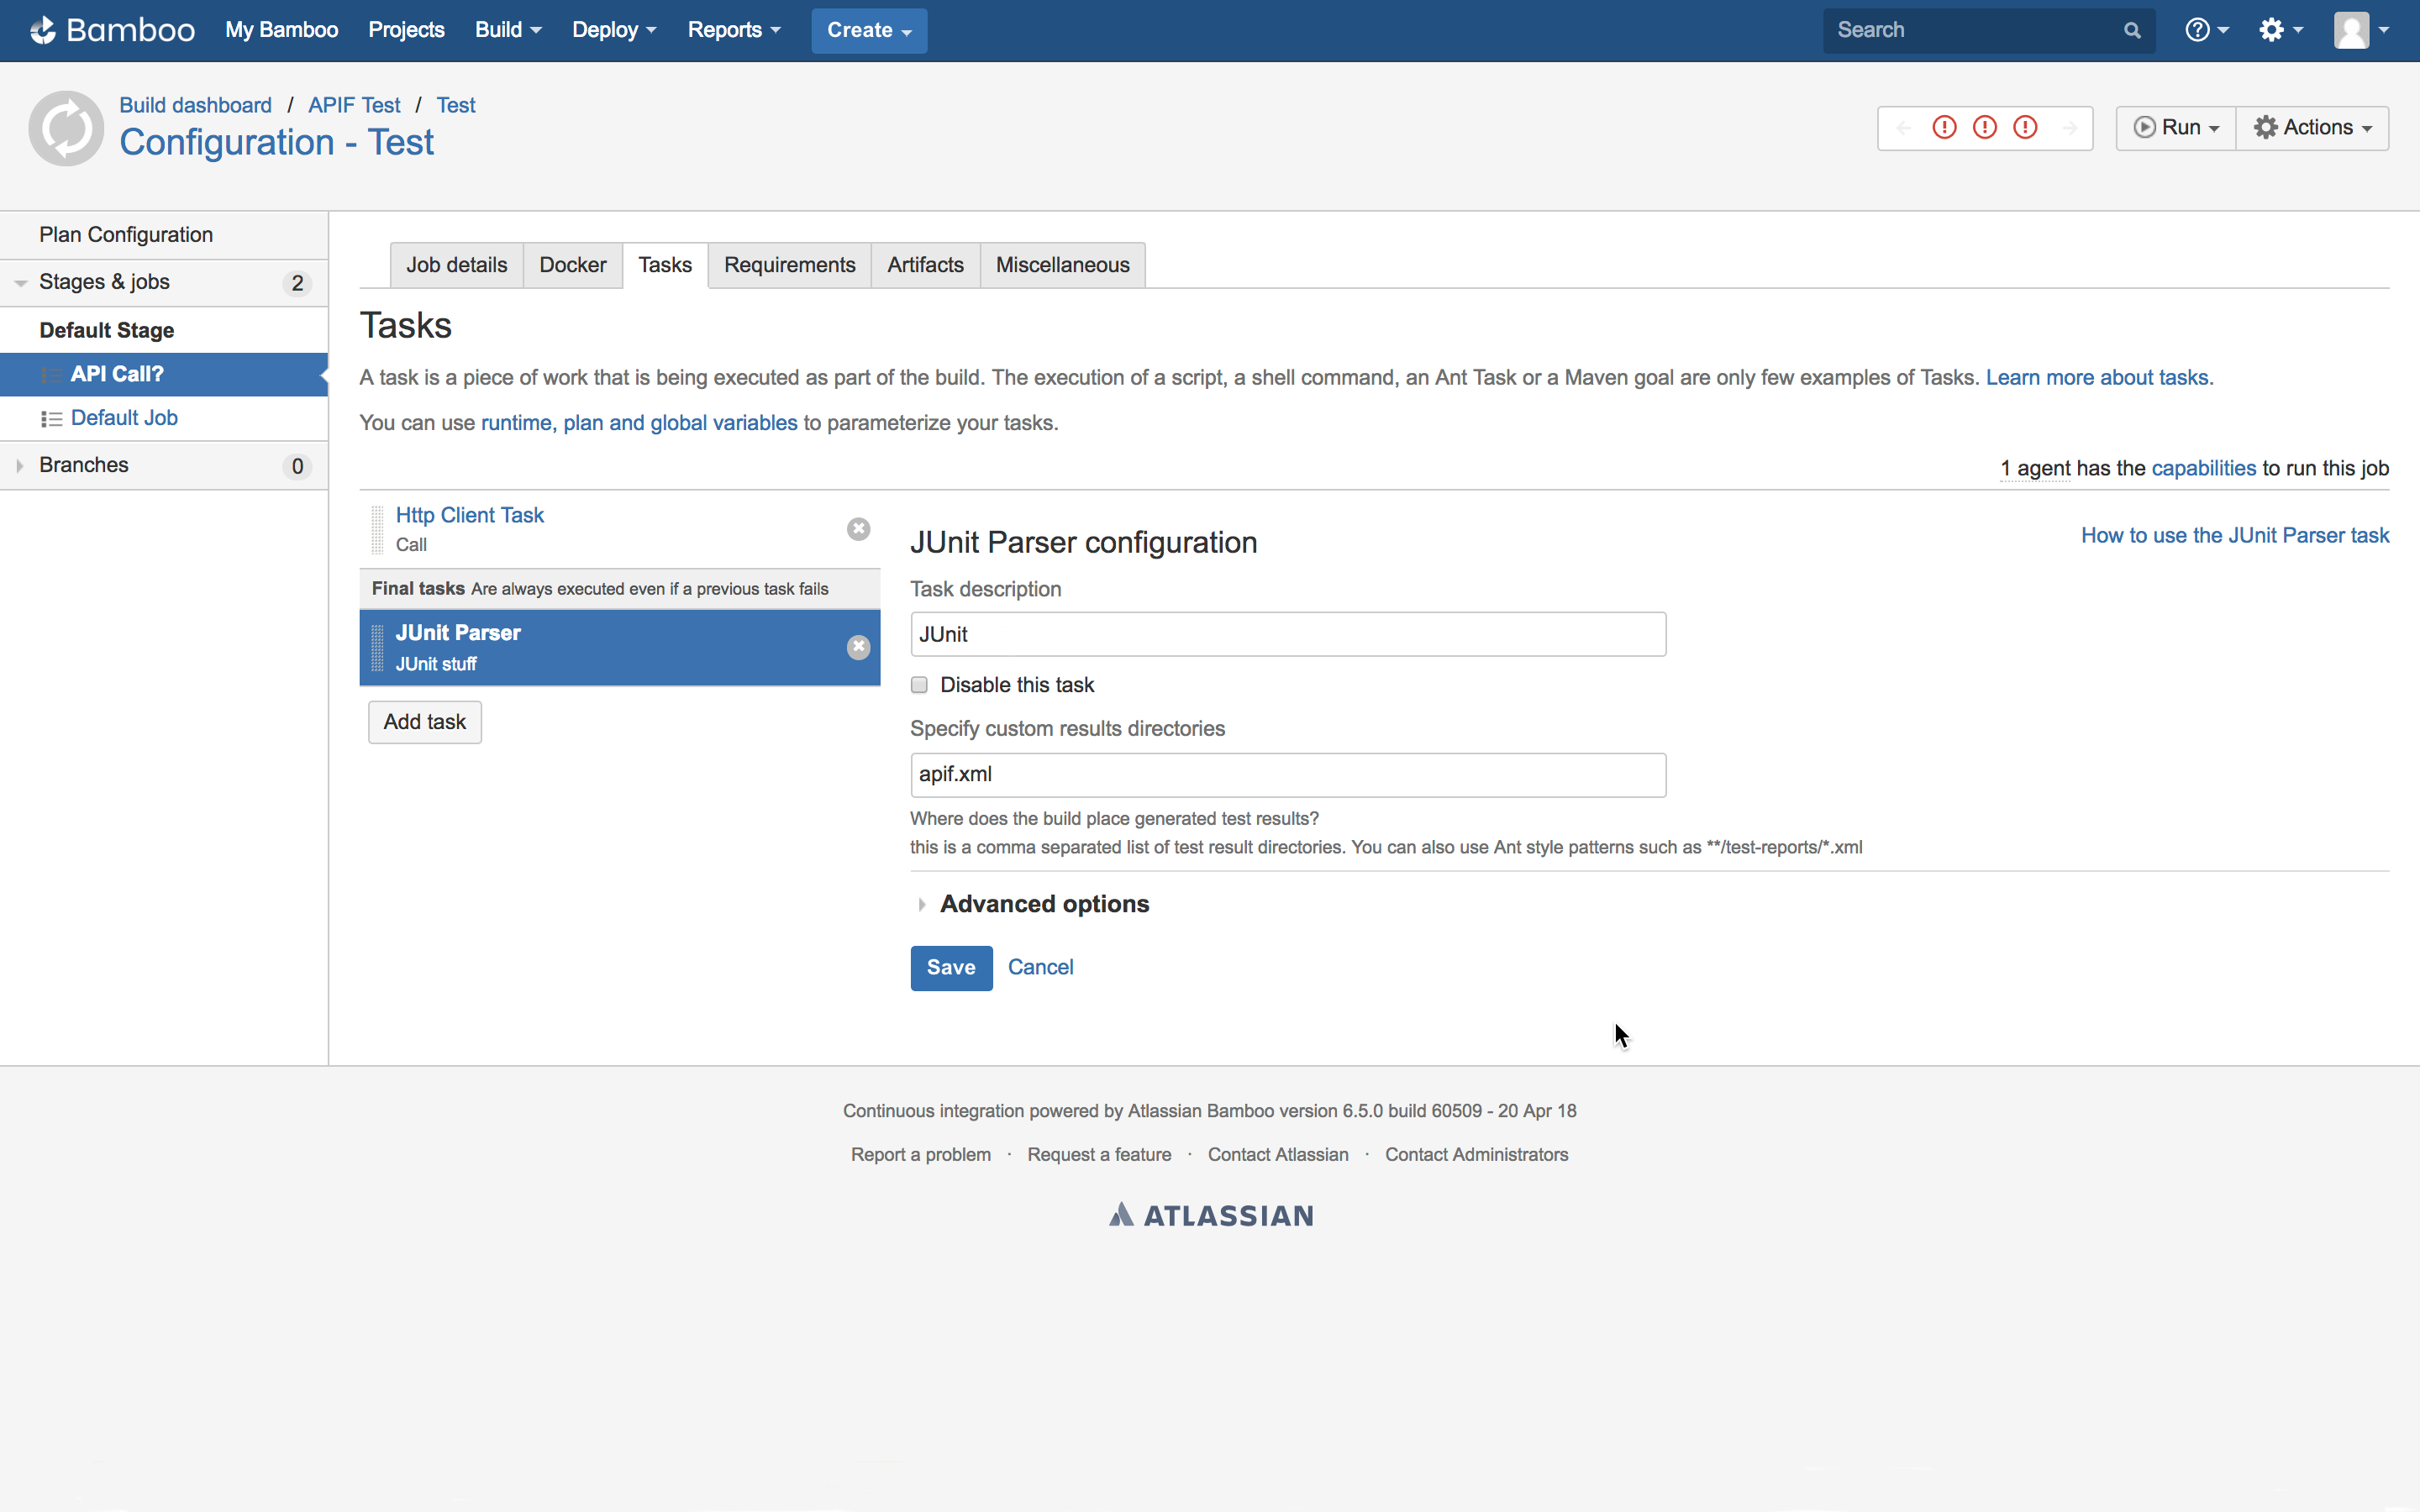
After the request is sent to the API Fortress API, we’ll need to save the JUnit data that’s returned. We do so by adding a JUnit Parser step. junit Once the above steps are completed and saved, the build sequence will make a call to API Fortress upon execution, receive the results of the tests, and parse the results. summary   Keywords: cicd, jenkins, bamboo, microsoft tfs, team foundation server, gitlab ci/cd, travisci

Connectors – DataDog

**To learn how to import a connector click here**

Here is a quick guide to setting up a DataDog integration.

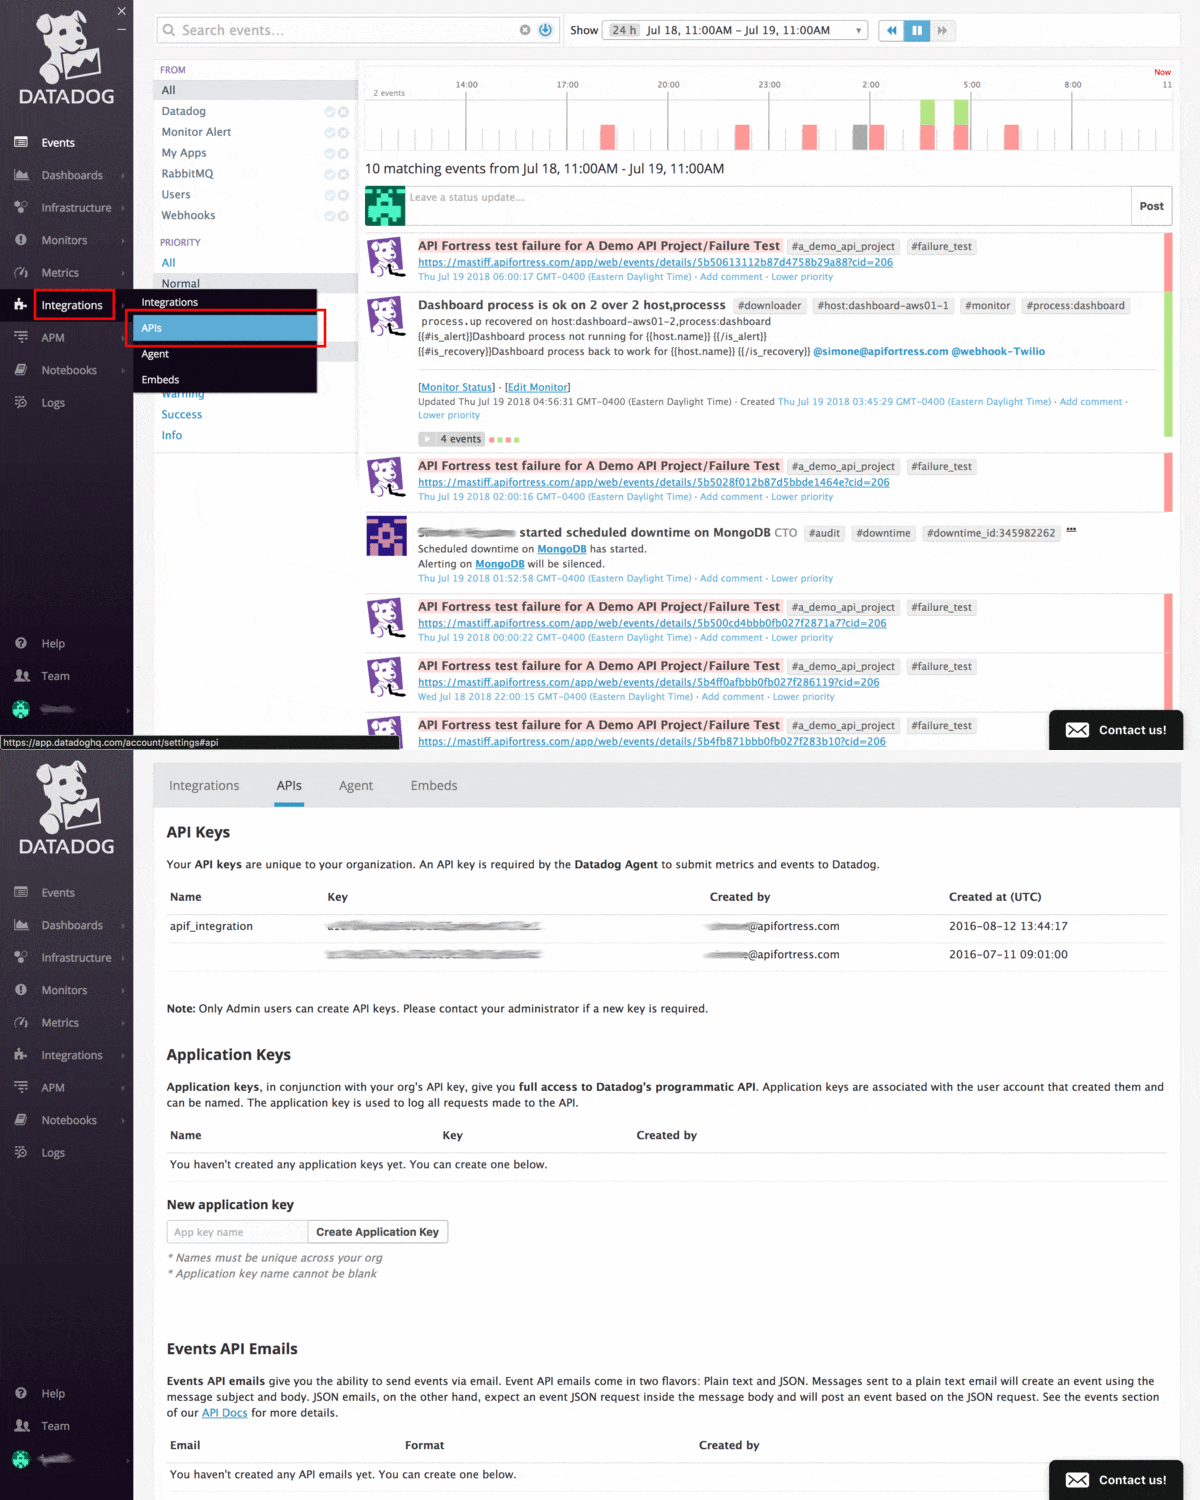
  1. First, we need to generate a new API key in DataDog.
    1. Log in to your DataDog account.
    2. Mouse-over Integrations and then click API
    3. Create a new API key at the top of the view (Note: You must have Admin DataDog account access.)
datadog
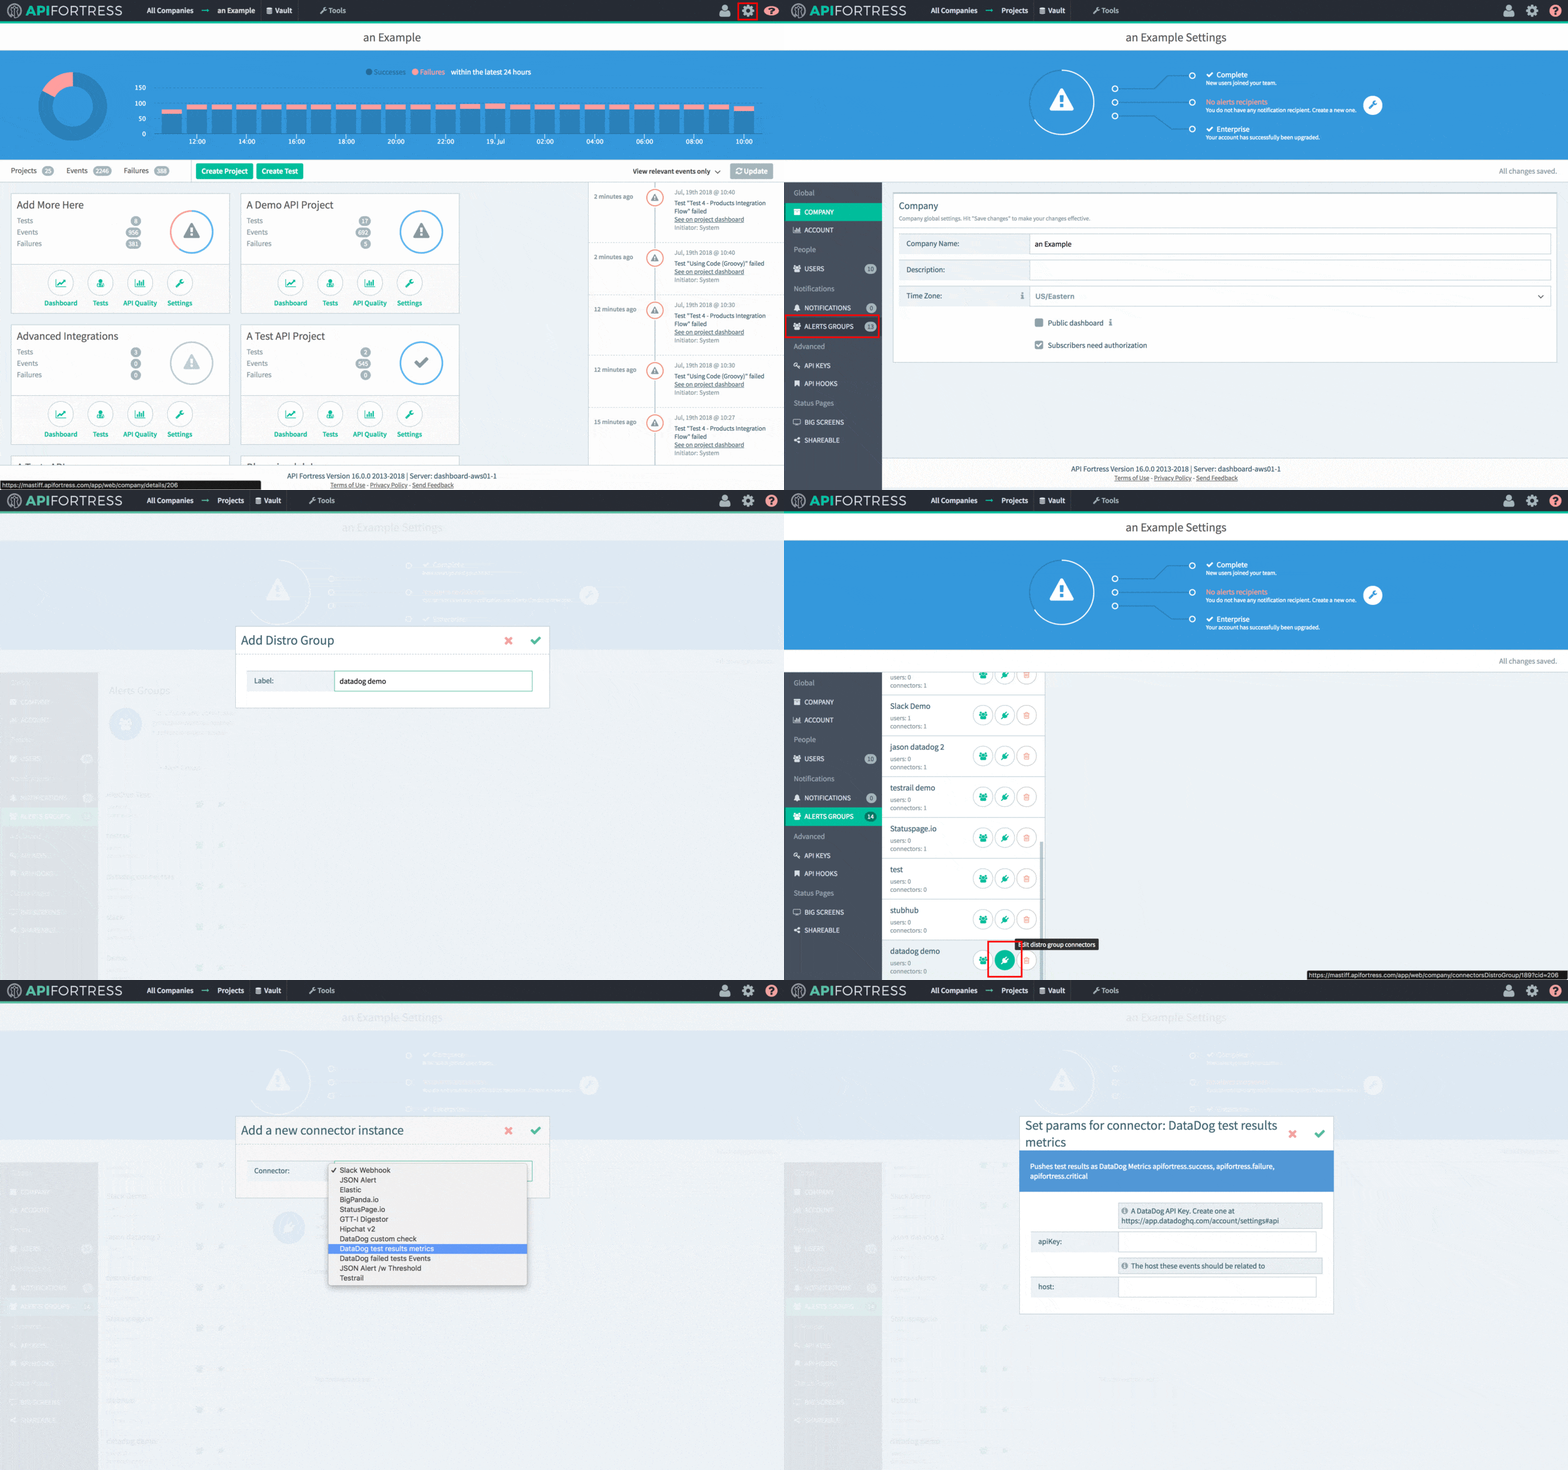
  1. In API Fortress go to company settings (top right gear icon)
  2. Click on Alert Groups
  3. Create a new Alert Group (if necessary)
  4. Add recipients to the Alert Group (if necessary)
  5. Click on the Connectors icon
  6. Choose one of the DataDog connectors from the dropdown
  7. Add your DataDog API Key created previously and the DataDog host you wish the connector to pass data to.
connector Once this process is complete, API Fortress will begin passing data to DataDog where it can be charted in any way you like! Note: This connector shares events with Datadog, which are outages. If you would like to include performance metrics, such as latency and fetch, please let us know and we can help set that up. It requires a small script.

Jenkins – Zephyr Enterprise Integration

Step 1 – Install the Zephyr Enterprise Jenkins Plugin

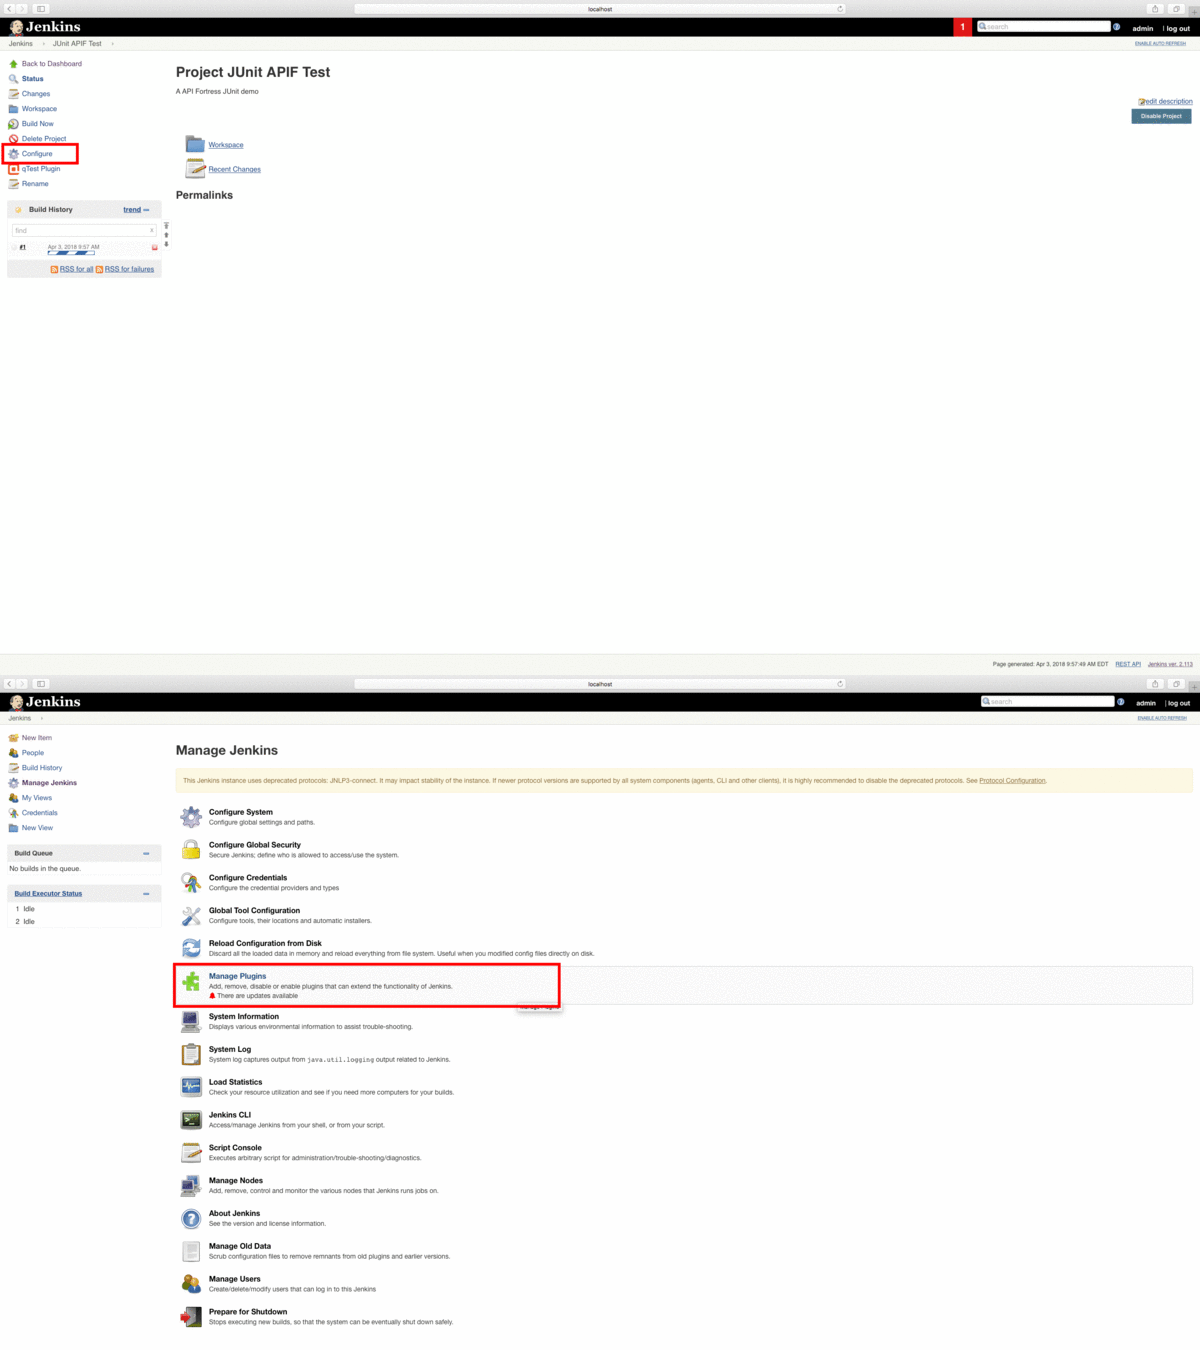
The first step to exporting data to Zephyr Enterprise is to download and configure the Zephyr Enterprise plugin. From the Jenkins main page, click “Configure” and then “Manage Plugins.” From the “Manage Plugins” window, search for and install “Zephyr Enterprise.” jenkinsAddons

Step 2 – Configure the Zephyr Enterprise Jenkins Plugin

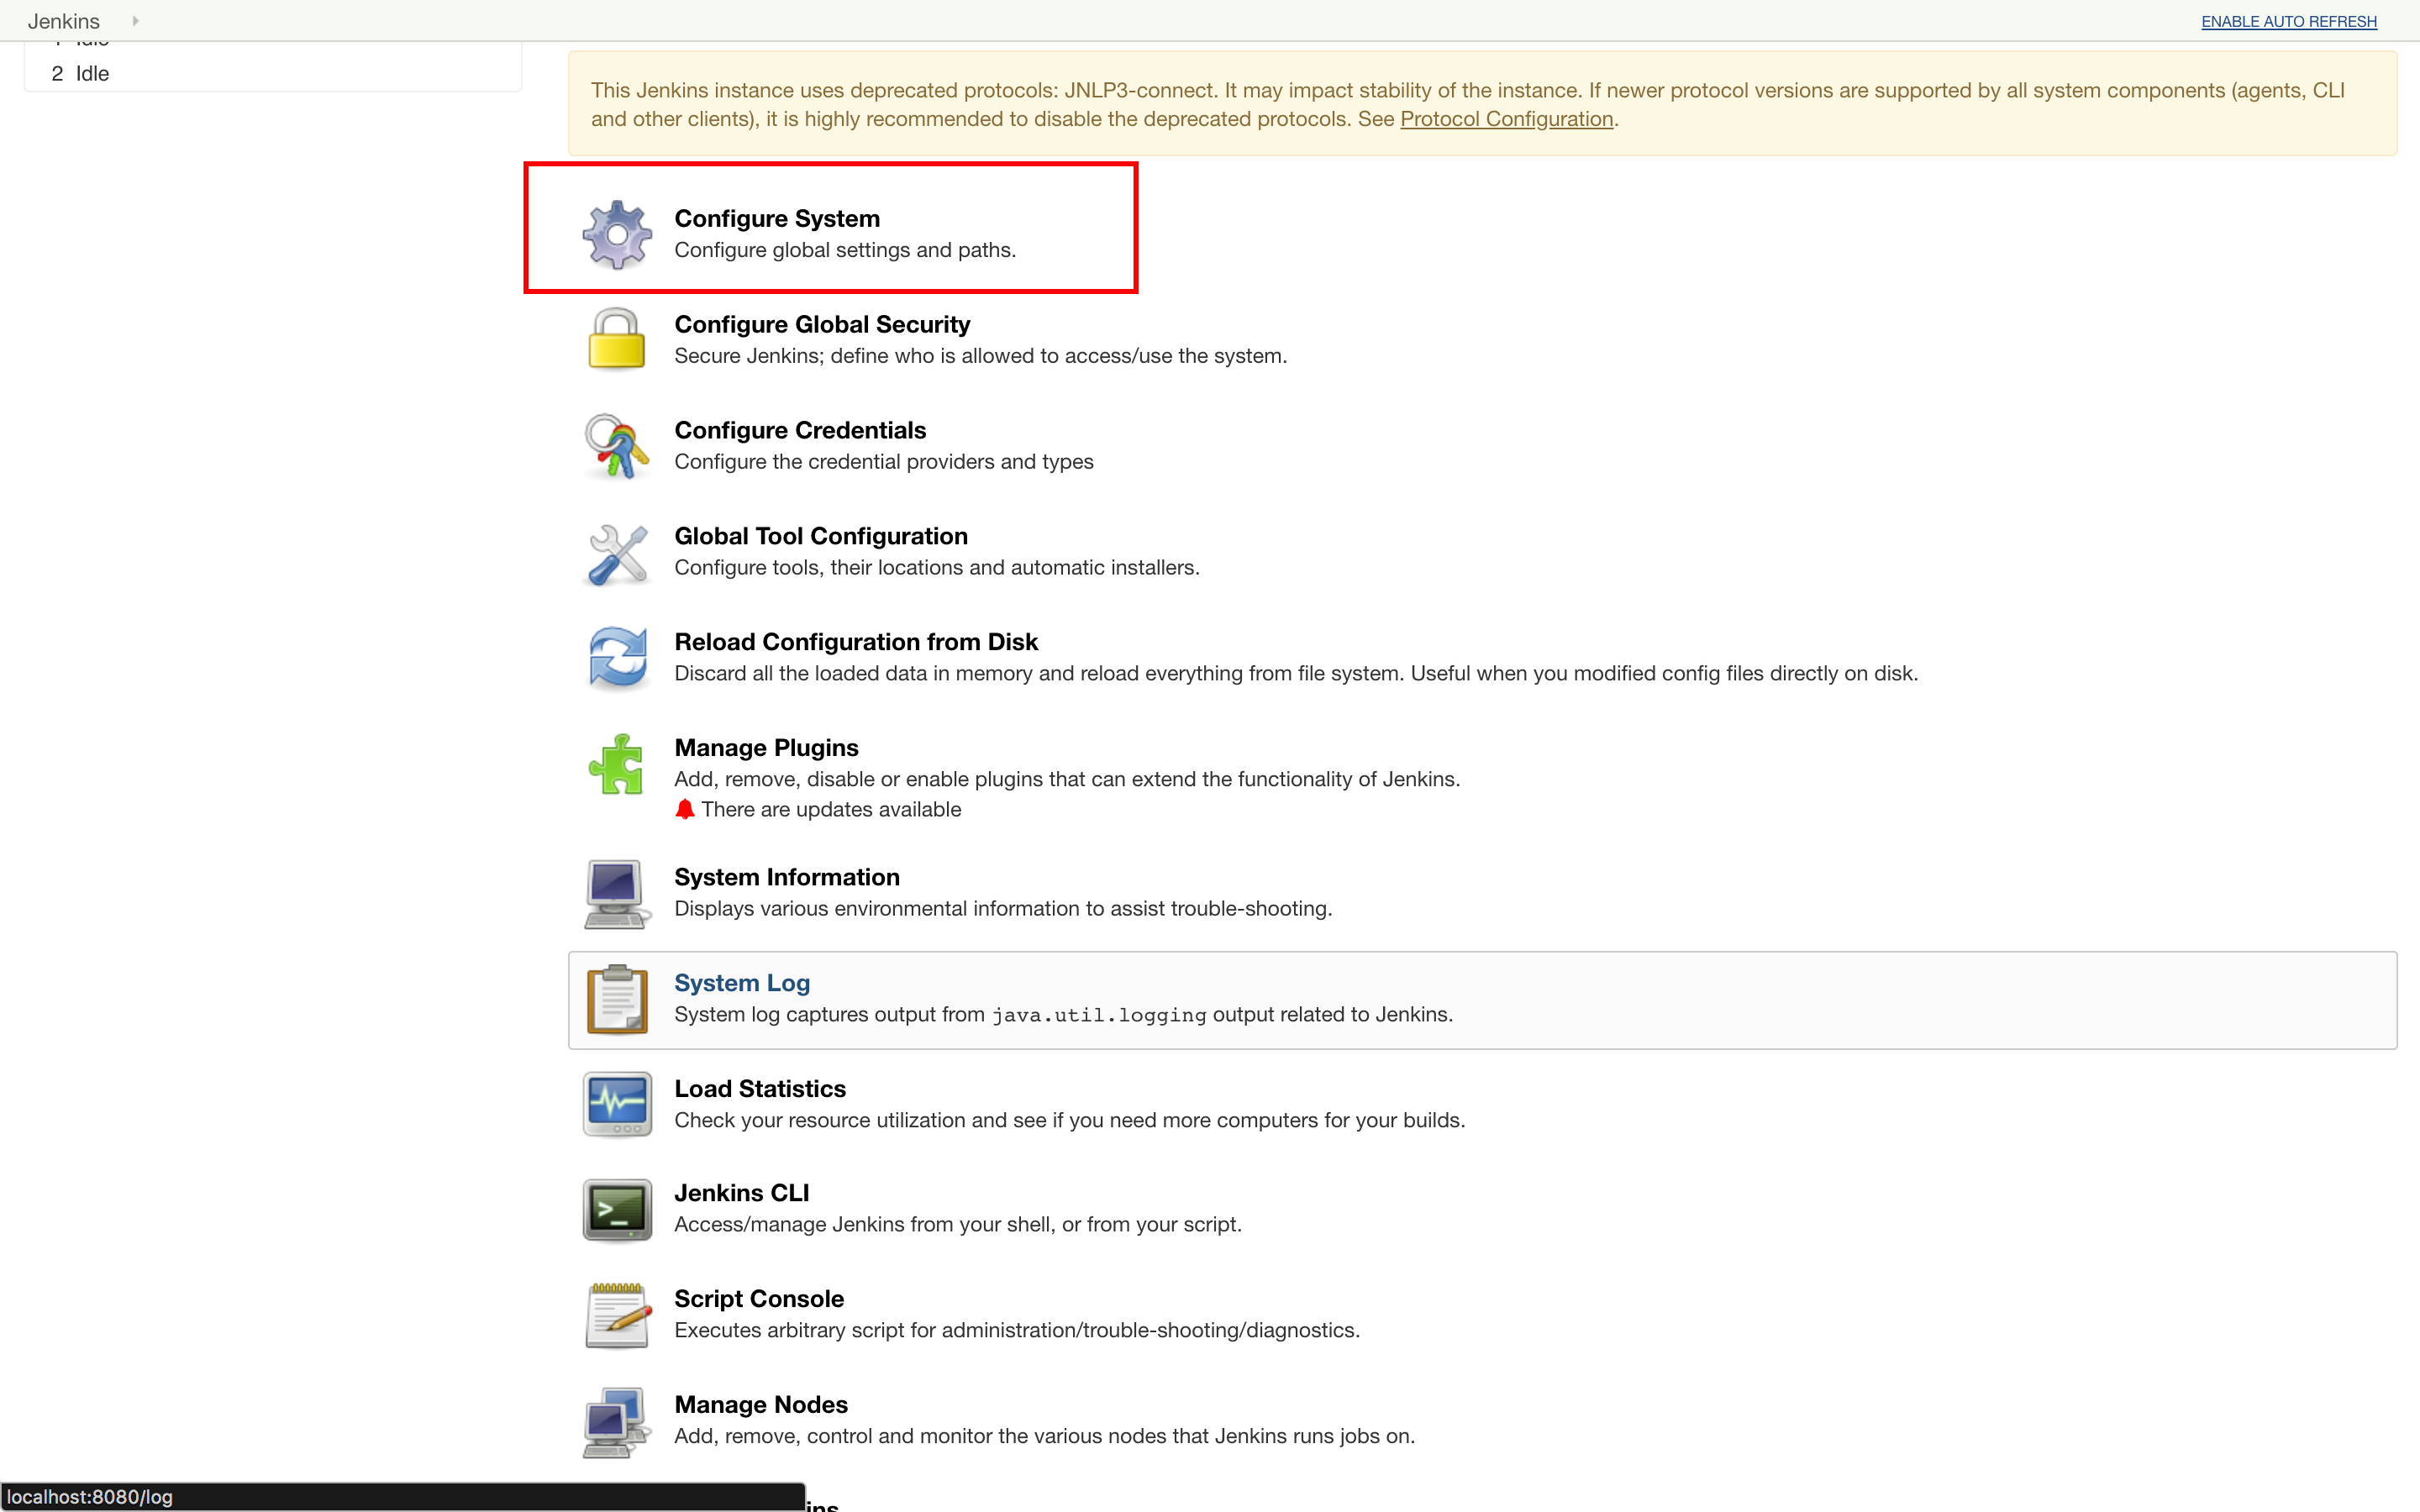
Click the “Configure System” option in the “Manage Jenkins” menu. JenkConfig Scroll down to “Zephyr Server Configuration” and enter your domain and login credentials. Screen Shot 2018-05-29 at 10.30.39 AM Click “Test Configuration.” If the test is successful, your Jenkins is properly configured to communicate with your Zephyr instance.

Step 3 – Generate an API Hook

Next, we need to create an API Fortress Webhook to export the test data to Jenkins. To do so, head to the Settings panel in API Fortress. This view, seen below, can be accessed from anywhere in the application by clicking the Gear icon in the top right corner of the screen. Note: You need Manager access to generate a Webhook. From Settings, click the API Hooks section and generate the hook for your project. The next step depends on what you’re trying to test. The following steps are going to assume that you wish to run all of the tests in a project. You can also run a single test, or a series of tests with a certain tag. If you would like to learn more about that please contact API Fortress. To import our data into Jenkins as JUnit, we’ll export it in JUnit format using a query parameter. Since we already have our API hook, we just need to add the parameter to do so. As it stands, our API hook is as follows: https://mastiff.apifortress.com/app/api/rest/v3/86f81b19-2d29-4879-91d9-6dbb2271fec0861 The normal command to run all of the tests in the project, per the API Fortress docs is /tests/run-all, so we append this on to the end of the API call. We also need to request JUnit output via query parameters. First, we need to set sync to true, and then we can set format to JUnit. In short, we need to append ?sync=true&format=junit. That gives us the final API call: https://mastiff.apifortress.com/app/api/rest/v3/86f81b19-2d29-4879-91d9-6dbb2271fec0861/tests/run-all?sync=true&format=junit Great! If we make this API call via a browser or a tool like Postman, we can see our results in JUnit.

Step 4 – Execute HTTP Call from Jenkins

From the Jenkins dashboard, let’s create a New Item. Next, we’re going to name and create a Freestyle Project. Click the OK button to proceed. Scroll down the page until you see the “Add Build Step” pulldown menu. Select “HTTP Request.” This option will only be available if you installed the HTTP Request plugin in the previous step. We’re going to paste the API call we created above into the URL line. If we save this configuration, we can run the build and see Jenkins receive our JUnit test results in real time. Next, we’re going to click the “Advanced” button. Scroll to the bottom of the newly opened view and enter a filename of your choice into the “Output Response to File” line.

Step 5 – Publish JUnit Test Results in Jenkins

Now that we’re receiving JUnit data from API Fortress in Jenkins, we need to publish the data so that we can use it further downstream. Click “Add Post-Build Action” and then “Publish JUnit Data.”
In the new window, enter the same filename that we saved our JUnit data to in the API call in the previous step.
Now, we’ve enabled Jenkins to execute API Fortress tests and receive the test data in JUnit format. Next, we’re going to allow it to pass this data on to Zephyr.

Step 6 – Exporting Data to Zephyr

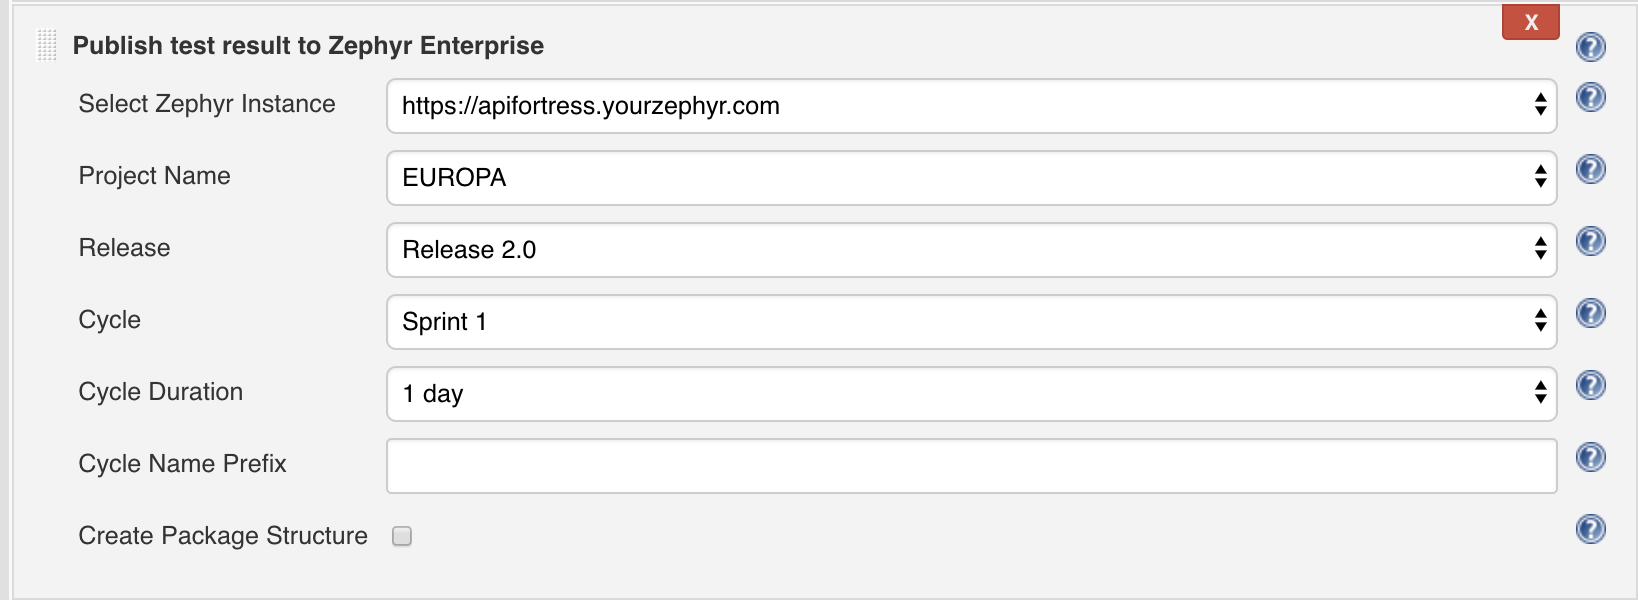
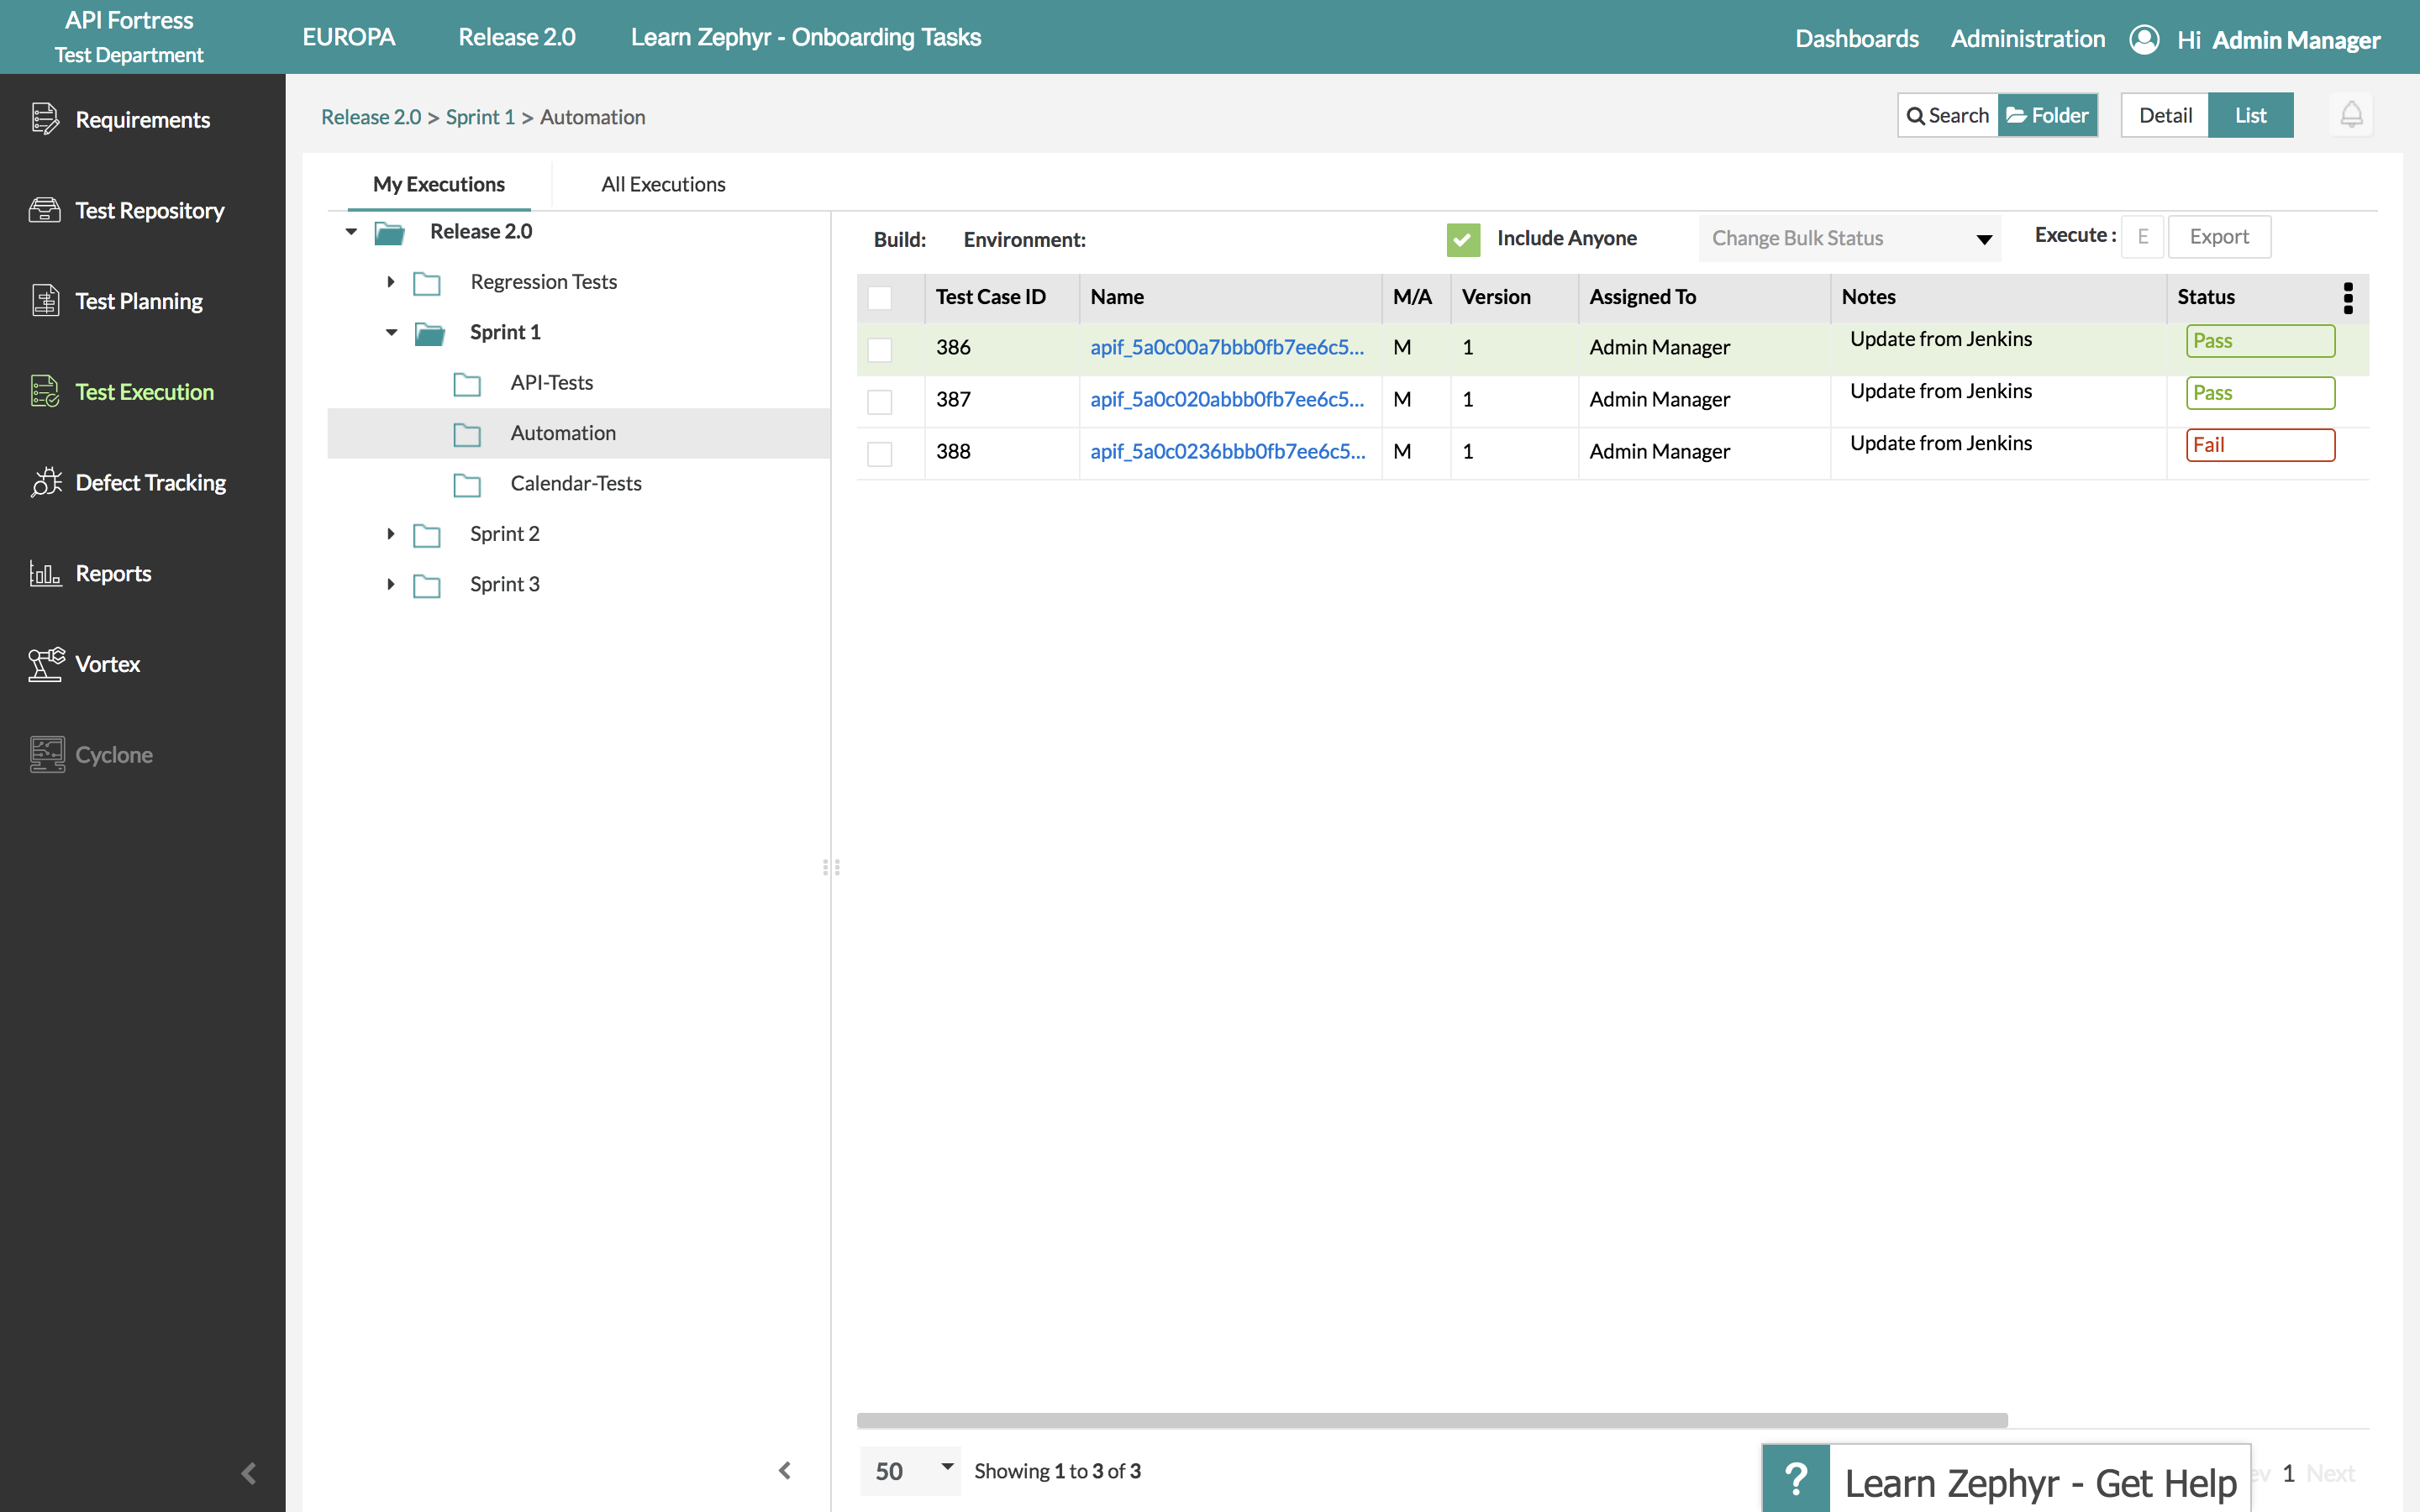
Click “Add Post-Build Action” and select “Publish Test Results to Zephyr Enterprise.” Since we configured the Zephyr plugin in step 2, Zephyr information should populate automatically from your Zephyr Enterprise instance. Select the project, release and cycle of your choice and save the build. Screen Shot 2018-05-29 at 10.30.05 AM Test data will now export to Zephyr every time this project is built. Screen Shot 2018-05-29 at 10.31.14 AM  

Jenkins – Tricentis qTest Integration

The following procedure will allow you to integrate API Fortress test results into your qTest instance. By passing JUnit test data through Jenkins and into qTest, your API Fortress test results can be visible in the same space as the rest of your tests.

Install Jenkins Plugins (qTest)

Log in to your Jenkins account. In order for the qTest integration to work, we need to extend Jenkins with a couple of plugins. First, click “Manage Jenkins,” then click “Manage Plugins.” Install Jenkins Plugin for qTest We’re going to need both the qTest plugin, and the HTTP Request plugin. To find the plugins, click the “Available” tab in the Plugins menu and use the filter in the top right corner to search for them. Install both.

Step 3 – Integrate API Fortress into your CI/CD Process

The first step to integrating API Fortress into your CI/CD process is to grab the generated API hook for the project in question. To do so, head to the Settings panel in API Fortress. This view, seen below, can be accessed from anywhere in the application by clicking the Gear icon in the top right corner of the screen. Please note you need Manager access to generate a webhook. From Settings, click the API Hooks section and generate the hook for your project. Generate API Webhook The next step depends on what you’re trying to test. The following steps are going to assume that you wish to run all of the tests in a project. You can also run a single test, or a series of tests with a certain tag. If you would like to learn more about that please contact API Fortress. To import our data into qTest via Jenkins, we’ll export it in JUnit format using a query parameter. Since we already have our API hook, we just need to add the parameter to do so. As it stands, our API hook is as follows: https://mastiff.apifortress.com/app/api/rest/v3/86f81b19-2d29-4879-91d9-6dbb2271fec0861 The normal command to run all of the tests in the project, per the API Fortress docs is /tests/run-all, so we append this on to the end of the API call. We also need to request JUnit outputt via query parameters. First, we need to set sync to true, and then we can set format to JUnit. In short, we need to append ?sync=true&format=junit. That gives us the final API call: https://mastiff.apifortress.com/app/api/rest/v3/86f81b19-2d29-4879-91d9-6dbb2271fec0861/tests/run-all?sync=true&format=junit Great! If we make this API call via a browser or a tool like Postman, we can see our results in JUnit. We’re almost there.

Step 4 – Add API Fortress Step to qTest

From the Jenkins dashboard, let’s create a New Item. Next, we’re going to name and create a Freestyle Project. Click the OK button to proceed. Add API Fortress step to qTest Scroll down the page until you see the “Add Build Step” pulldown menu. Select “HTTP Request.” This option will only be available if you installed the HTTP Request plugin in the previous step. We’re going to paste the API call we created above into the URL line. HTTP request Next, we’re going to click the “Advanced” button. Scroll to the bottom of the newly opened view and enter a filename of your choice into the “Output Response to File” line. Output response to fileNow that we’ve told Jenkins to output the JUnit response to a file, we need to make that file accessible to downstream after-build steps. Click “Add post-build action” and select “Publish JUnit Results.” publish JUnit results
In the new window, enter the same filename that we saved our JUnit data to in the API call in the previous step.
Now, we’ve enabled Jenkins to execute API Fortress tests and receive the test data in JUnit format. Next, we’re going to allow it to pass this data on to qTest. Click on the “Add Post-Build Action” pulldown below the build step we just created and select “Submit JUnit Test Results to qTest.” submit JUnit test results to qTest
 
Enter the URL of your qTest instance and your qTest – Jenkins API Key. Click the “Retrieve Data” button to populate the next few menus. Select a project, release, and environment (optional) where you want to push the test results. Choose the final options with regards to how you wish the data to be stored in qTest, and click save. retrieve data From now on, every time you click “Build Now” with this test, the results will be exported to the qTest Project of your choice automatically. test results

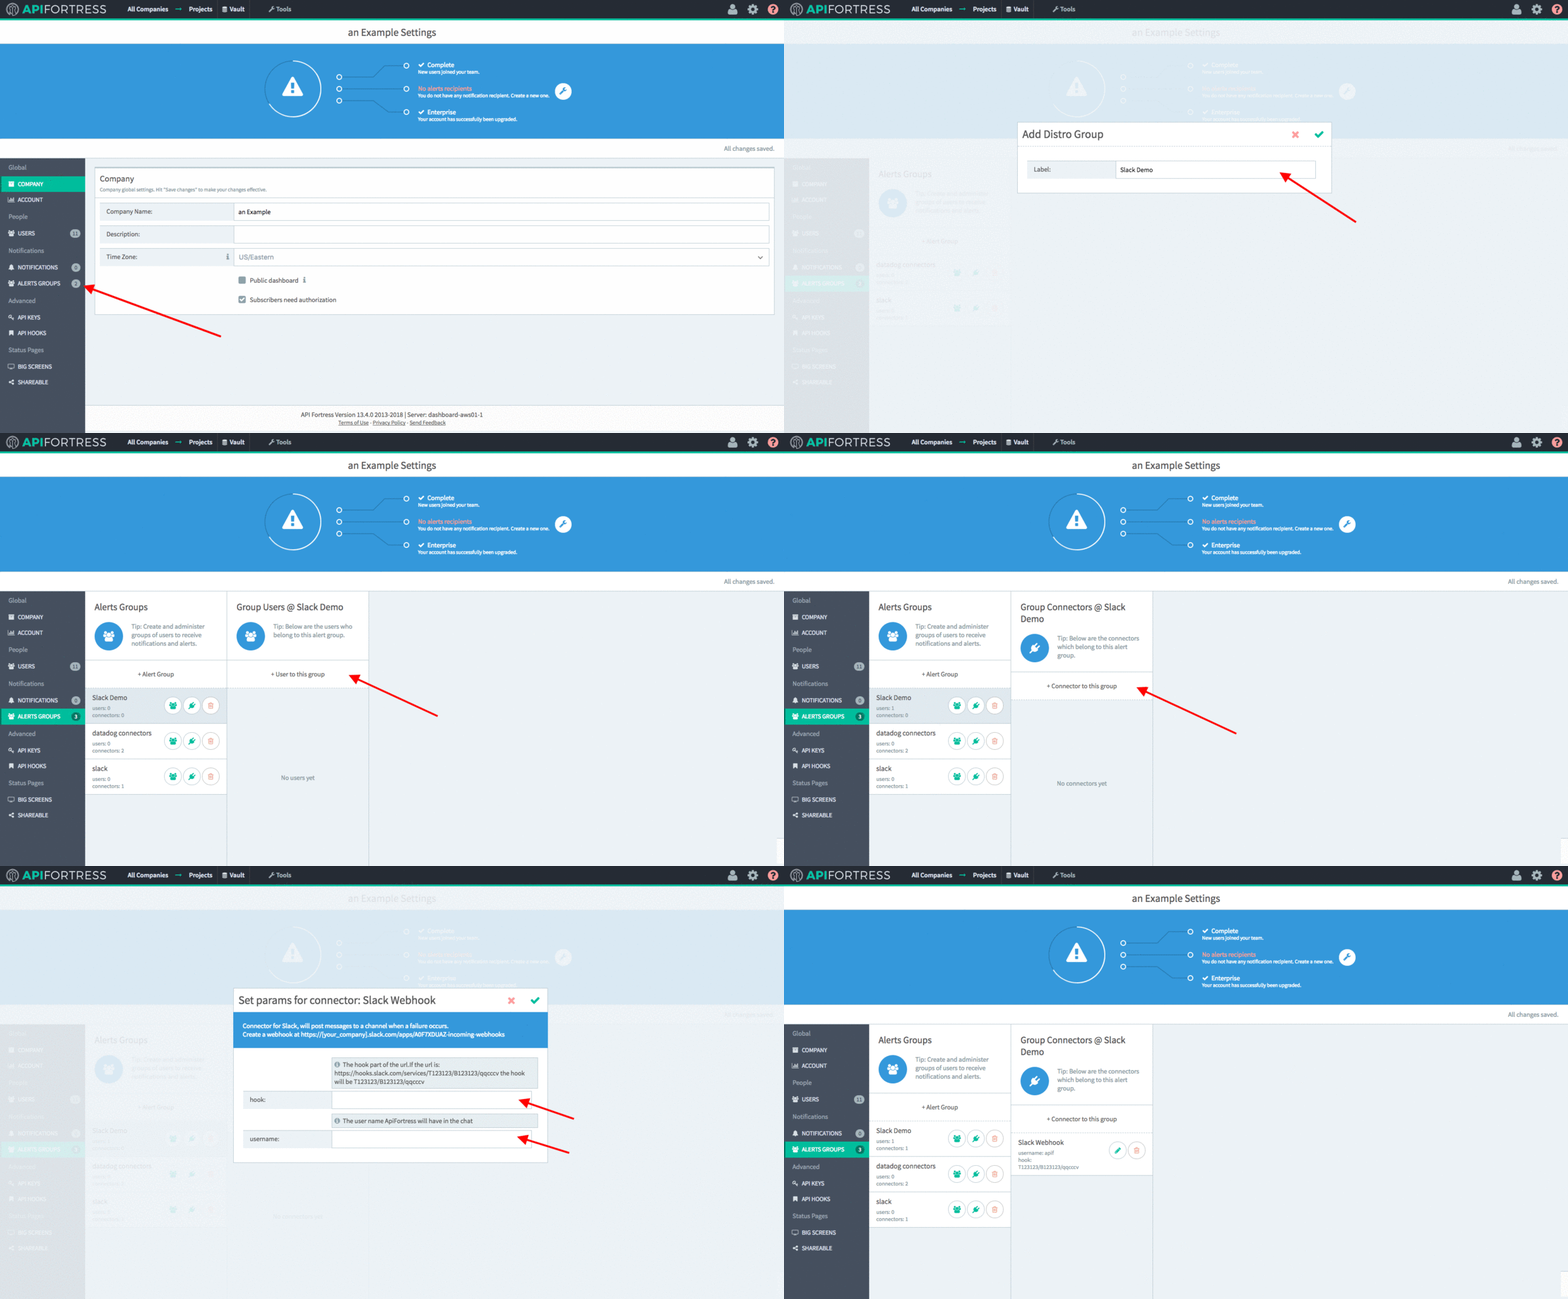
Connectors – Slack

**To learn how to import a connector click here** Here is a quick guide to setting up Slack integration.
  1. FIRST! Get your Slack webhook. This is the link to generate a new one.
  2. In API Fortress go to company settings (top right gear icon)
  3. Click on Alert Groups
  4. Create a new Alert Group (if necessary)
  5. Add recipients to the Alert Group (if necessary)
  6. Click on the Connectors icon
  7. Choose Slack from the dropdown
  8. Add your Slack webhook Important! The full URL is https://hooks.slack.com/services/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, Then only part that you need to copy in comes after /services/ i.e. T08QUN1SR/B08QUGM8T/qVvPDLTa3OtvskrpyKBTfhvI
notifications - alert group and slack