The vault allows you to store variables and code snippets that can be used across an entire project.
Explainer Video
The link to access the Vault is at the top of the window, as shown below:
The first column shows all of the projects of a company and the Global Vault. Code snippets and variables saved in a specific project are only available in that project. They are not available across projects. If a variable and/or code snippet needs to be available in more projects within the company, they must be saved to the Global Vault. The Global Vault has been built to make variables and code snippets available across all of the projects in a company.
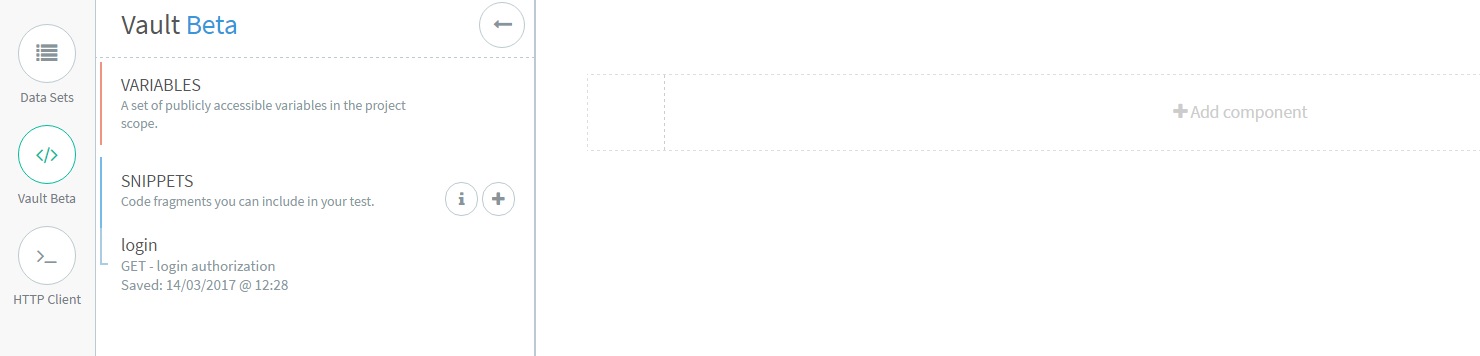
In the snippet section, you will find all of the snippets you have created using the Composer (see here for more details). Once you have saved the snippet, from the composer, you can choose whether you want to save it and make it available only for the current project or for all the projects within the company by saving it in the Global Vault. If you already have a snippet saved for the current project but you need to make it available across all projects, you can easily export them from the current project to the Global Vault by using the import/export feature.
A good use case for the snippets feature is an authentication flow; you don’t need or want to rewrite all of the steps in every test. You just need to call the snippet that contains the authentication snippet. Another good example is integration testing, where you can reuse various tests to create one larger flow.
In the variable section, you can define variables that will be part of the scope of the tests.
If a variable with the same name is defined within the test, it will override the one defined in the Vault. For identical variable names in the global vault and in the project vault, the latter will have higher priority.
Defining a variable in the Vault is helpful when you need to use the same variable across multiple tests. This way, you don’t need to rewrite it every time. For example, a password could be saved as a variable and reused in multiple places.
Just like code snippets, if you need a variable available across multiple projects, you can save it in the Global Vault or import it directly from another project.Additionally, you can import variables from Postman. See here for more details.When you open the Vault tab in the Composer, global snippets and variables will be highlighted for ease of identification.
Here is a quick example on how the Vault can be used in a test.
The Authentication Snippet
First, create a new test. Go to the test list, click +New Test, enter the test name and click Compose. Once the composer appears, simply enter the call. For this example, we will add a GET request that logs in using a Basic authentication:
Consider a scenario where this login will be required for all the endpoints we have to test. It makes sense for this call to be stored in the Vault.
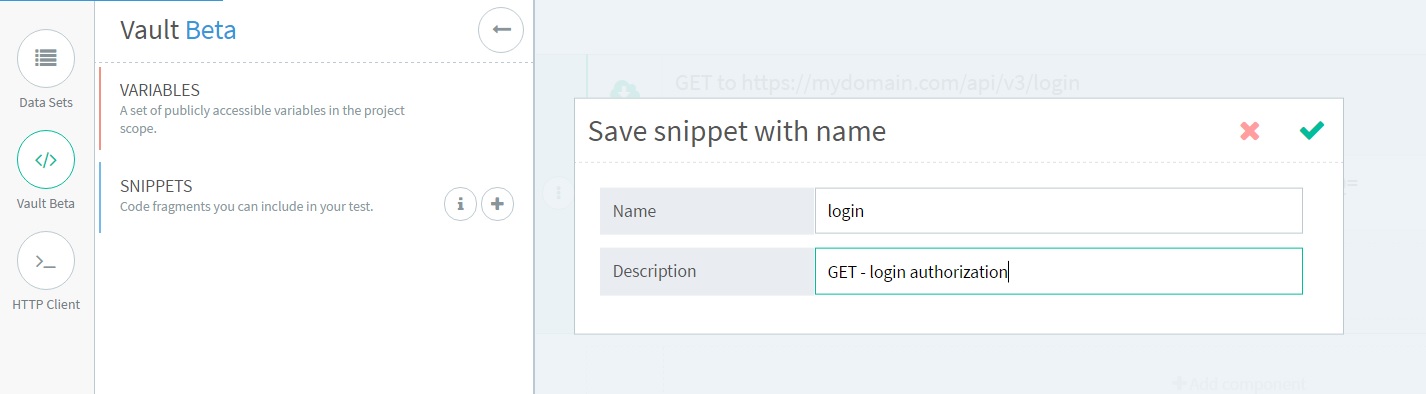
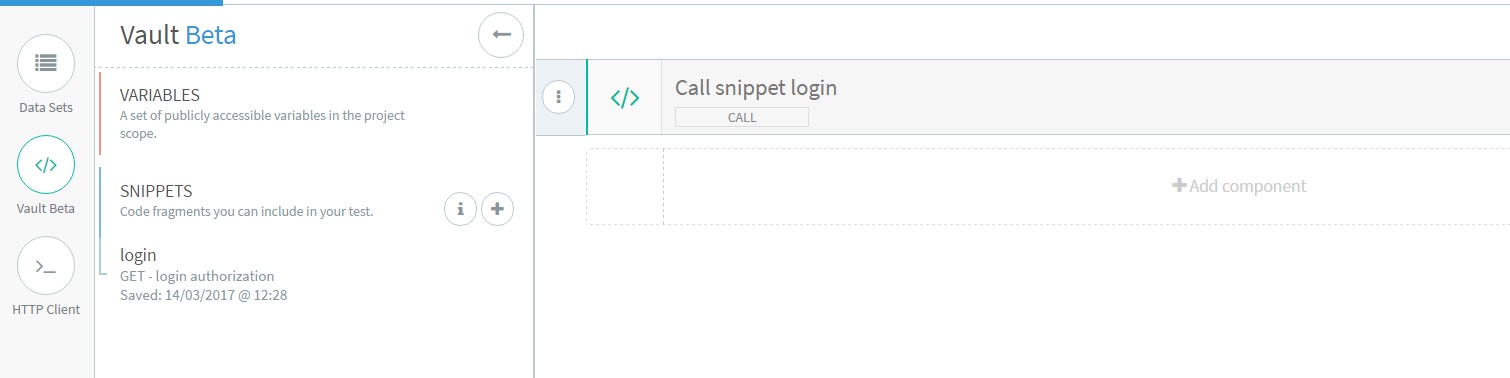
Select the GET, open the Vault panel and click the + button. Enter a name and description.
Now you can proceed with creating the test. Once done, you may create other tests for your API. Once again, click +New Test. Once you are in the Composer, you can open the Vault panel and select the snippet saved in the previous step.To use the login call in the new test, just click the down arrow button next to the snippet, and it will be added into the test.Now you can call the endpoint that you want to test. Let’s use the search endpoint. Pass the ”ID” variable as a query parameter. The authorization token that was parameterized after the login call will be passed in as well:Now, consider the case where we want to use the same ”ID” in multiple tests. Don’t set the ID as a global param or an input set. Add it to the vault instead. Save the test and exit from the Composer. Click on Vault in the header and add the variable ”ID” here:
Once done, go back to the test and check that the variable is available in the Vault panel:
If you launch the test, you can see that the ”ID” will be replaced with the value you have set in the Vault.
Integration testing is a core feature of the API Fortress platform. Watch our video about how to write an Integration Test. Follow along with the demo video in the API Fortress platform here: Quick Integration Demo.Integration testing is critical to creating a strong API testing strategy. Microservices are built to work together, and an integration test allows you to create end-to-end tests that resemble common user flows. While only testing individual endpoints is a good start, this method will miss a large number of problems that occur when all services need to work together.Let’s consider an example that only a proper integration test could solve: Company A has an authentication server. This server, when given the proper user credentials, returns an authentication token. This token is required for all other calls throughout the platform’s API environment. Without this first API call, none of the other API calls can work. API Fortress makes it easy to validate the integration, capturing the entire API flow from end to end.
Getting Our Token
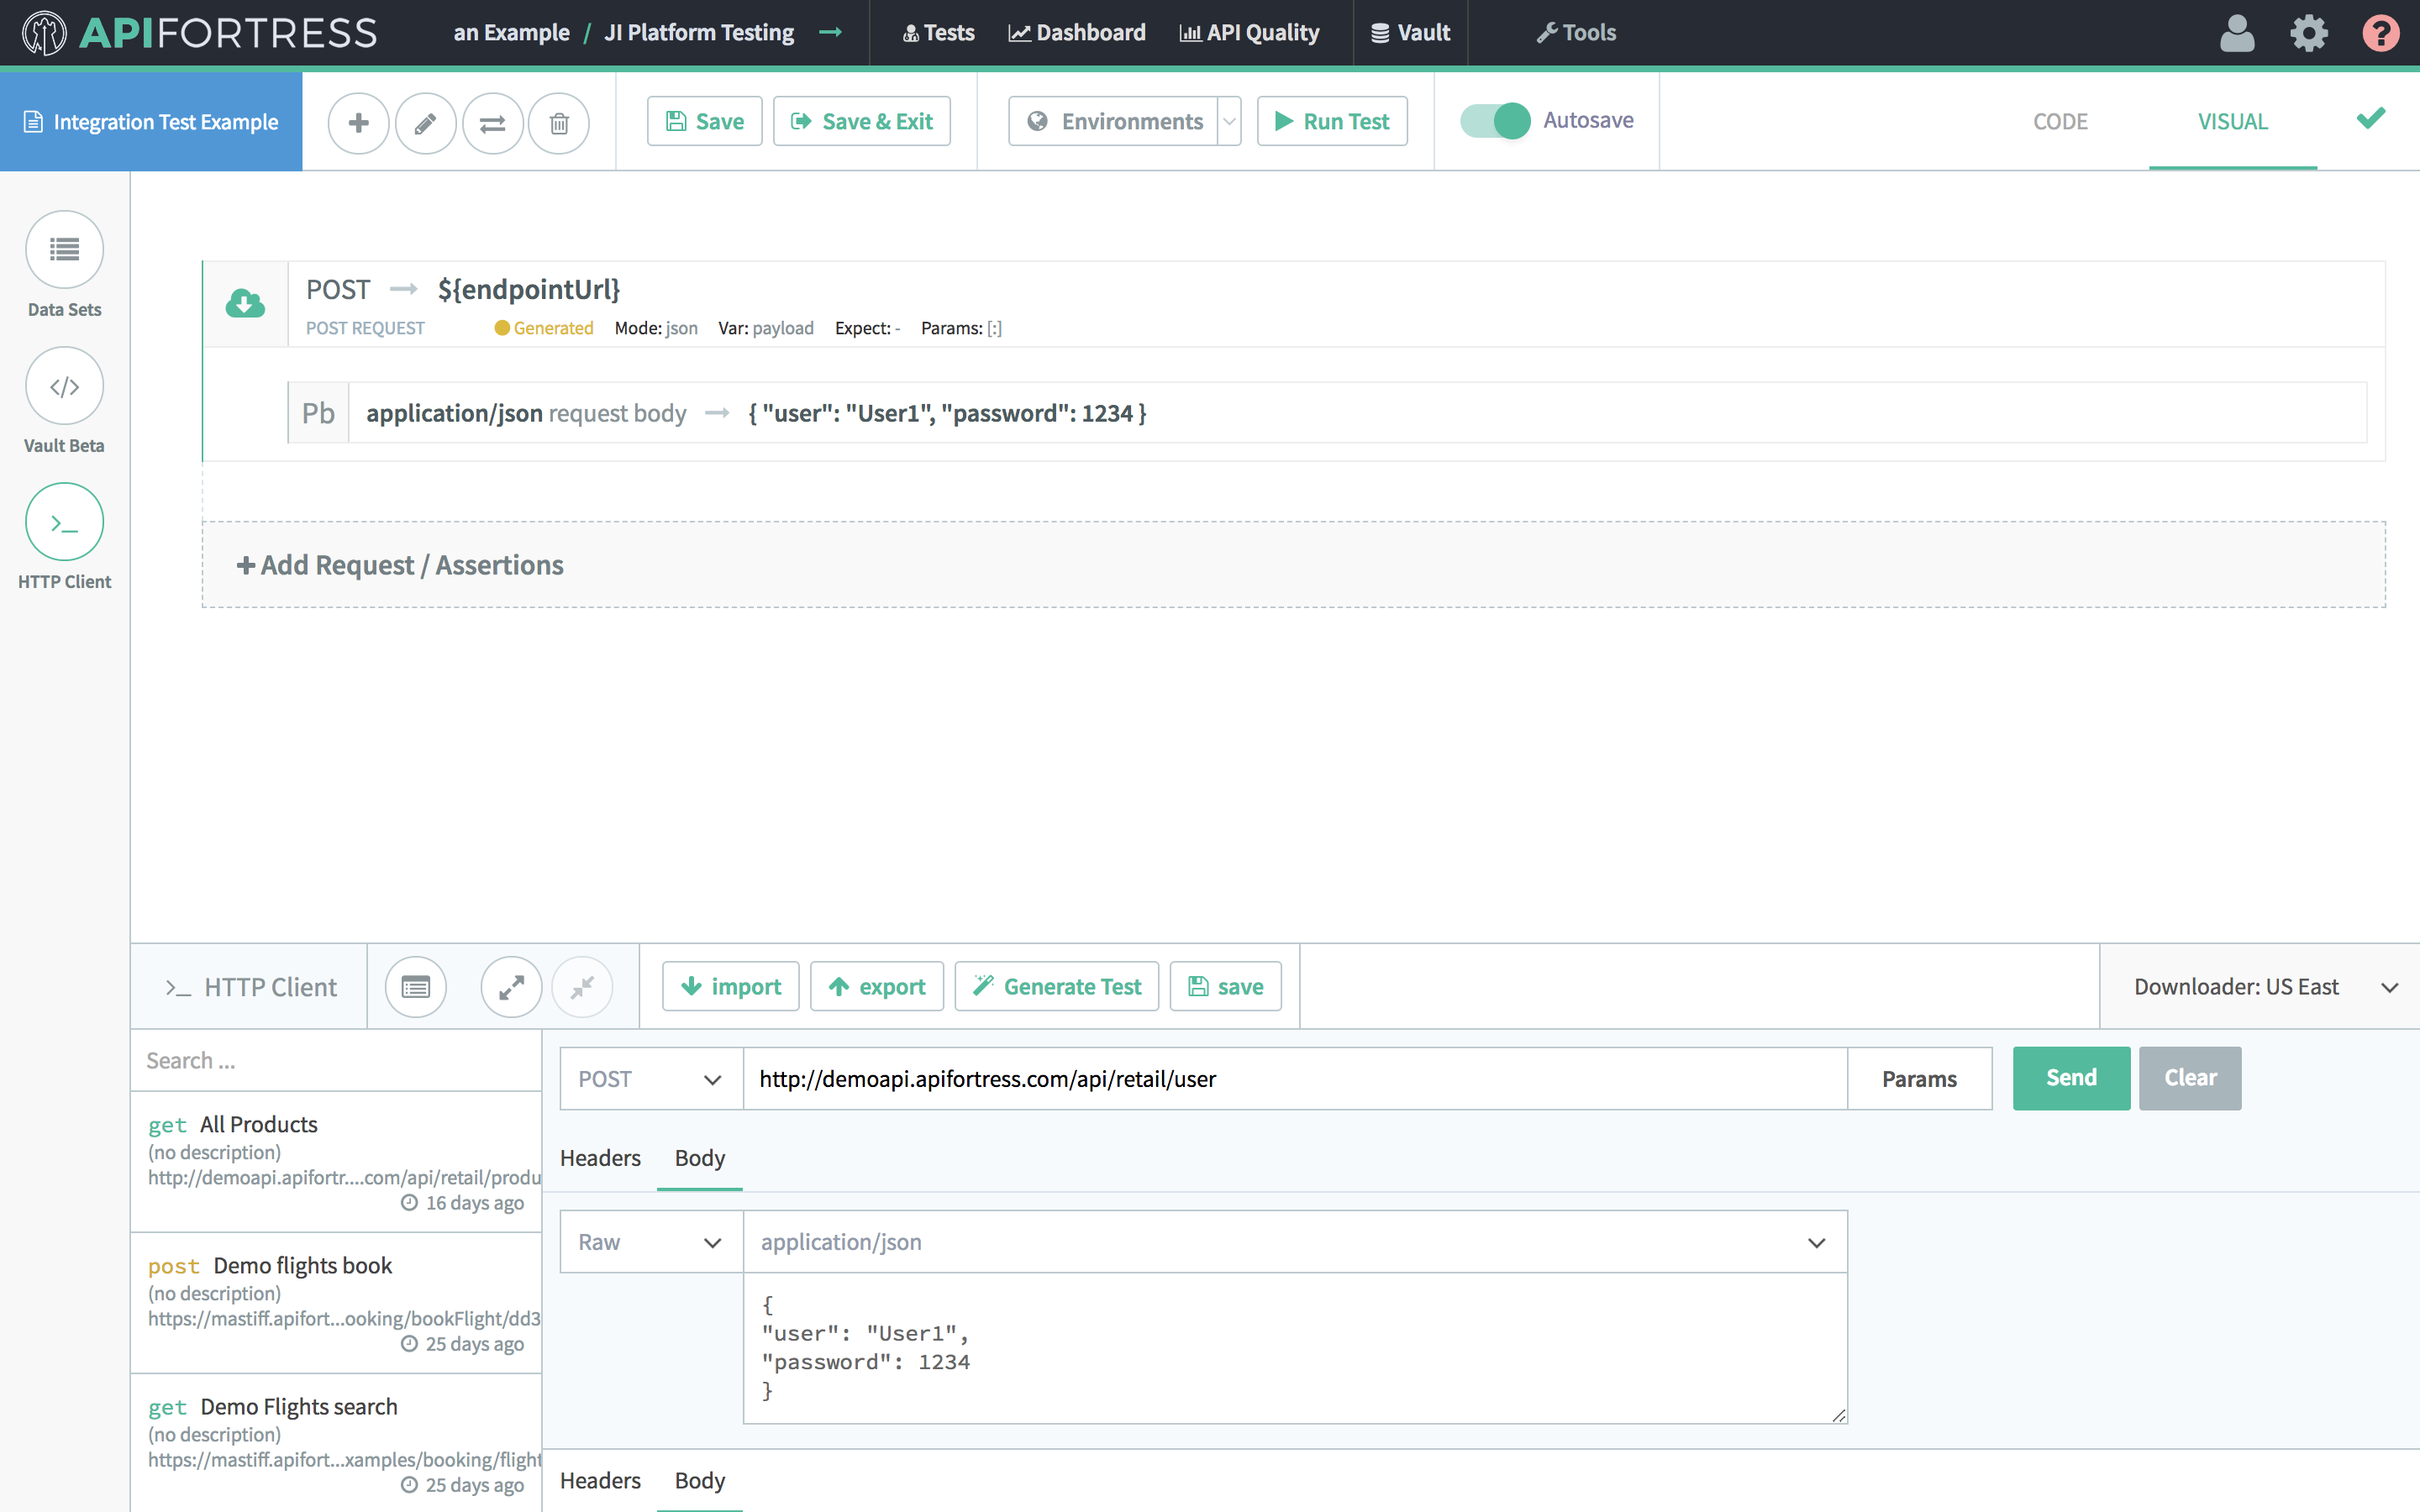
First, we need to make our POST call to the authorization server.
In this case, the request body is the username and password. Given proper credentials, the authentication server will return a user token.Next, we need to use this token to make further calls to the application.
Setting a Variable
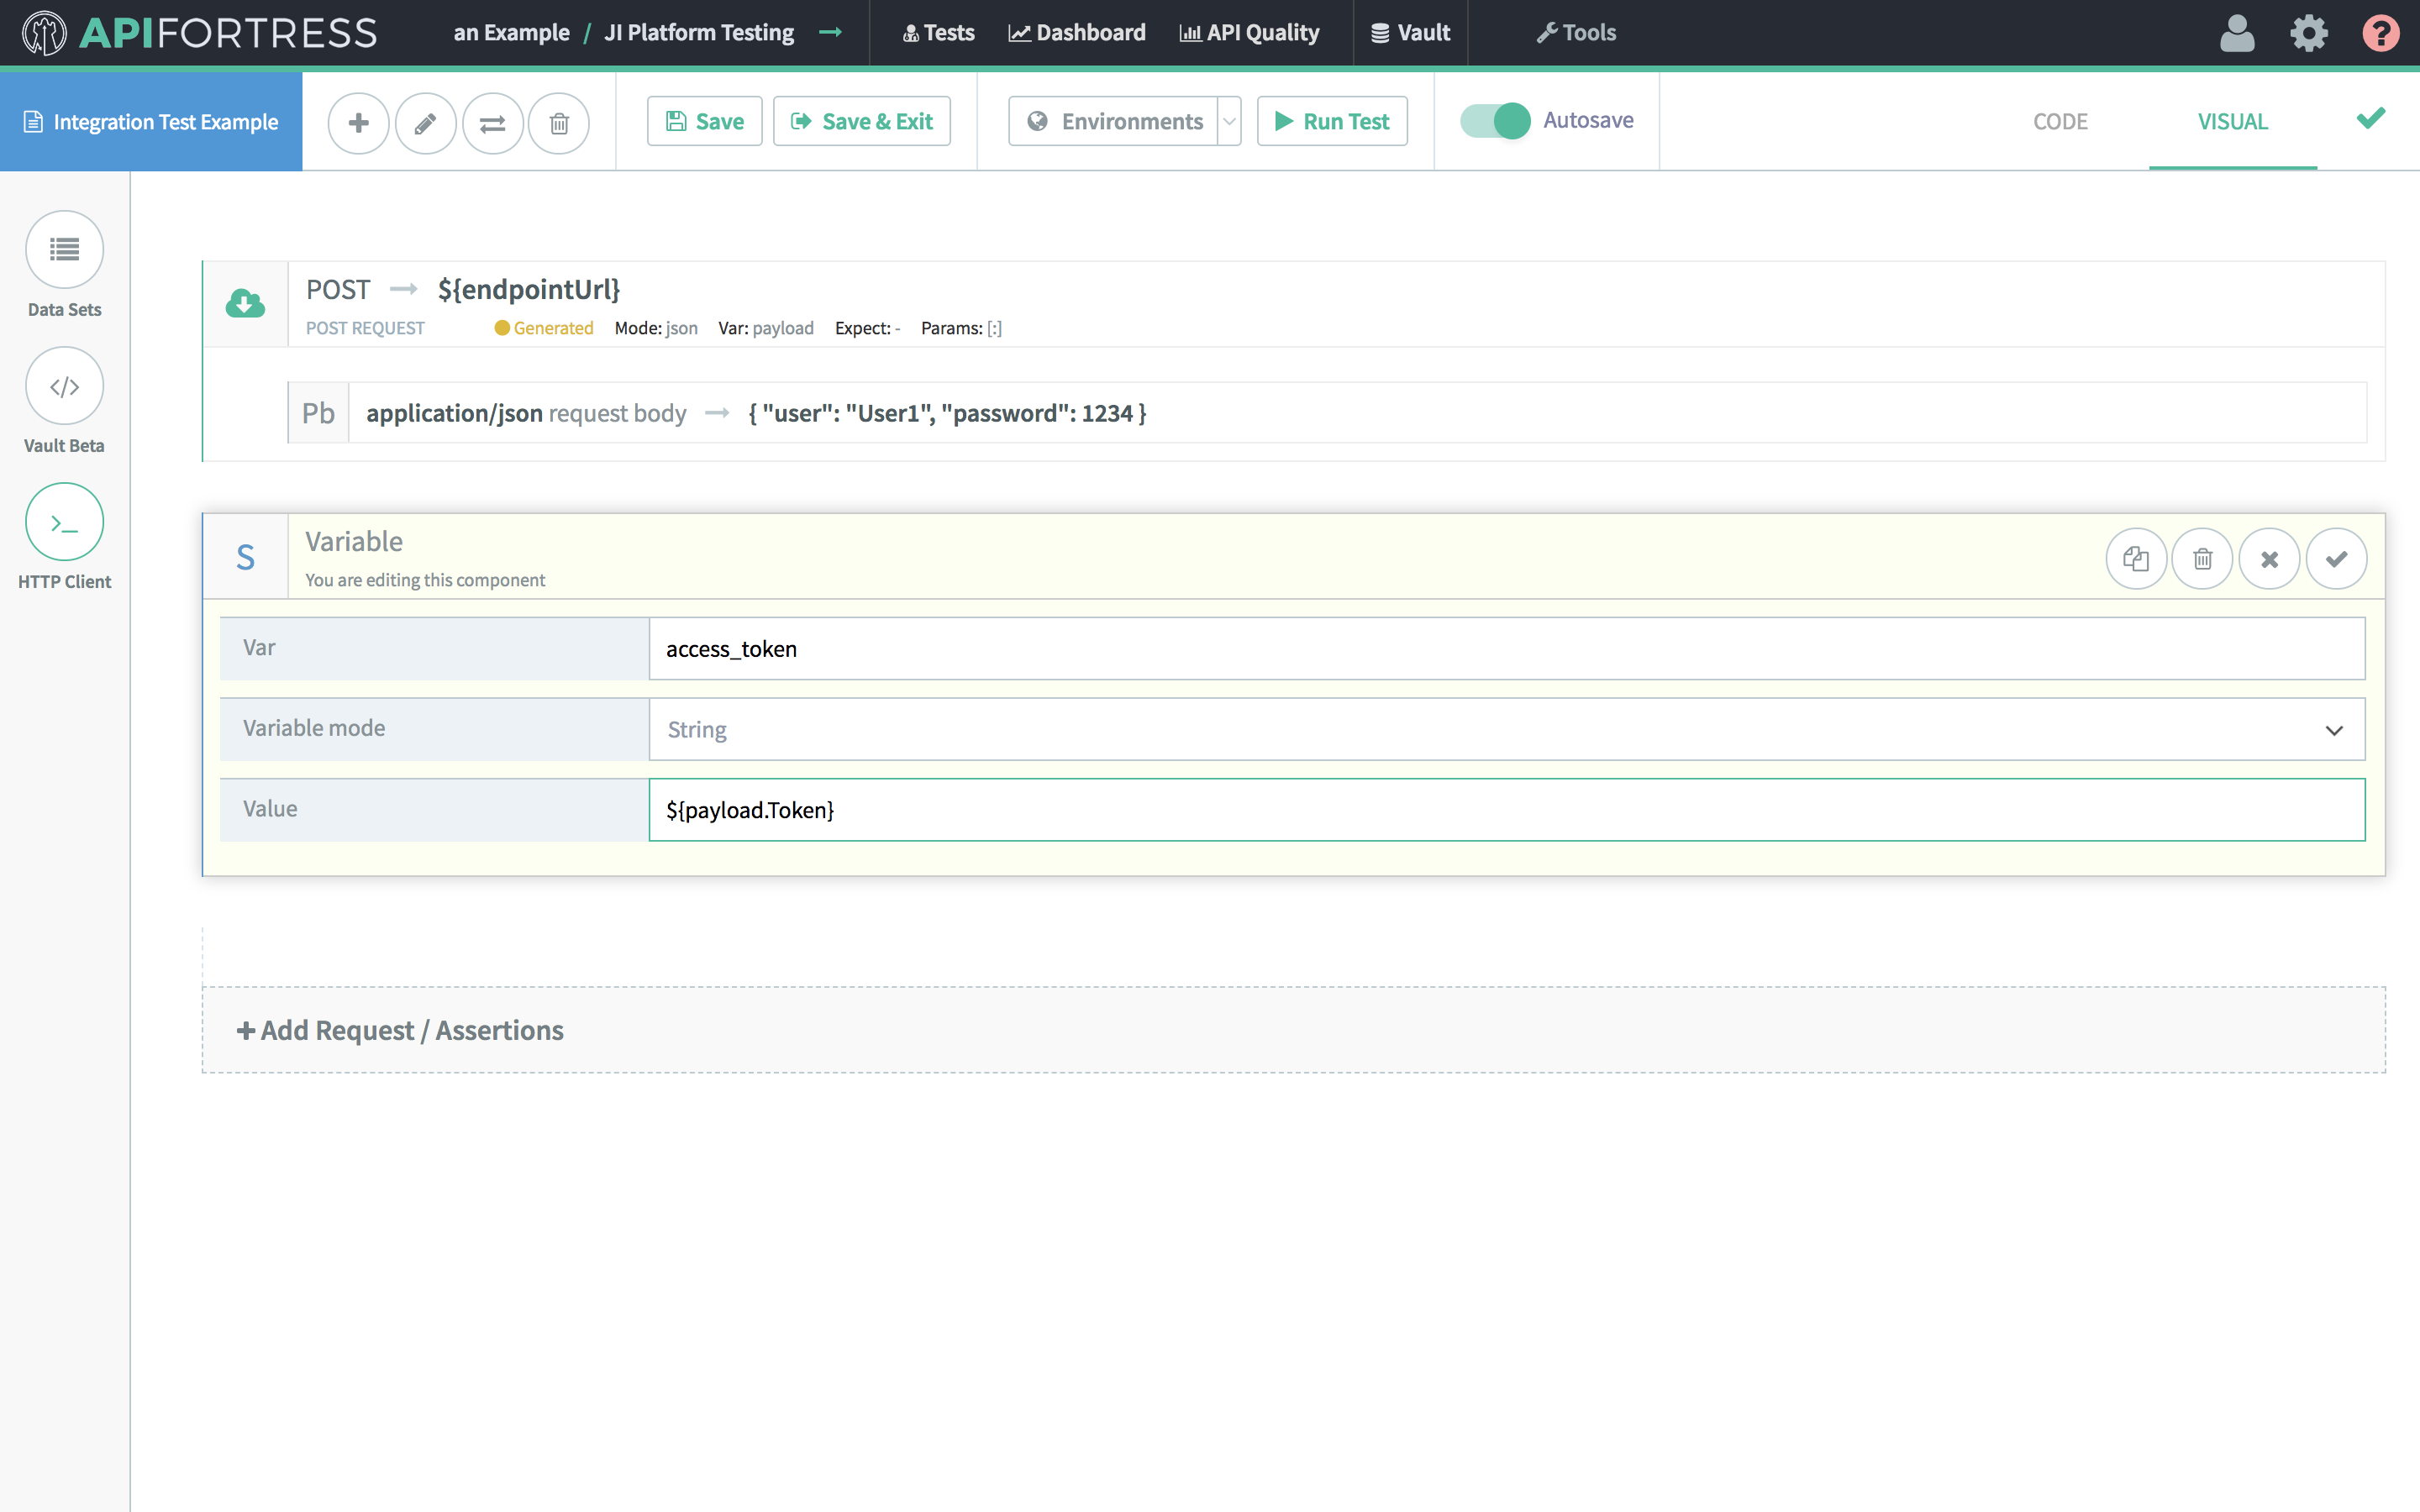
First, we need to assign the token to a variable. Variables are used to store data temporarily for a test. You can use the API Fortress Vault for more permanent variables (learn more i about variables here). We do this so we don’t have to manually invoke or set a variable every time it is needed. Next, add a “Set” component, and enter the information as seen in the image below.
Now, call the variable “access_token” and assign the value to ${payload.Token}. The response body from the original post call was saved to a variable called “payload.” The key to access the token is named “Token,” so you may find it by calling “payloadToken”. Be sure to wrap this all in ${} so that API Fortress knows to interpret what’s between the brackets instead of using it literally.
Making Follow-up Calls
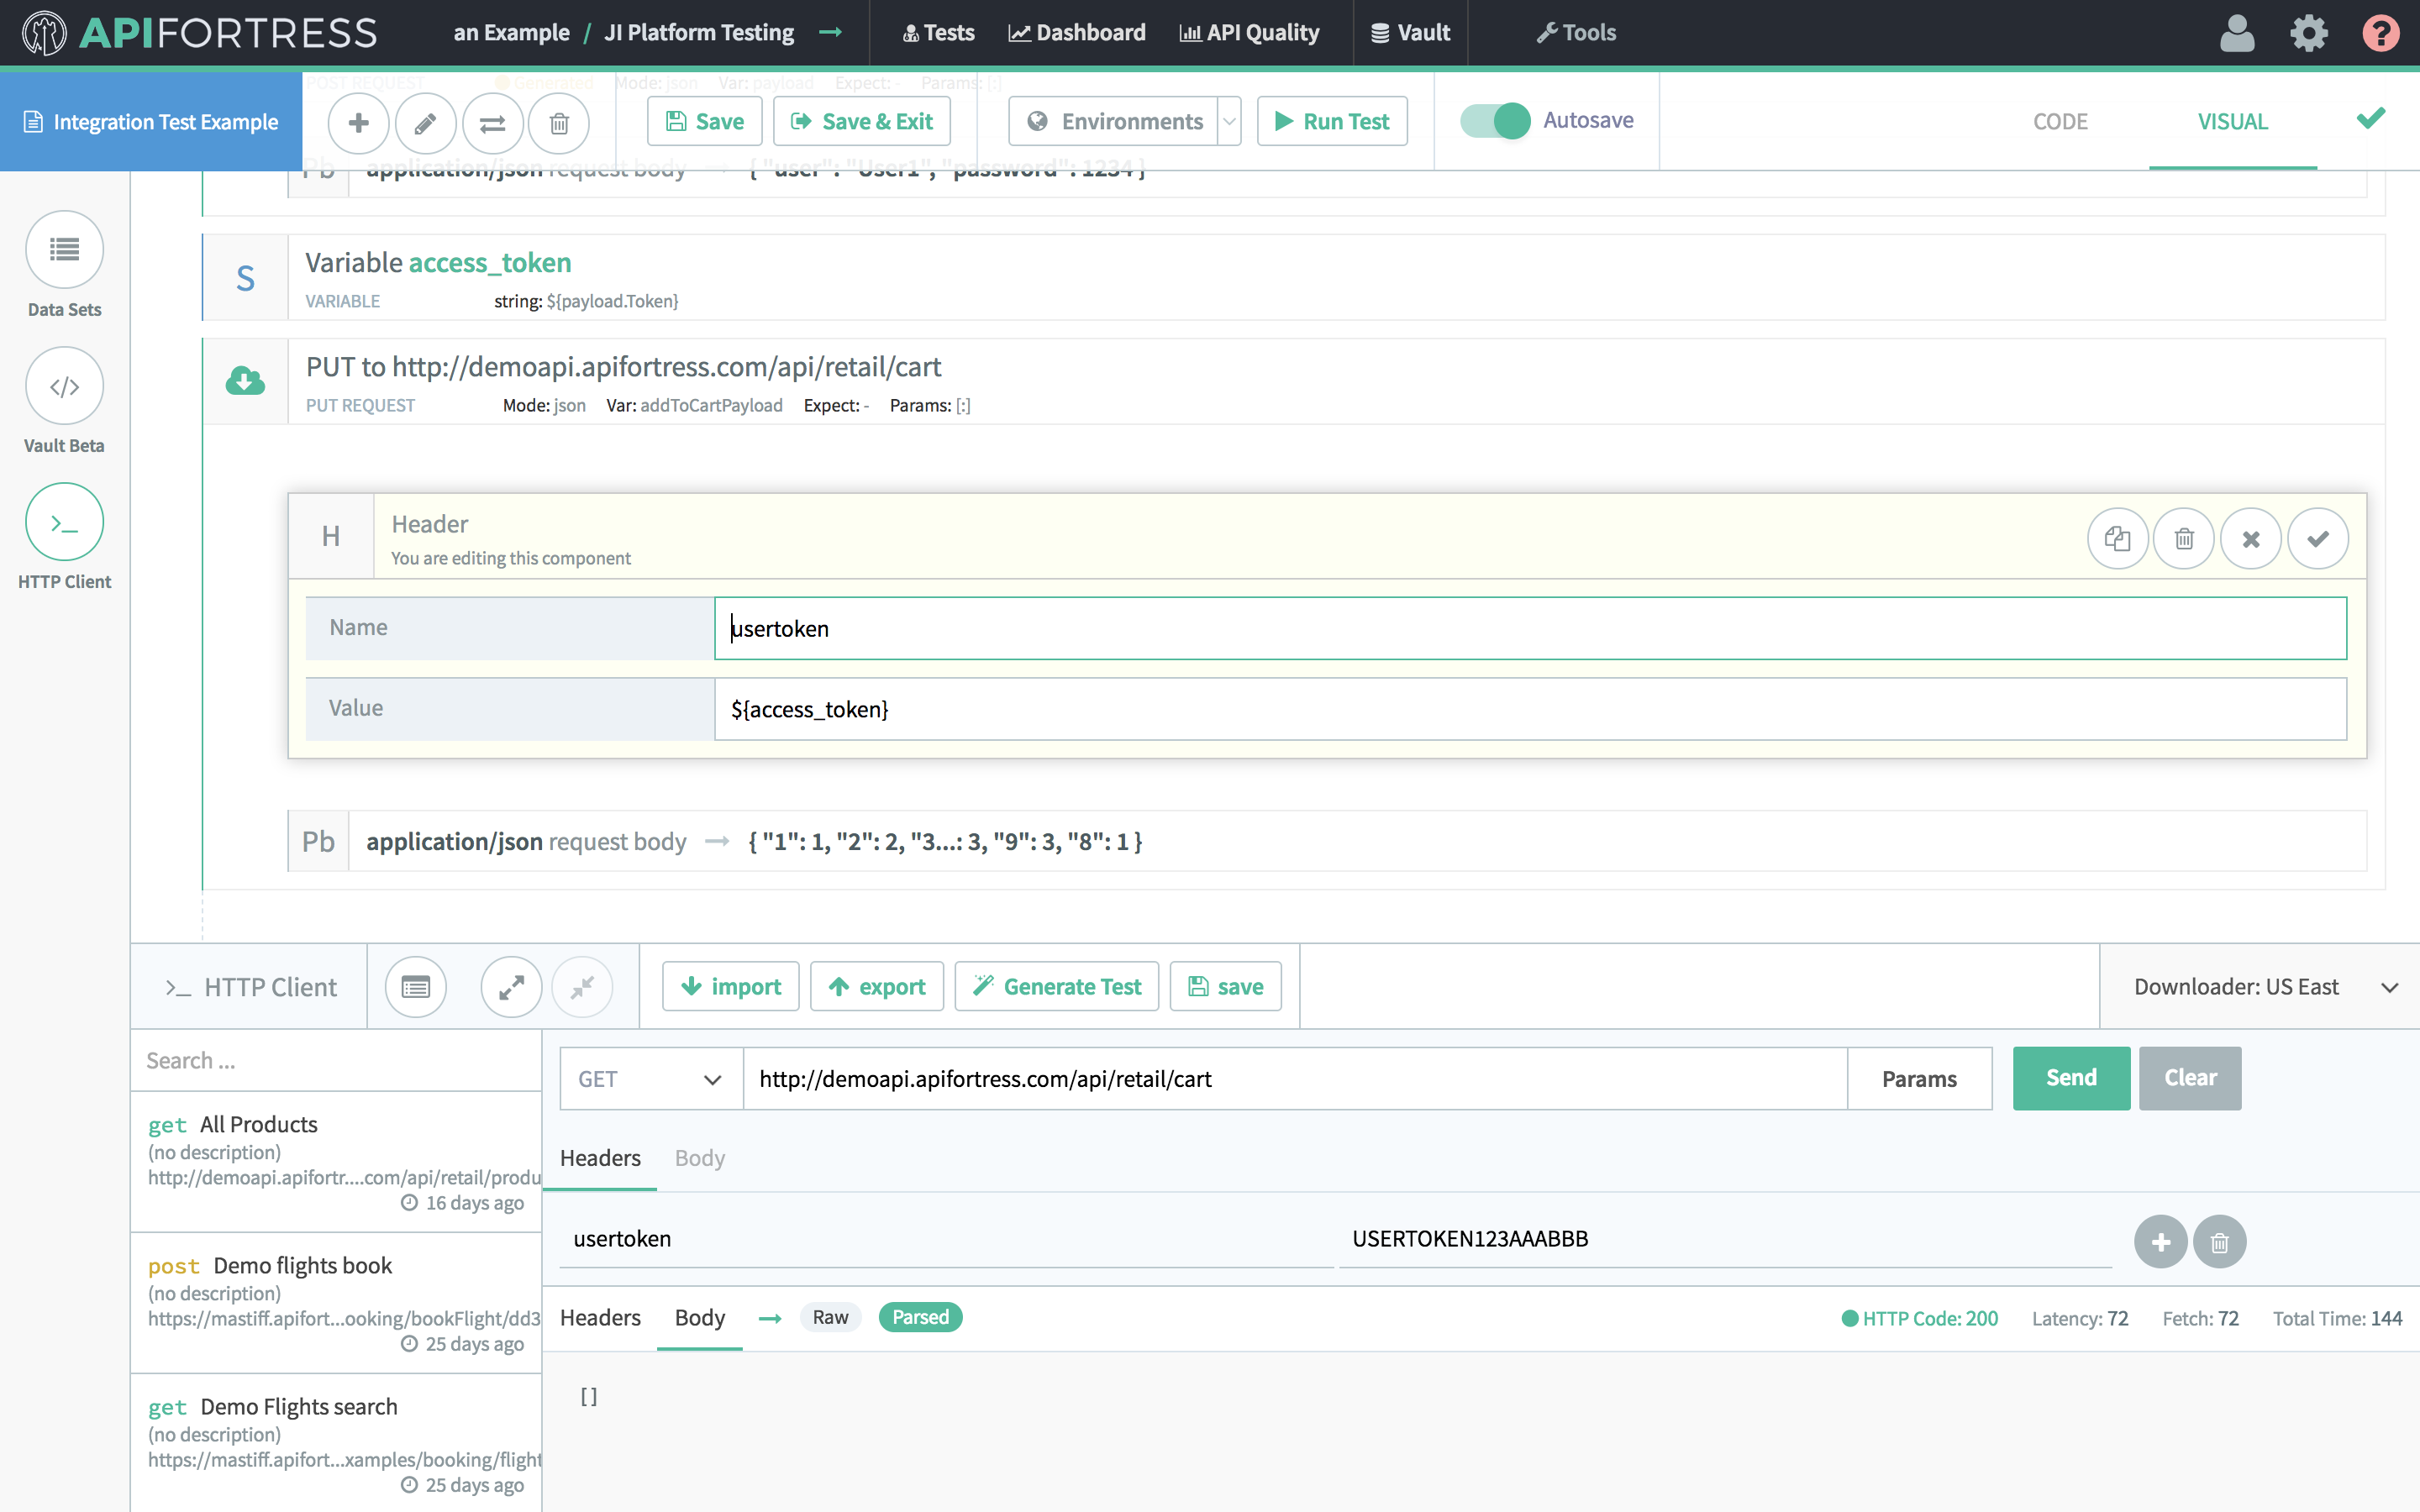
We’re nearly there. We’ve made our authentication POST call, and then we’ve saved the token to a dynamic variable named “access_token.” Now it is time for the third, and for this example, final step.This API has a cart function that requires a user token in order to add items to a cart or view items currently in the cart. Use the access token granted by the authentication server to add items to a cart.Use a PUT request to the cart endpoint to update the cart. Set the “usertoken” header to ${access_token}. This is the same notation as before. The request body is a JSON object that the server will recognize as items and quantities. That part isn’t important for the purposes of this demonstration.
Why?
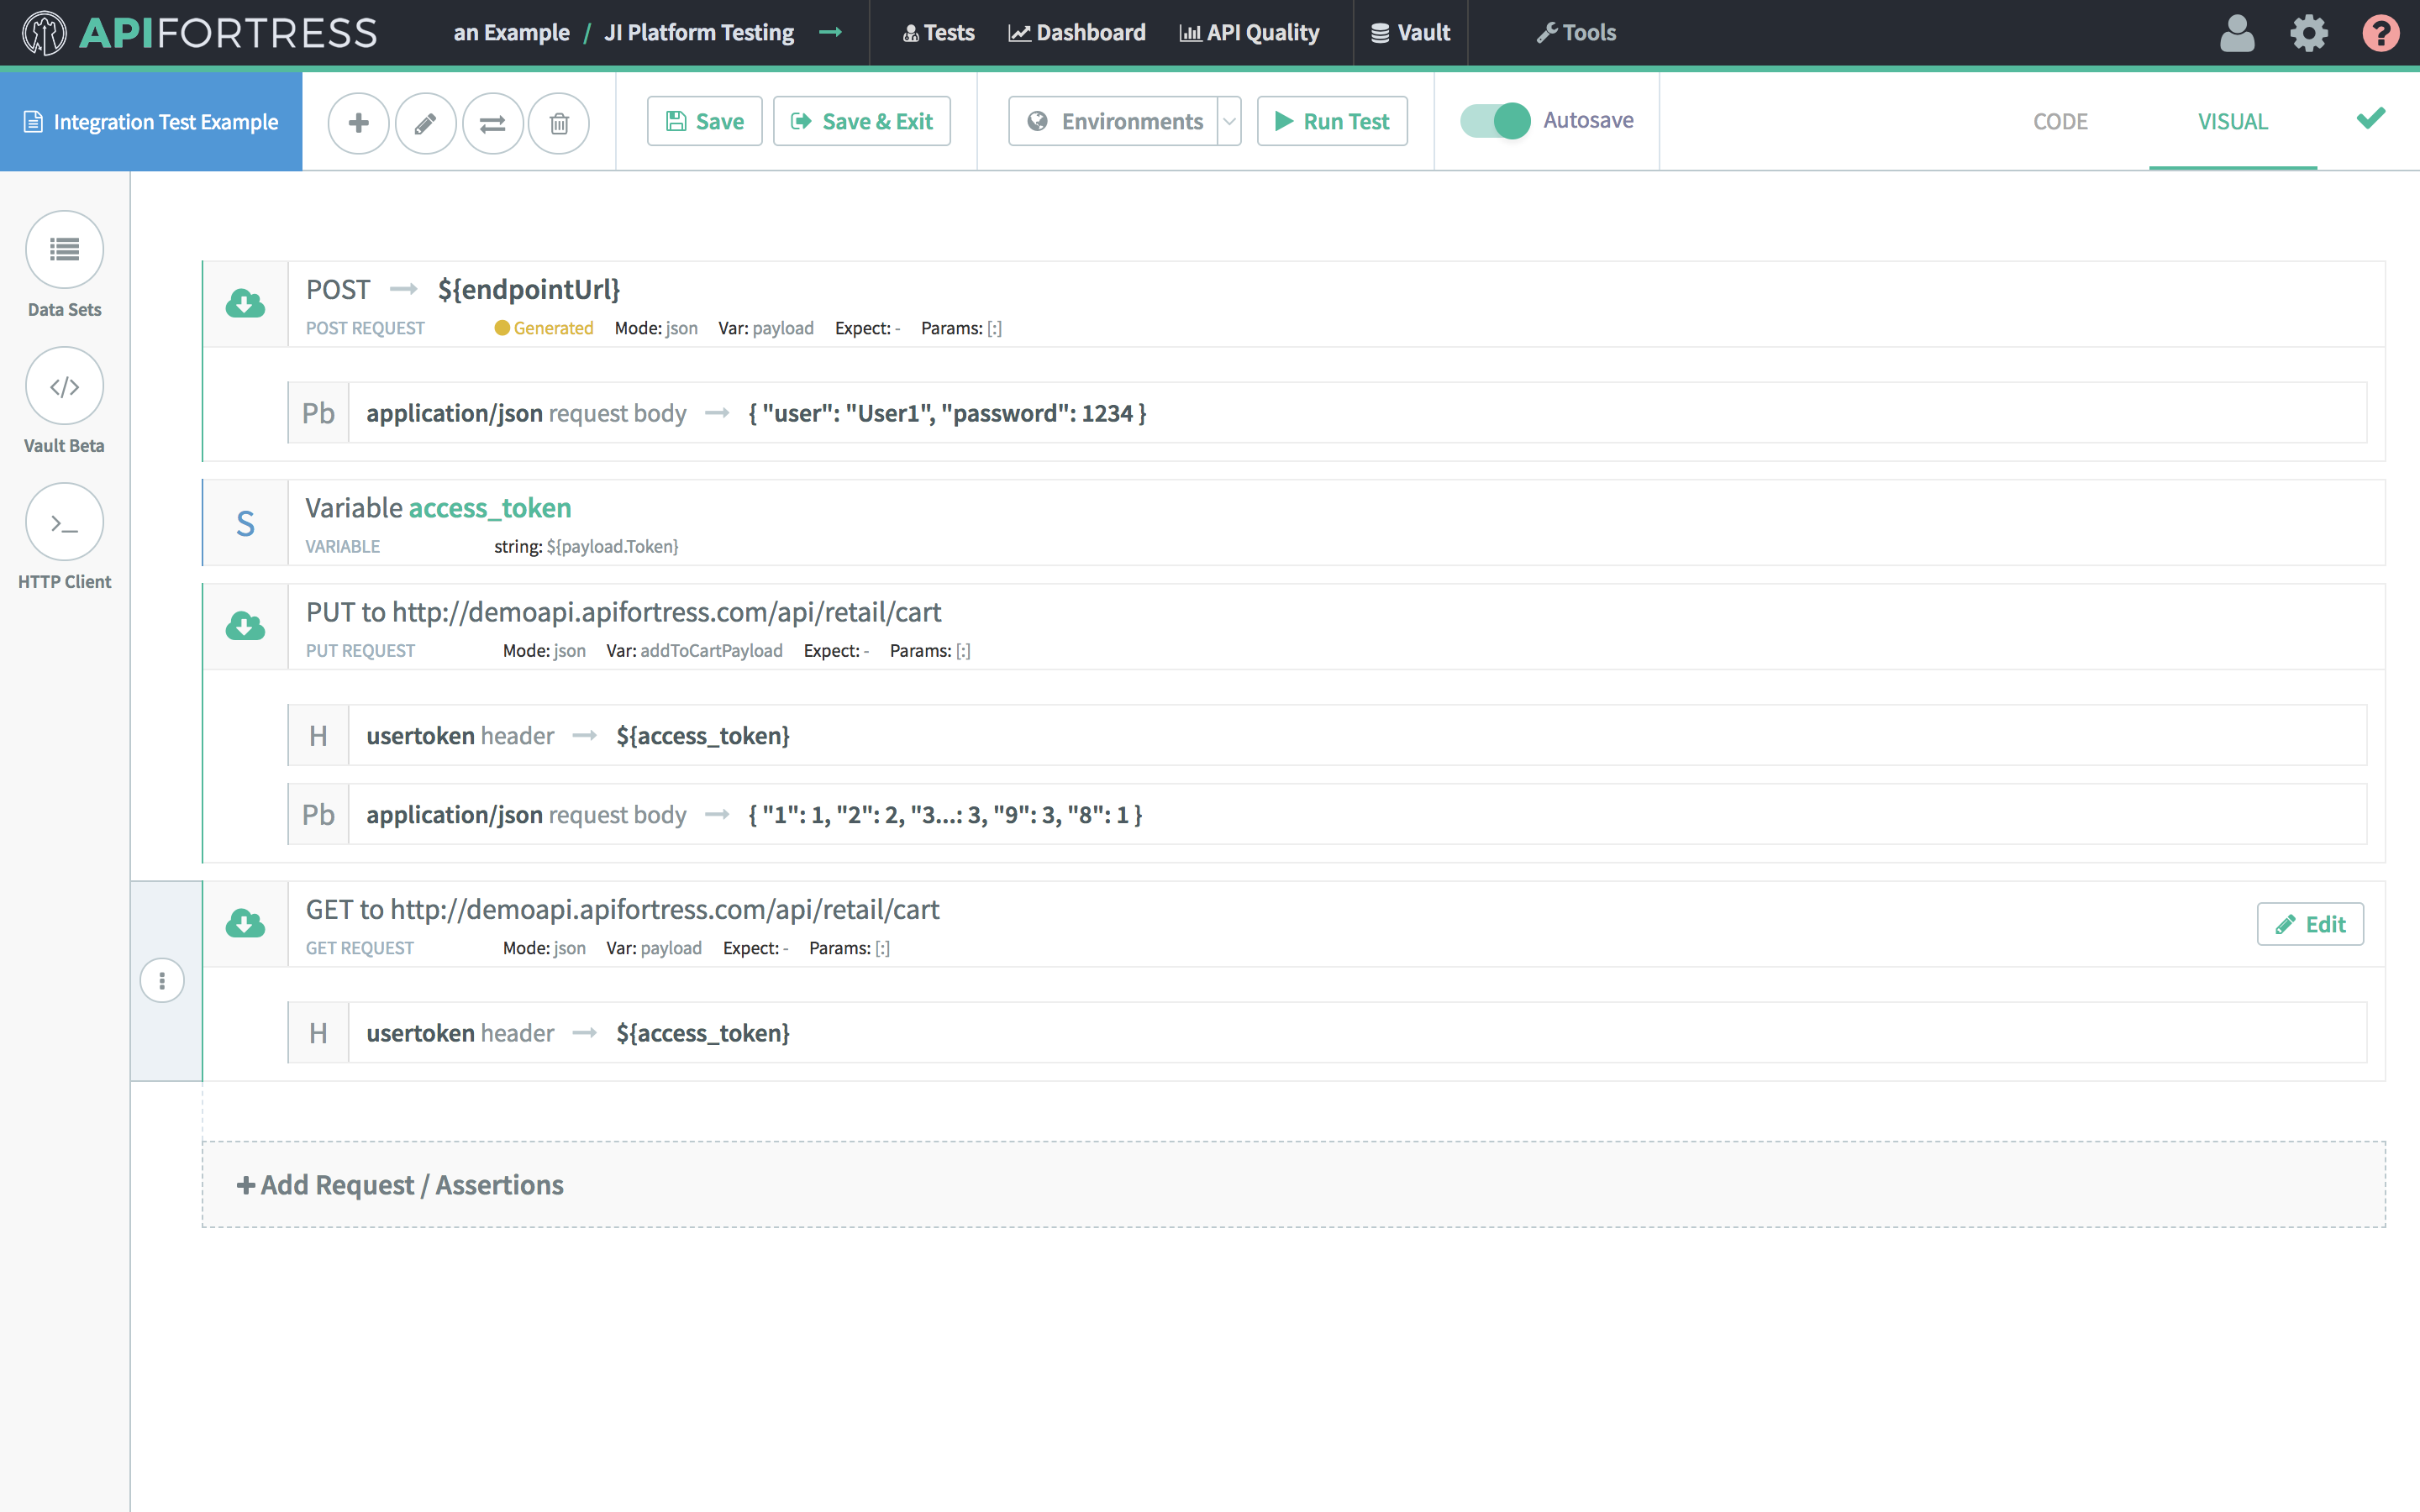
As we stated at the start, it is imperative to not just exercise endpoints, but validate that an entire series of microservices are working. It’s best to do that by writing tests that emulate common and uncommon user flows. A critical part of that work involves creating reusable variables to allow the test to work at any time, with any data.By making a request for a fresh token at the beginning of the sequence, and then assigning it to a variable, you will know that any time you run this test, you’re doing so with a valid access token, which is automatically being passed to all follow-up calls.Feel free to keep using the same access token over and over as seen below.Please feel free to reach out to us should you have any questions, or take a look at the Examples project that contains other examples.
API Fortress Load Testing is more than stress testing: it’s functional load testing. Rather than simply overburdening a server with requests, API Fortress Load Testing directs properly formatted requests to the appropriate endpoints and records failures at an API endpoint level.
Step 1: Access Load Testing Control Panel
To access Load Testing from the main page. click on the “Tools” button, and then “Load Testing”.
Step 2: Create a Task
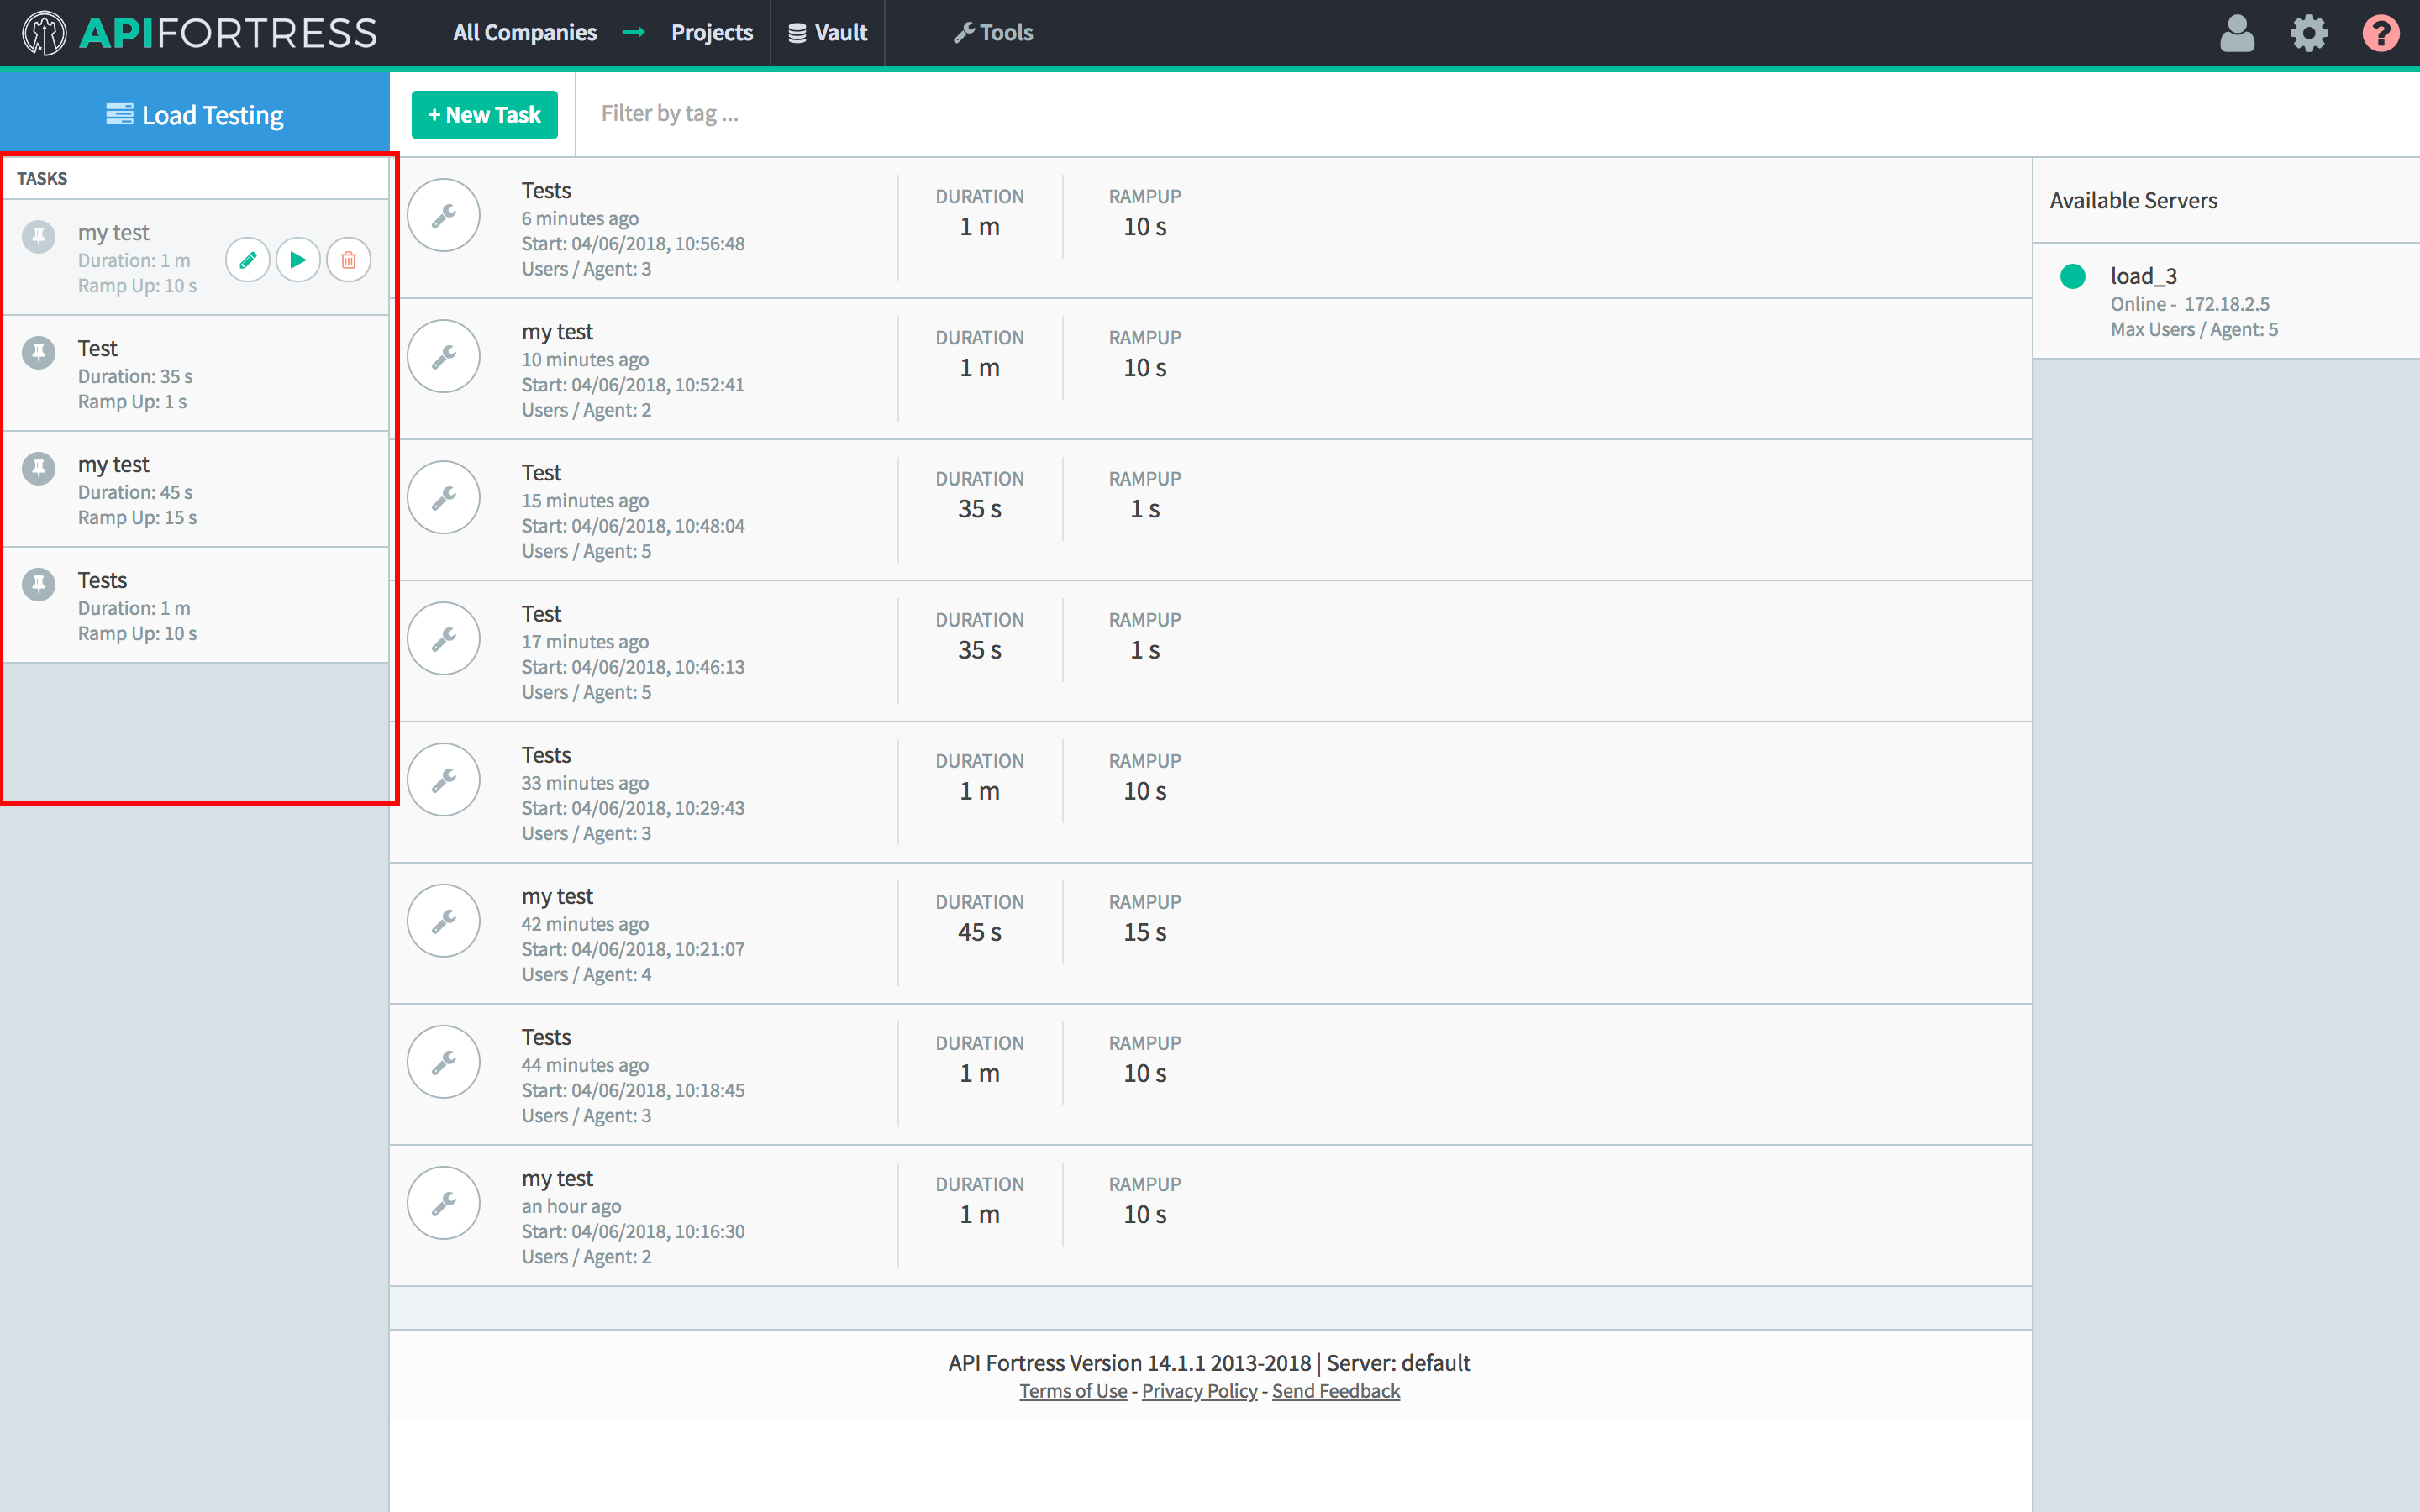
This is the main Load Testing screen. From here, you can create and run a new task. You can also run, modify or delete a saved task. To create a new task, click “+New Task”.The “Create New Task” screen allows you to set the parameters for the new test.
Name – The name that you give to the test.
Project – A drop-down menu of all of the projects available to your current Company (Team).
Test – Allows you to select a test from the selected project.
Tags – Allow you to tag the test for later use.
Duration – How long, in seconds or minutes, the test will last.
Ramp Up – A warm-up period, during which the load test will make requests of the server, but at a much lower rate.
Users/Agent – Defines how many users will be simulated per load testing agent.
Server – Allows you to select servers from the column on the right to behave as agents for the load test. Click the “Select” button to select a server.
Once you have successfully created a test, it will appear in the column on the left side of the screen.
Step 3: Run the Task
You can run the task by hovering over it and clicking the “Play” button. The test will now run at the top of the queue in the middle of the screen. Once it is complete, it will display a summary of the test performance.
In API Fortress, you do not have to be concerned with organizing variables in a hierarchy from global to local… why? Almost any string can be hardcoded or referenced as a variable in API Fortress. Hardcoding is fine as long as you’re building simple tests, however, it is advisable to parametrize some items when:
The number of tests is increasing
The complexity of tests is increasing
The number of tested environments is increasing
Most of the parametrization you will likely do relates to the HTTP request itself.
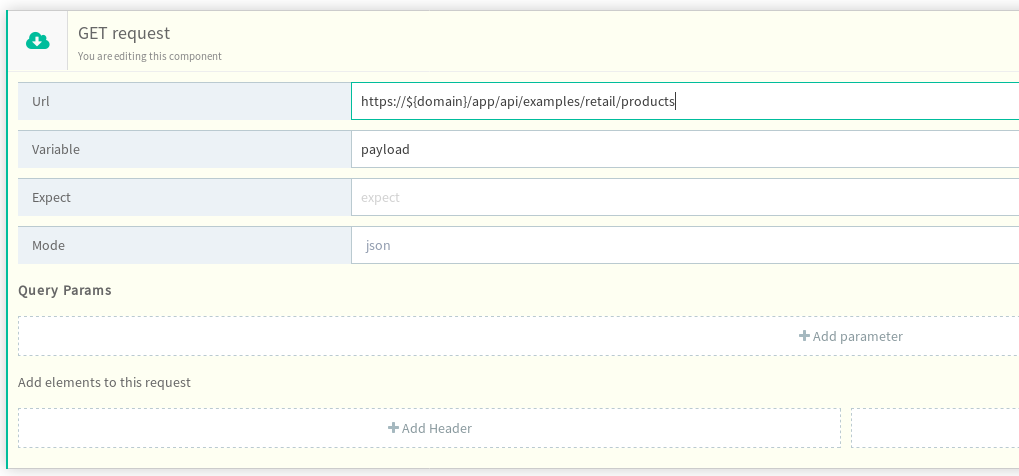
Using the Vault
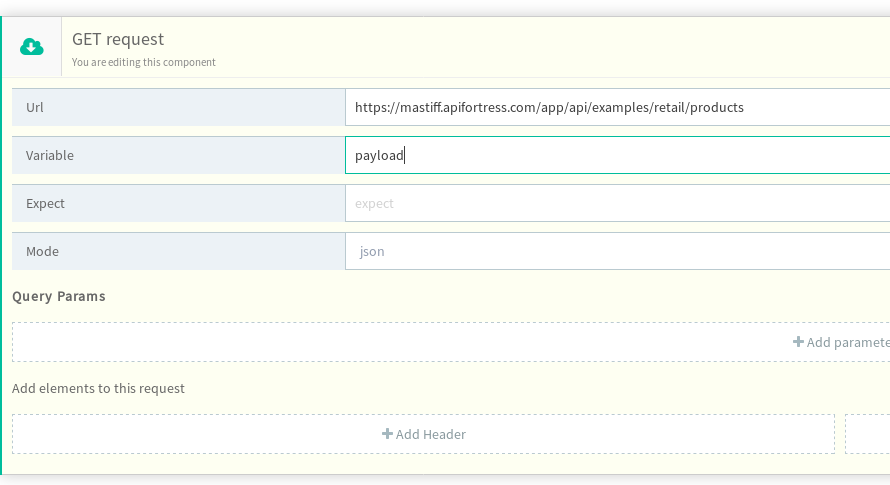
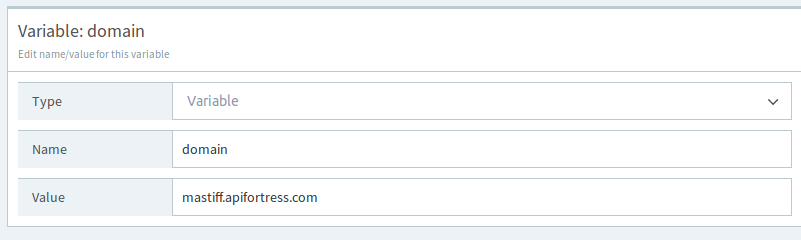
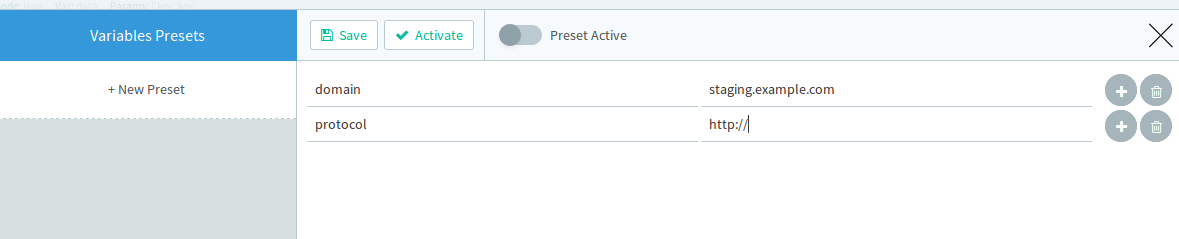
While the following variable is perfectly valid, it may become extremely painful to update tens or hundreds of tests if the domain changes.Alternatively, you may use the API Fortress Vault to store domain names to solve this problem. Simply add a “domain” variable in your vault as follows:And then edit the GET like this:In this way, you can eliminate duplicate tasks by simply editing the vault variable to instantly update all tests.
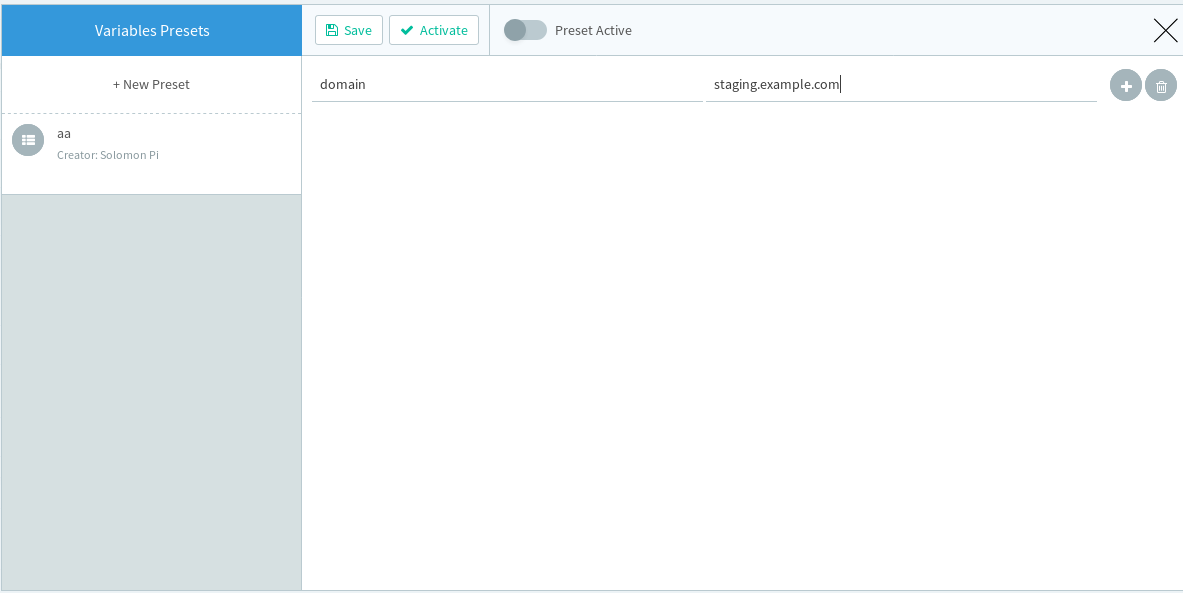
Using the Environments
Once a domain is parametrized, you may override a variable, if needed.By activating a preset in the environments section, you will be able to hit a different domain in the current session without actually changing the test as in the following:The same selection can be performed while creating a schedule to create specific runs hitting specific environments.
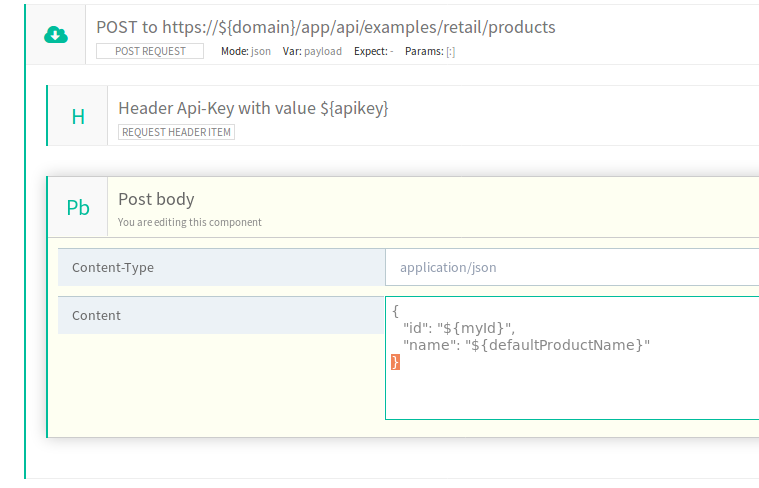
In Request Bodies
Variables are not only bound to URLs. Request bodies can also be handled like “templates” when needed, incorporating variables as in:
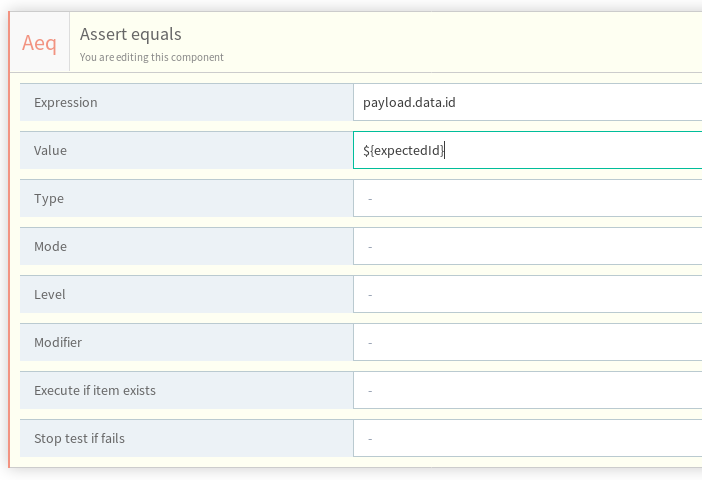
And Basically Anywhere
Reference variables almost anywhere that you need. Consider the following example assertion:Yes, we’re using variables as expected values.
However…
API Fortress provides the flexibility and freedom to combine the use of global, local, and hard coded variables as you want. In addition, API Fortress also provides helpful hints as you work with variables.
Review
Fill the vault with data that is project-centric: Domains, protocols, API keys. They are all fine. We discourage you from introducing test-specific variables because it would produce an overhead of information that would go unused most of the time.
Fill the globals/input set with test-specific variables, such as paths, IDs, dates, and serial numbers, etc.
Make sure that the “vault + globals/input set” add up to a complete variable scope for the test. In other words, the test should be able to run without further information.
Use the environments to change the values of the variable scope generated by the vault+global/input sets.
Don’t overdo things. Parametrize stuff that can actually change, and leave everything else as static strings. Variables are… well, variable, so an excessive and unnecessary use of variables leads to uncertainty and hard-to-track behaviors.
parametrization, pass values, pass variables, header variables, body variables
Gain a wide range of options to mix and match your test settings with our latest “Environments” features. Explore our variable containers from the lowest to the highest priority:Vault: Each project has a vault where variables and snippets are contained. Each vault is global to the project and its variables are injected during test execution.
Globals / Input set: They belong to each test and contain the variables that are needed by the test to perform its duties. Since these variables can be overridden to hit different environments, we generally suggest considering these variables as containers of the default scenario. If the variable has been previously declared in the vault, globals/input sets will win over the Vault.
Overrides: When an overridden variable is declared (using the API, the Scheduler or the Jenkins plugin) its value will be injected into the test when it’s executed. If the variable has already been declared in the vault or the globals/input set, it will be rewritten with the new value.
Environments and Pre-sets: They are collections of overrides. You can save an environment with a name and reuse it when running a test.
SET commands: The last item of the chain, the SET commands within a test will introduce a runtime variable. If a variable with that name has already been declared, it will be overwritten.
Suggested Usage
Tests should be as self-contained as possible and should host as much information as possible to perform its operations (with the help of the Vault). In other words, Vault + Globals / Input set should always generate a complete variable scope. Therefore, running a test without any environment selection should at least lead to no syntax or runtime errors.Environments and overrides should be used to change some of the values or introduce contextual values to hit a staging server instead of the production server, or run the test against a special product ID.
Double evaluation
All variable containers have a “double evaluation” capability, meaning that a variable declaration can actually reference another variable.
By doing so, you can decide to store the actual data in the variable container that best suits your approach, and then reference it.
In the following example, we are storing the actual domains in the Vault, deciding a default in the Globals, and overriding in the environment:
If run without environment selection or overrides, the test will hit the production domain. If run with the staging environment, the test will hit the staging domain.
The Environments will not know the actual domain, therefore the actual data management will happen within the Vault.
Known Issue: The double evaluation will not work on query params. As a workaround, in the test before performing the call, introduce a SET component to resolve the variable as in: <set var=”apikey” value=”${apikey}”/>
Environments loading
If you begin using environments heavily, you may soon realize that the integration using the APIF API (and any CI/CD plugin) may become a bit “unfriendly,” as lots of data will need to be copied around.For this reason, we have introduced a special override variable that allows you to ask API Fortress to load a specific environment when invoking a test using the API.The apif_env variable, passed as an override, will cause the system to load a specific environment.
Example:
apif_env: staging
This will load the “staging” environment and all its override variables.
Notes
As you become acquainted with the platform, you may be tempted to use all of these features at once before you’ve achieved sufficient expertise. We should warn you that you may not be prepared for the overall complexity that may occur as a consequence, especially if you double-reference variables.
One of the key aspects of creating meaningful tests is being able to run them against different environments to ensure that the upcoming release will pass the tests designed for the production release.For that reason, API Fortress offers the “Environments” feature.
An “environment” is a collection of override variables. An override variable is a variable that will replace the value of a variable that has been hardcoded within the Vault or the test itself, during a predefined session.
You can access the feature in the “tests list” by clicking the “hamburger menu” icon:
Or access the feature in the Composer by clicking on “environments”:
Simply Overriding Variables
In the override panel, you can type in which variables you want to override, and activate the preset:
By doing so, you will be overriding the variables for the current session for as long as the preset is activated. This override will be performed in your session only.
Saving the Environment
Once your Preset is ready and you are willing to save it for later use, you can click on the “save” button and give it a name. The Preset will be associated with the current project and will be available to you and other users.
Activating a Saved Environment
Once your environment is saved, you can activate it by choosing it from the “environments” dropdown that will show up by clicking on the arrow-down to the right of the environments icon.
In this example, we named the environment “staging”.
To disable the environment and go back to defaults, just select “None”.
Using a Saved Environment via API
When using the API by invoking a test execution, you can have API Fortress load an environment based on its name.
To do so, just provide the special variable “apif_env” in the params section, and provide the name of the environment you want to load, as in:
API Fortress offers many options to be notified of API defects and performance issues. The easiest way to be alerted is through email and text.You may also receive notifications using third-party tools via our connectors, or use our webhooks for any tool that has APIs. Next, learn how to set up alerts through email and SMS.
Note
You must have “Manager” access to set the notifications. By default, the user that registers the company is the manager and is automatically added as the one who receives the notifications via email. The manager(s) can add others to the notifications list.
To Add Others or Edit Your Settings
Go to Company (Team) settings (gear icon)
Click on Notifications
Click on ‘+email’
Choose the type of report
reports is default, administrative is for billing purposes
Choose users in the dropdown
Add SMS and/or Weekly Reports with the checkboxes.
In API Fortress, it is simple to schedule a test to run as often as you’d like, from any location you choose (based on account type), and with granular control as to when it runs. Let’s take a look at how it works.
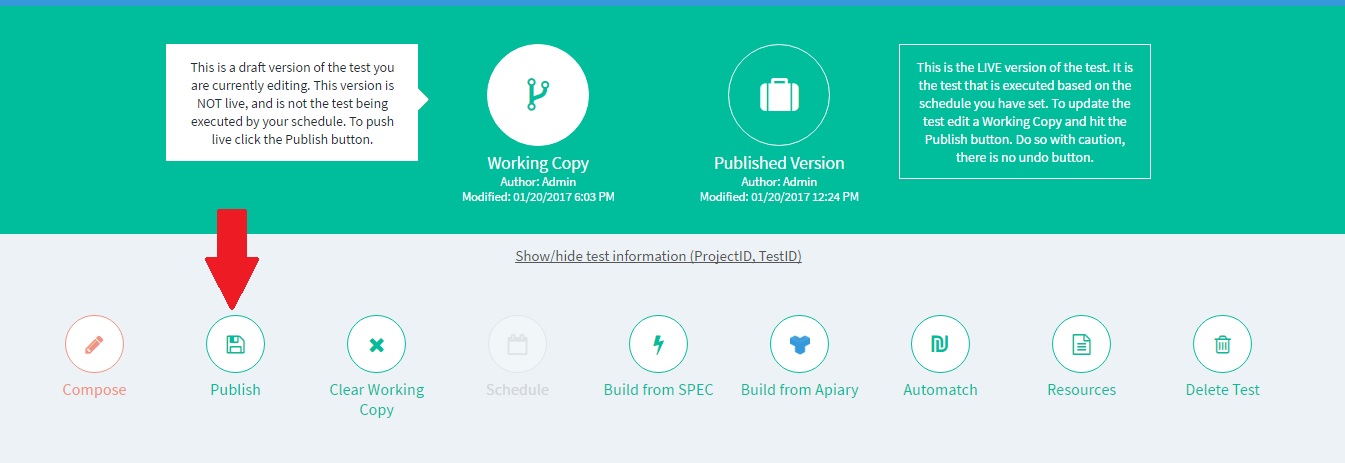
Step 1: Publish the Working Copy
API Fortress has a unique working copy/published copy system. This system allows you to edit a test without affecting the live, currently active version. You can learn more about it here. Step 1 is to publish your working copy. After you finish editing your Working Copy, click the “Publish” button (highlighted below). An individual test should also execute its own I/O operations (GET, POST, PUT, DELETE).
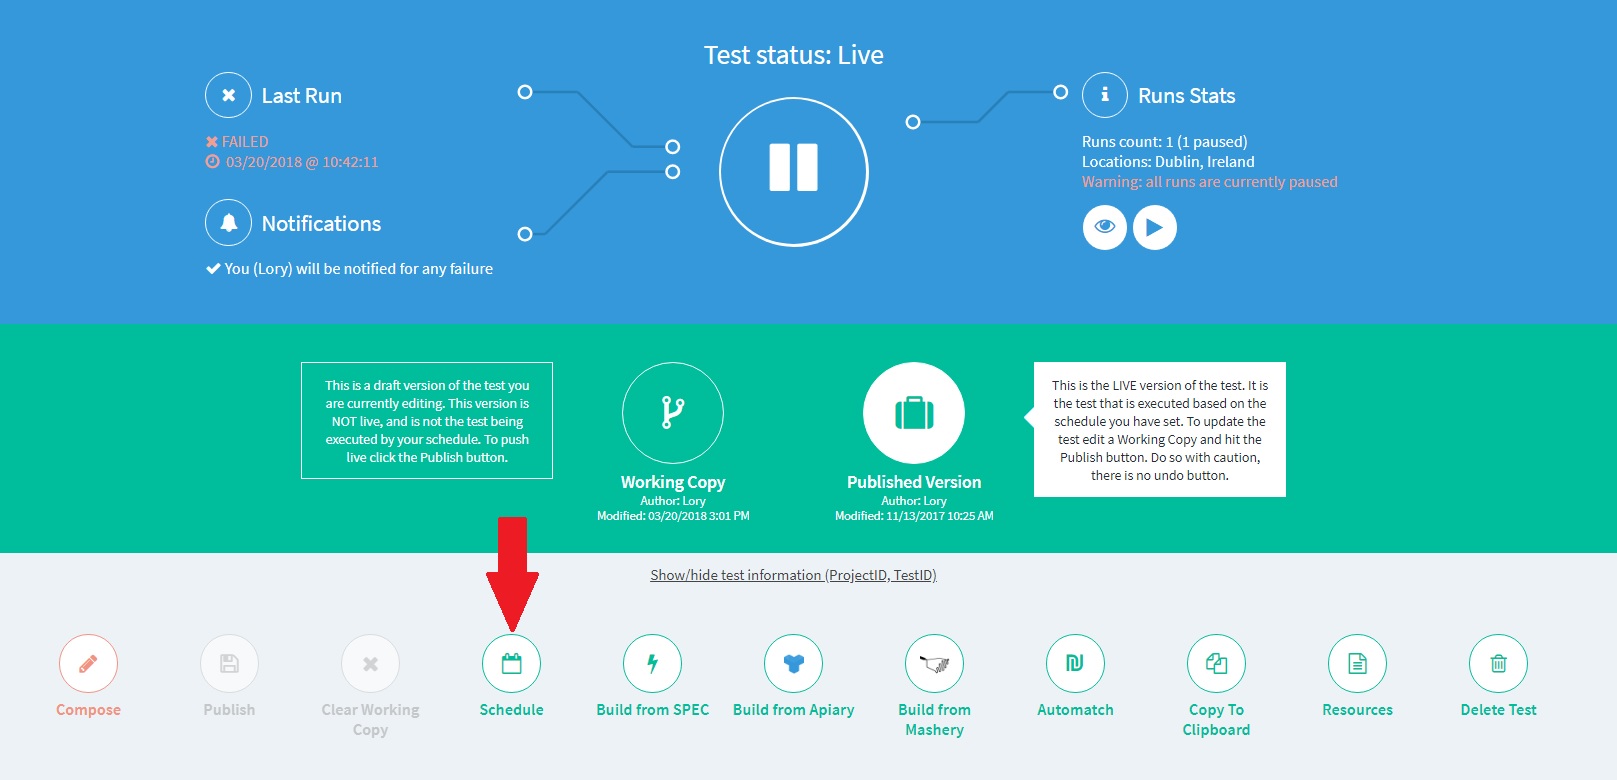
Step 2: Schedule
You can access the Scheduler from the Test Control Panel:
Or from the Test List page:
Step 3: Create a New Schedule
Click + Create New Run on the left side of the screen to create a new scheduled run of your test.
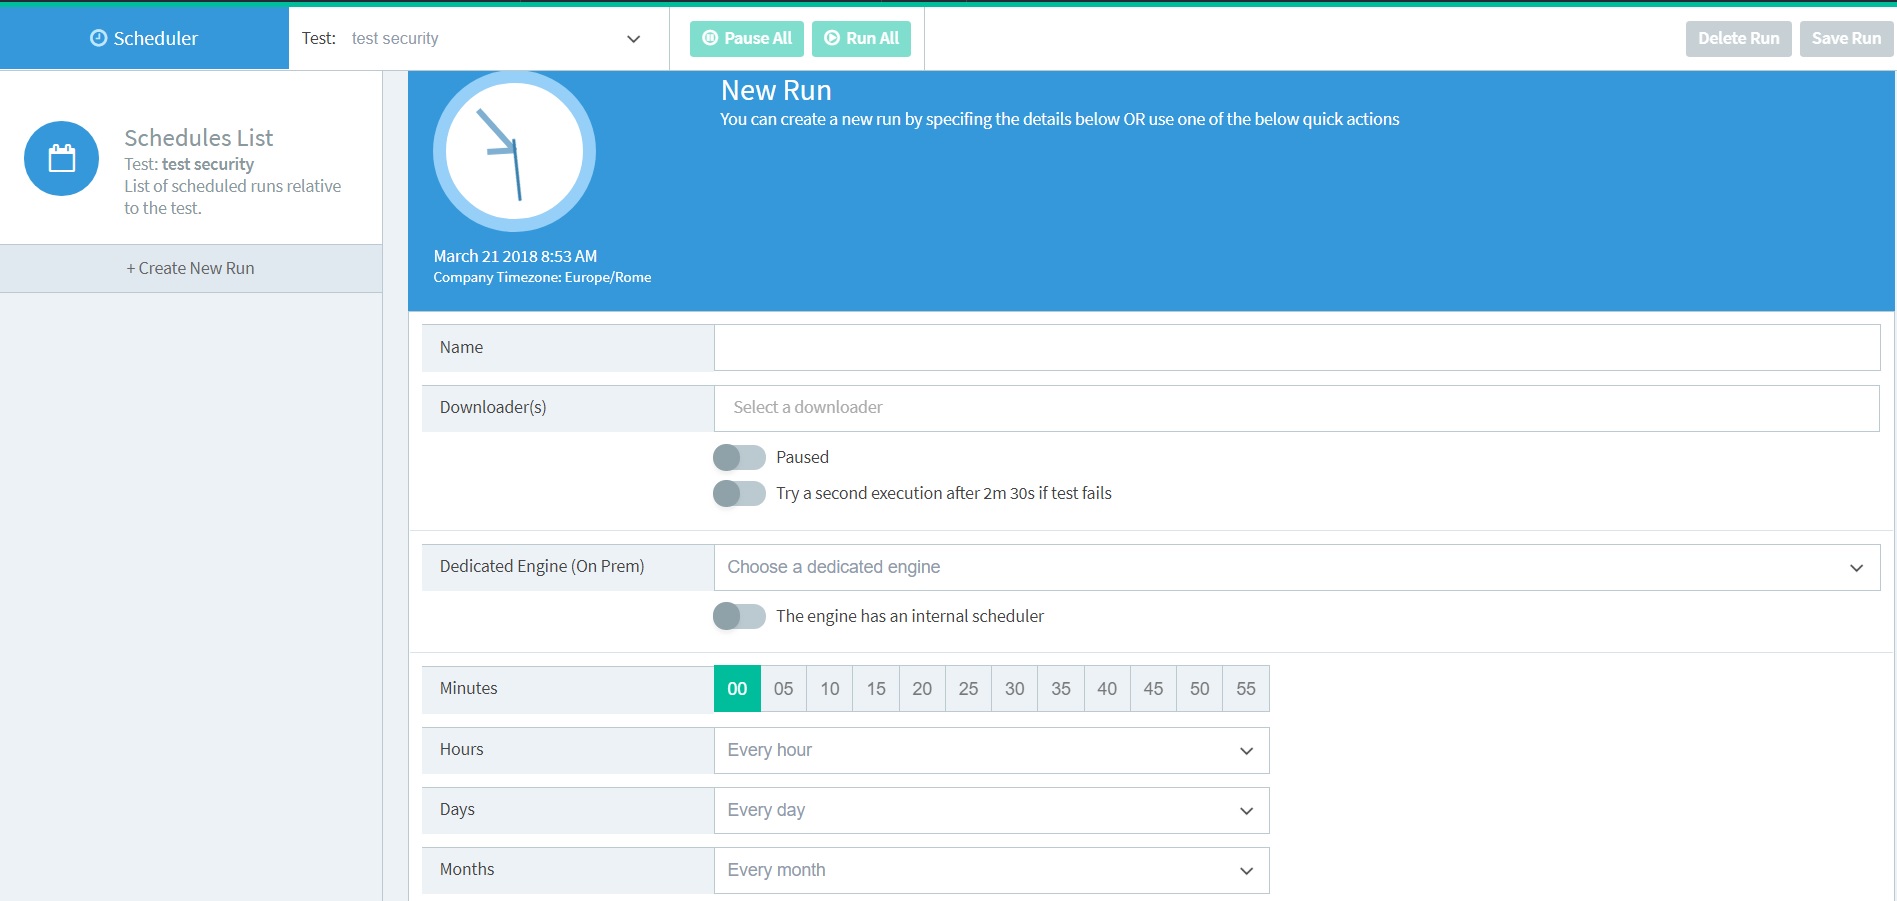
Step 4: Fill Out the Fields
Name – This is how you will identify your scheduled test in the future. We recommend sticking to the “Test Name – Schedule” convention. For example, a good name would be: “Test 1 – Every 10 Minutes.”Pause Toggle – This will prevent the run from triggering if clicked. Try Second Execution Toggle – When this checkbox is selected, another execution will run after 2m 30s if the initial execution fails.
Downloader – This dropdown allows you to choose which datacenter the request will be made from. You can select one or more than one.Dedicated engine (self-hosted/on-premises only): If you are using the Self-Hosted/On-Premises version of API Fortress, you can select a dedicated engine to run the test from.Time configuration – This allows you to select when your tests will run. The time configuration system works via intersection. Minutes: Sets the minutes of the hour that a test will run. The minimum interval is every 5 minutes. The interval type you can choose from depends on the account type. Hours: The hours of the day that the test is going to run.
Days: The days of the month the test is going to run.
Months: The months of the year the test is going to run.
Example: If we set minutes: 5, 15 and days: 1, 5. The test will run every hour at minute 5 and 15, only if the day is either the 1st or 5th.
Variable Override – This section allows you to override any variable that is defined in the Global or Data Set sections of the test. One example is to create a new run that executes in the morning and late afternoon where the variable you override is the domain. This means that twice a day the staging environment would be tested.
At the top of the page:
Test (drop down): This is a list of all available tests for scheduling (all of the tests that are published). You can switch from one test schedule to another without exiting the scheduler page. The first item is the Global Scheduler option. See below for more details.Pause All/Run All: These buttons allow you to pause all or run all the scheduled runs with a single click.
Delete Run:Removes a run from the scheduler.Save Run:While API Fortress will automatically save working copies, we recommend that you click Save to manually save the run.
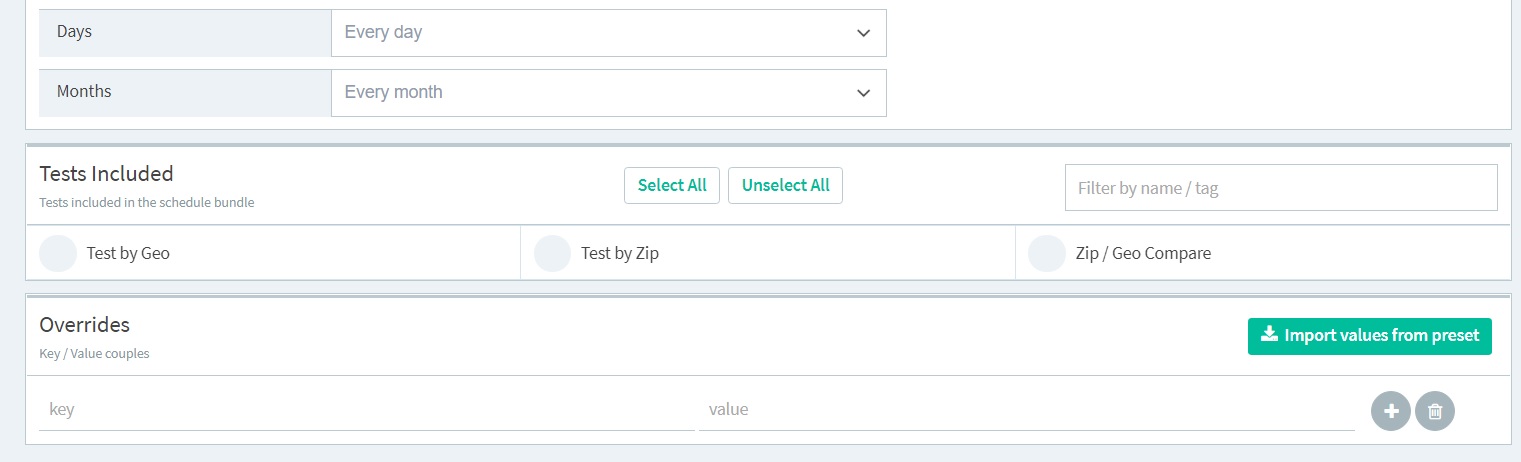
Global Scheduler
By selecting the Global option from the Test dropdown, you can schedule a unified run for all or some of the tests available in the project.
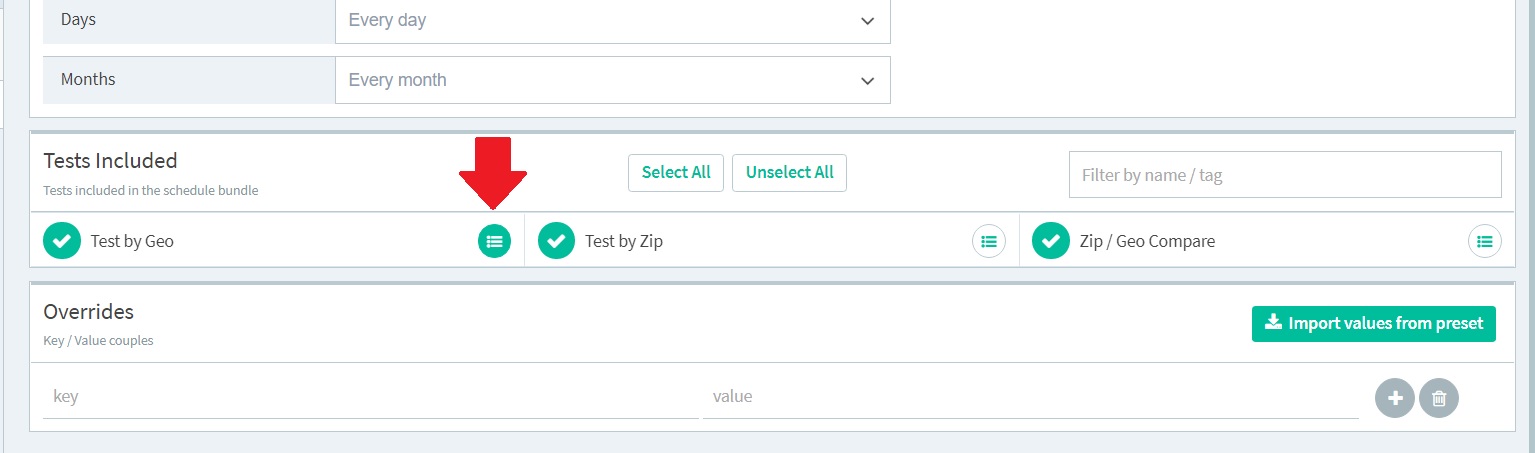
Unlike the scheduler for a single test, the Global Scheduler includes an additional section where you can select the tests you want to schedule together.Note: The key/value pairs inserted in the overrides section at the bottom of the page will be used for all of the selected tests. If you need to add values for an individual test out of the collectively scheduled tests, you must add them for the single test. To do so, you have to first save the scheduled run. Once the schedule is saved, the icon highlighted below will appear next to each individual test. You can add override values by clicking on this icon.
Connectors are the way API Fortress integrates with other services and platforms to send data and/or notifications to them. A big benefit is how seamlessly API Fortress can be integrated into your day-to-day operations without disrupting workflows.
There are two levels of notification integrations:
Failures Only
Sends a notification only when a test failure happens; this is typical for stateless services such as Slack.
Send All
Sends all events, including successes; this is very handy when the service needs to log everything or alter a state.
Currently Available
API Fortress offers a full-featured API as well as webhooks for third-party integrations. Any platform with an API can be integrated with API Fortress. Find our current preconfigured connectors and connectors-in-progress in this list:
This feature allows you to create a test starting with a specification file.
From the interstitial page, choose the “Build from SPEC” icon.
Note: This process deletes your working copy. Keep this in mind if you attempt to use a specification file with a test that has already been written.
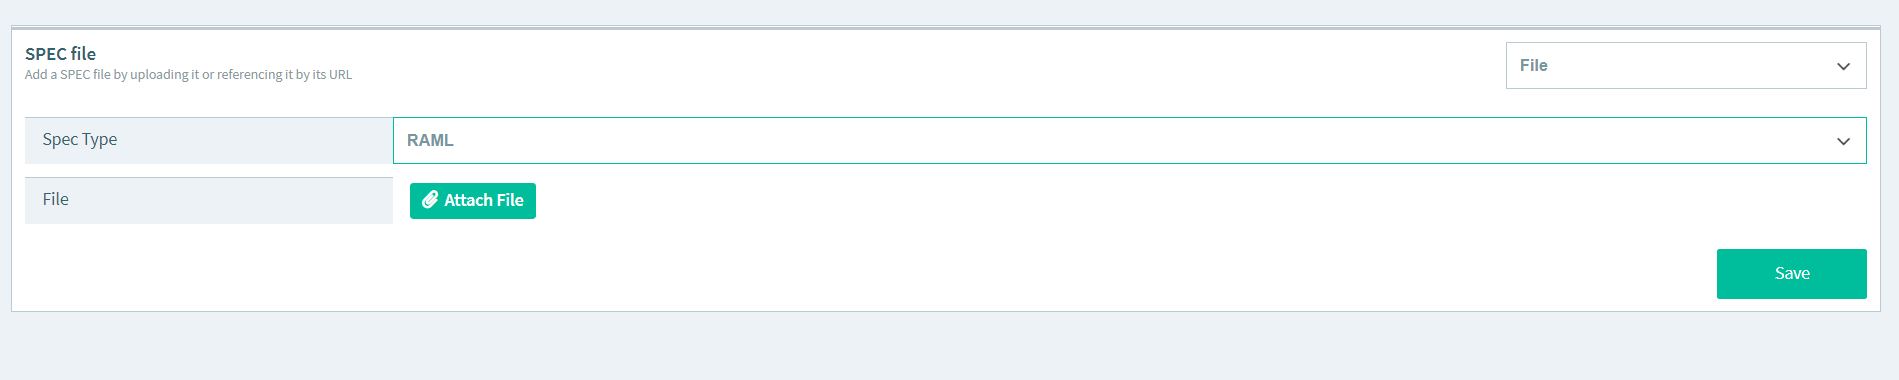
The available specification files you can choose from are: Swagger, RAML, OpenAPI 3, API Blueprint, I/O Docs, SOAP WSDL, and Postman Collection.
There are two ways to build a test from a specification file.
One way is to upload the specification file itself. Another way involves providing the URL that points to the specification file. The dropdown in the top right allows you to select your mode.
Upload your spec file by clicking the Attach File button, and select the correct file from the popup.
You may also reference the specification file with a URL. Selecting the URL field in the dropdown will open the SPEC URL field.
Once you have chosen the file type and the method, click the Save button and you will be redirected to the next step where the available endpoints are listed in a dropdown. Choose the one that you wish to test and click “Continue.” The test will then be created. You can now make any further adjustments, save and publish them for later use and scheduling.
Note: For RAML, we suggest uploading the entire zip file. Here’s an example video of building tests from a RAML file.
Mass Generate Tests From a Spec File
This feature allows you to create multiple tests from one specification file.
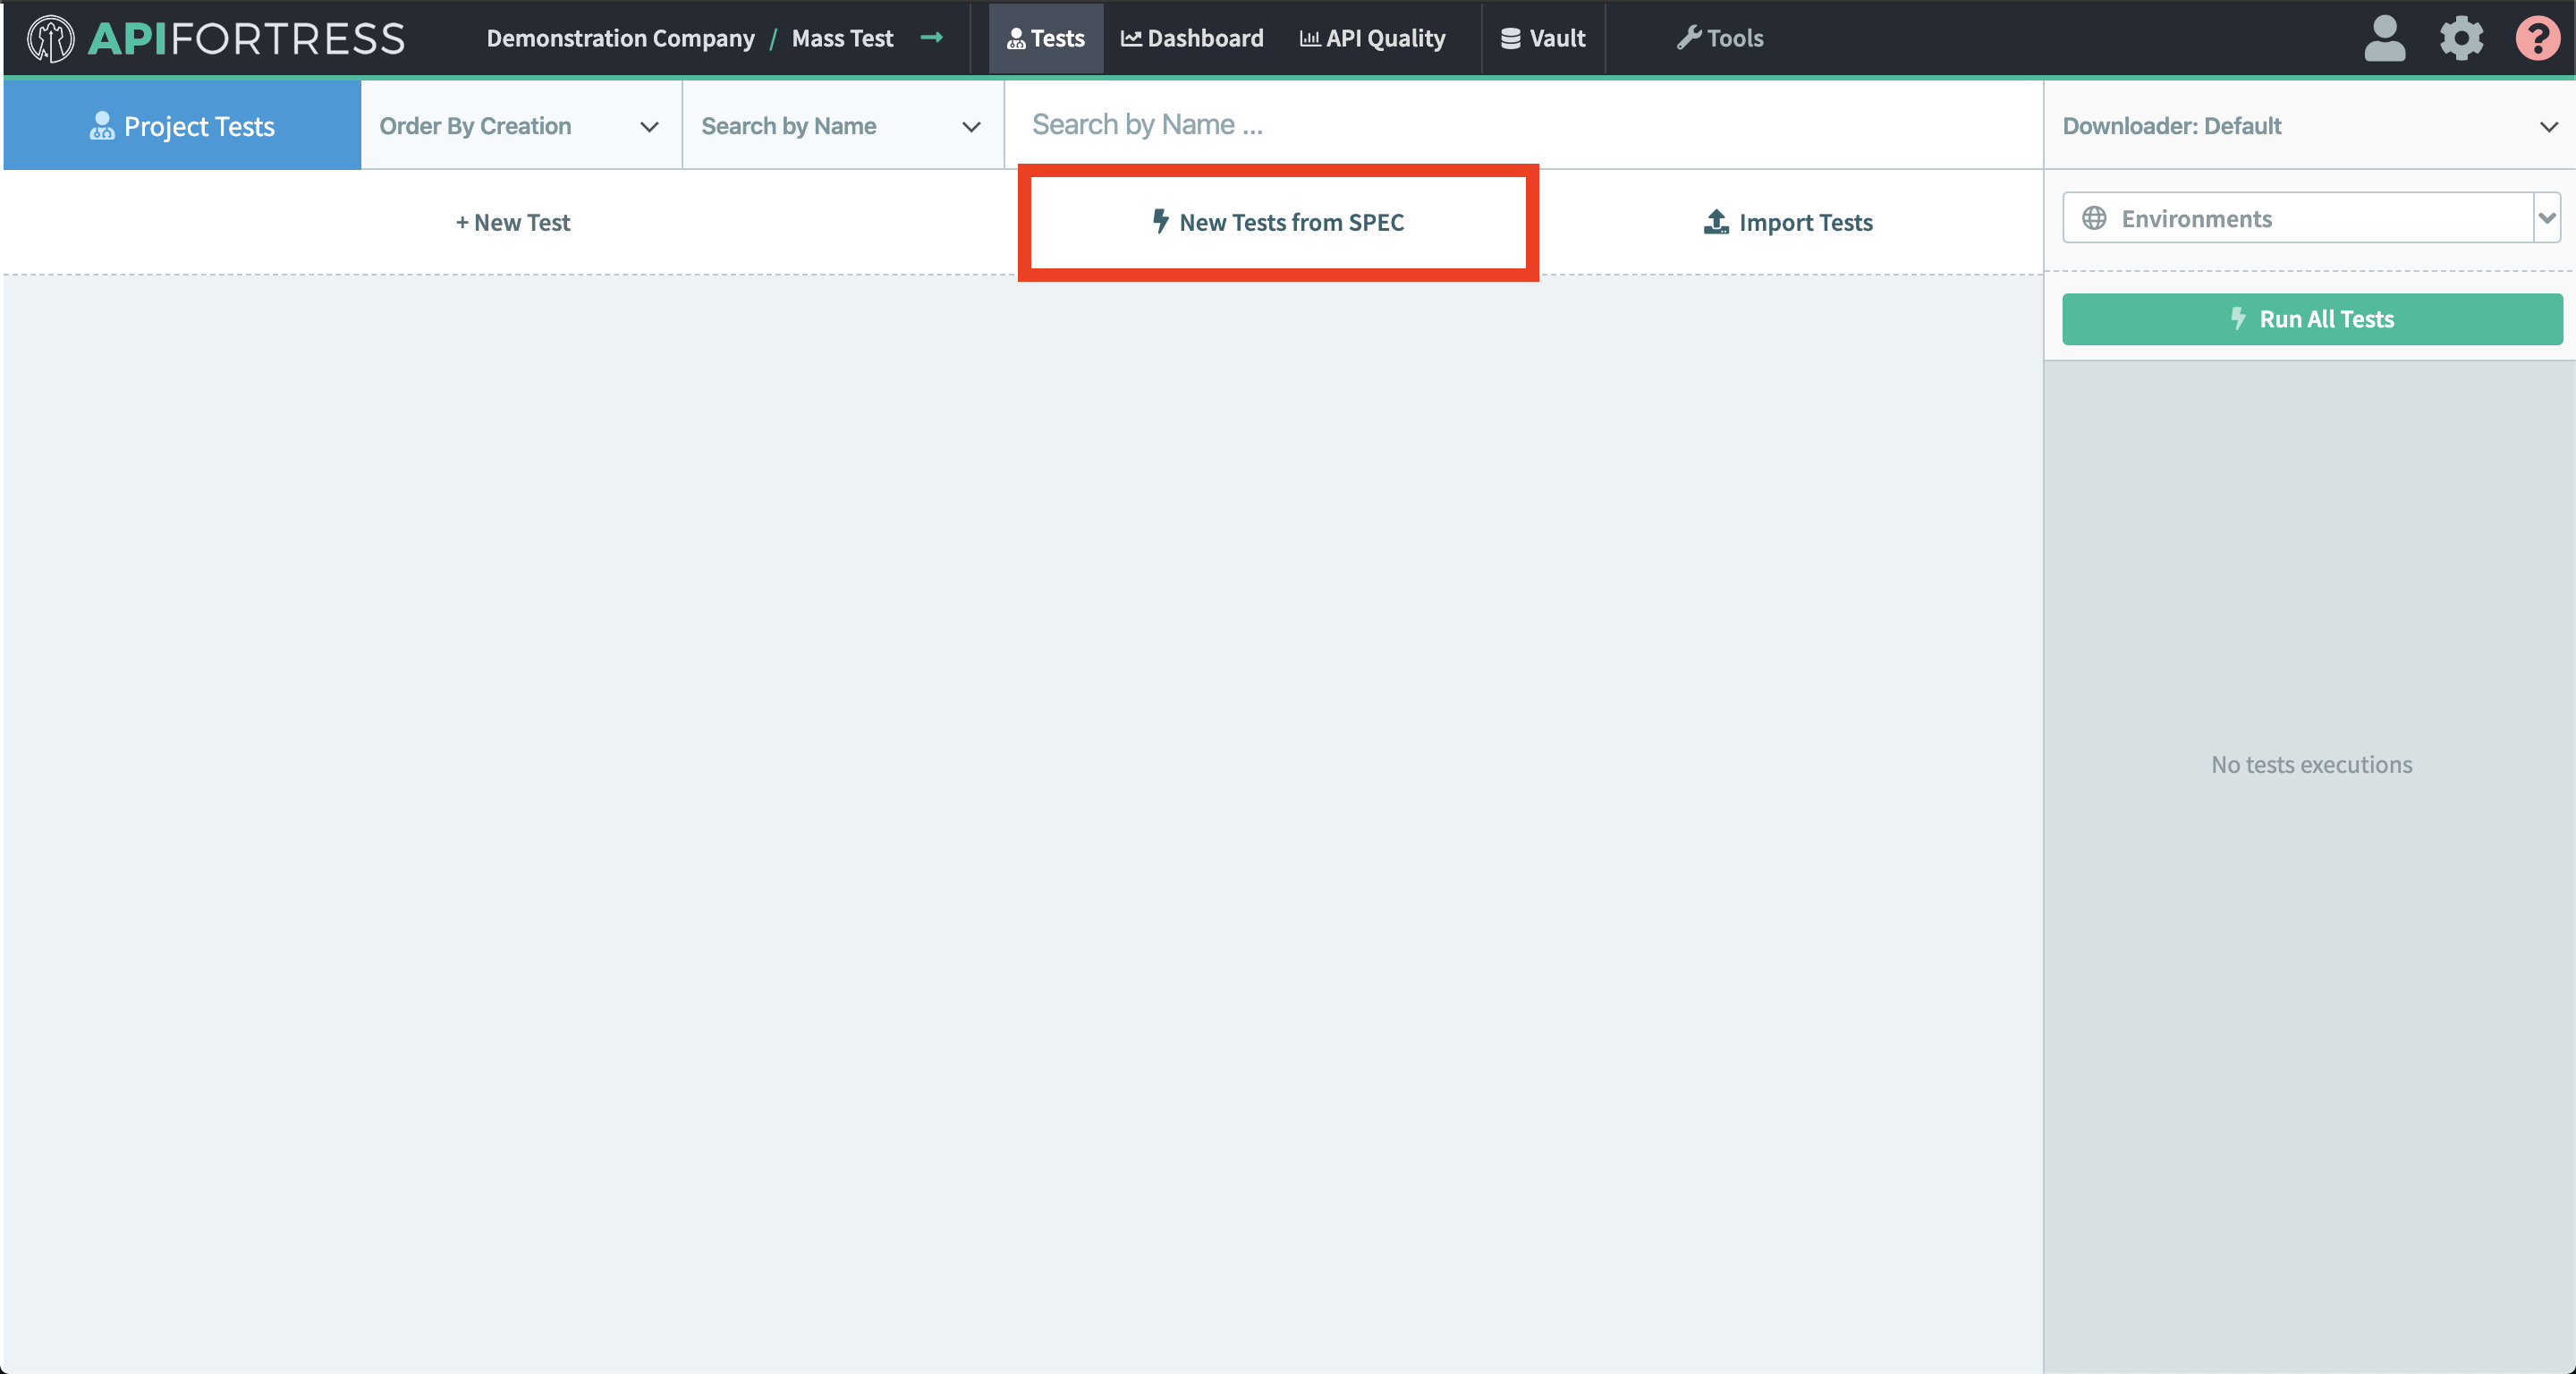
From within the project page (where you would like the tests to be stored), choose the “New Tests from SPEC” icon at the top.
Note: This process will create one test per path chosen in the specification file inside of the project you are in.
The available specification files you can choose from are: Swagger, RAML, OpenAPI 3, API Blueprint, I/O Docs, SOAP WSDL, and Postman Collection.
There are two ways to build a test from a specification file. One way is to upload the specification file itself. Another way involves providing the URL that points to the specification file. The dropdown in the top right allows you to select your mode.
Upload your spec file by clicking the Choose File button, and select the correct file from the popup.
You may also reference the specification file with a URL. Selecting the URL field in the dropdown will open the SPEC URL field.
Once you have chosen the file type and the method, click the green check mark on the top right and you will be redirected to the next step where the available endpoints are listed out.
Choose as many as you wish to test or select one then click “Select All” in the top left to select all paths and then click “Import selected”. The tests will then be created and named in the following syntax “method endpoint – status_code” i.e. “GET /v1/users/ – 200”.

 The first column shows all of the projects of a company and the Global Vault. Code snippets and variables saved in a specific project are only available in that project. They are not available across projects. If a variable and/or code snippet needs to be available in more projects within the company, they must be saved to the Global Vault. The Global Vault has been built to make variables and code snippets available across all of the projects in a company.

 In the snippet section, you will find all of the snippets you have created using the Composer (see here for more details). Once you have saved the snippet, from the composer, you can choose whether you want to save it and make it available only for the current project or for all the projects within the company by saving it in the Global Vault. If you already have a snippet saved for the current project but you need to make it available across all projects, you can easily export them from the current project to the Global Vault by using the import/export feature.
 A good use case for the snippets feature is an authentication flow; you don’t need or want to rewrite all of the steps in every test. You just need to call the snippet that contains the authentication snippet. Another good example is integration testing, where you can reuse various tests to create one larger flow.
In the variable section, you can define variables that will be part of the scope of the tests.
A good use case for the snippets feature is an authentication flow; you don’t need or want to rewrite all of the steps in every test. You just need to call the snippet that contains the authentication snippet. Another good example is integration testing, where you can reuse various tests to create one larger flow.
In the variable section, you can define variables that will be part of the scope of the tests.
 If a variable with the same name is defined within the test, it will override the one defined in the Vault. For identical variable names in the global vault and in the project vault, the latter will have higher priority.
Defining a variable in the Vault is helpful when you need to use the same variable across multiple tests. This way, you don’t need to rewrite it every time. For example, a password could be saved as a variable and reused in multiple places.
Just like code snippets, if you need a variable available across multiple projects, you can save it in the Global Vault or import it directly from another project.
Additionally, you can import variables from Postman. See here for more details.
When you open the Vault tab in the Composer, global snippets and variables will be highlighted for ease of identification.
If a variable with the same name is defined within the test, it will override the one defined in the Vault. For identical variable names in the global vault and in the project vault, the latter will have higher priority.
Defining a variable in the Vault is helpful when you need to use the same variable across multiple tests. This way, you don’t need to rewrite it every time. For example, a password could be saved as a variable and reused in multiple places.
Just like code snippets, if you need a variable available across multiple projects, you can save it in the Global Vault or import it directly from another project.
Additionally, you can import variables from Postman. See here for more details.
When you open the Vault tab in the Composer, global snippets and variables will be highlighted for ease of identification.
 Here is a quick example on how the Vault can be used in a test.
 Consider a scenario where this login will be required for all the endpoints we have to test. It makes sense for this call to be stored in the Vault.
Select the GET, open the Vault panel and click the + button. Enter a name and description.
Consider a scenario where this login will be required for all the endpoints we have to test. It makes sense for this call to be stored in the Vault.
Select the GET, open the Vault panel and click the + button. Enter a name and description.
 Now you can proceed with creating the test. Once done, you may create other tests for your API. Once again, click +New Test. Once you are in the Composer, you can open the Vault panel and select the snippet saved in the previous step.
 To use the login call in the new test, just click the down arrow button next to the snippet, and it will be added into the test.
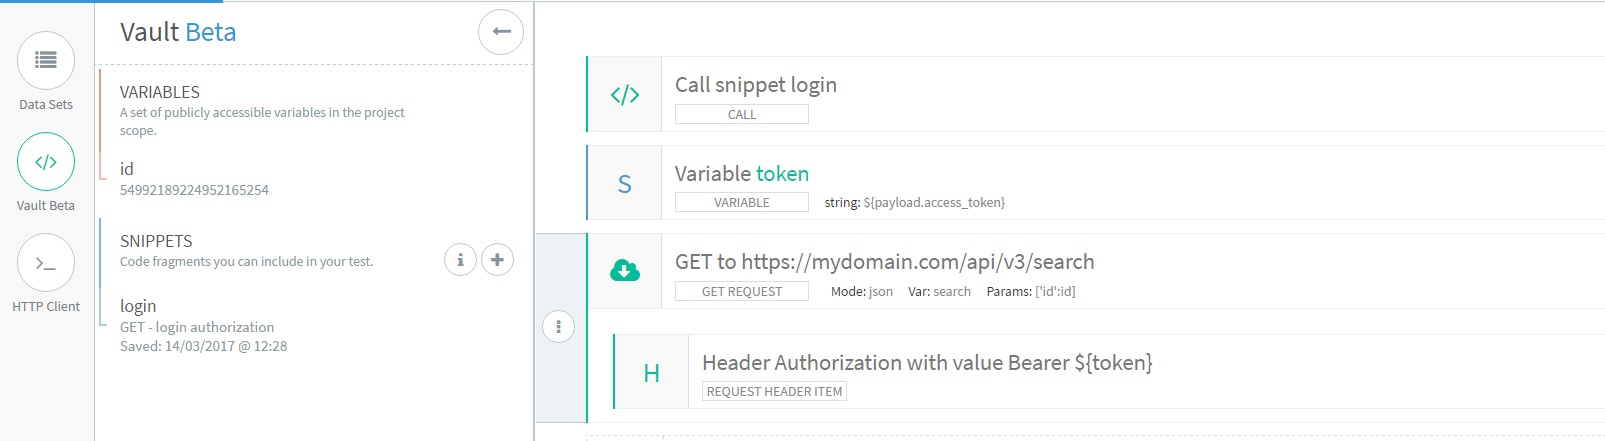
 Now you can call the endpoint that you want to test. Let’s use the search endpoint. Pass the ”ID” variable as a query parameter. The authorization token that was parameterized after the login call will be passed in as well:
 Now, consider the case where we want to use the same ”ID” in multiple tests. Don’t set the ID as a global param or an input set. Add it to the vault instead. Save the test and exit from the Composer. Click on Vault in the header and add the variable ”ID” here:
 Once done, go back to the test and check that the variable is available in the Vault panel:
 If you launch the test, you can see that the ”ID” will be replaced with the value you have set in the Vault.

 In this example, we named the environment “staging”.
To disable the environment and go back to defaults, just select “None”.
In this example, we named the environment “staging”.
To disable the environment and go back to defaults, just select “None”.


 From the interstitial page, choose the “Build from SPEC” icon.