Flow (Pause or Stop a Test)

This component allows you to pause or stop a test entirely. Parameters:
Name Type/Value Required
Command ‘stop’, ‘wait’ Yes
Value (depends on ‘Command = wait’) Number Yes
Command: This parameter defines the action you want to take. ‘Stop’ will stop the test. ‘Wait’ will pause the test for a number of milliseconds defined in the ‘Value’ parameter. Value: The number of milliseconds you want to pause the test for.   This component is especially useful when combined with the “If” component. See the examples below: If the statusCode is not ‘200’, the test will be halt; none of the remaining assertions will be checked. In this example, the test will wait 1000 milliseconds before performing the GET request.  

Each

Allows you to iterate over a collection of elements and execute the piece of code for each element. Parameters:
Name Type/Value Required
Expression Expression Yes
Expression: The path of the collection you want to iterate on. See Expression for more details.   for each ‘legs’ collection checks if ‘vector’ item is an integer value. If a collection is nested in another one, you need to refer to them as _1, _2, and so on.   
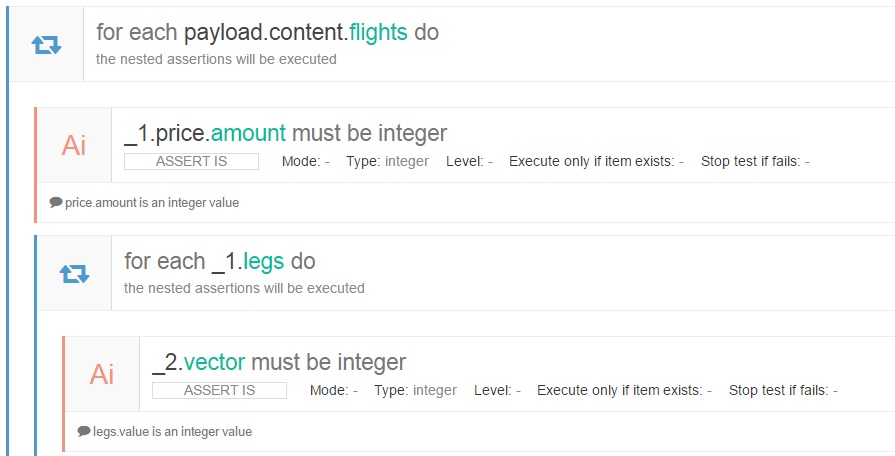
for each payload.content.flights collection checks if ‘price.amount’ is an integer and then, for each legs array (that is a nested collection in the flights collection) checks if vector item is an integer value.    

If

Allows you to run a specific piece of code only if a specific condition is met. Parameters:
Name Type/Value Required
Expression Expression Yes
Expression: The condition that evaluates if the code must be executed or not. Examples: if payload.success is equal to true then the code within the element is executed, otherwise is skipped. if _1.intermediate exists then the code within the element is executed, otherwise is skipped. This is useful when the element is not always present.

Set

Allows you to set a variable for future uses in the test. For example,  you can save a value retrieved from the response and use it in a subsequent call. Parameters:
Name Type/Value Required
Var String Yes
Variable mode ‘String’, ‘Data’, ‘Language’ Yes
Value (depends on ‘Variable mode = string’) String Yes
Data (depends on ‘Variable mode = data’) Data Yes
Lang (depends on ‘Variable mode = language’) ‘Groovy’ Yes
Content (depends on ‘Variable mode = language’) Data Yes
Var: artistId Variable mode: String Value: _1.id
  Var: sobjects Variable mode: Data Data: payload.findAll {it.name == ‘bananas’} Var: queries Variable mode: Language Lang: Groovy Content: if (payload.id>100) return ‘furniture’

Delete

The I/O operations you can do are: GET, POST, PUT, PATCH and DELETE. From the composer, choose ‘Add Component’ and then choose the type of operation you want to do.   Once done, you will have a form to fill up: Parameters:
Name Type/Value Required
Url Url Yes
Variable String Yes
Expect String No
Mode ‘json’,’xml’, ‘html’,’text’ Yes
Params String No
Url: the url of the resource you want to test. It could be the full url of the resource or a string with variables using the $. (i.e. ‘https://domain/resourcename’ or ‘https://${domain}${endpoint}’) Variable: the name of the variable that contains the response. It will be the name you will refer during the test. Expect: it is an optional field and needs to be filled only if the expected behavior differs from a positive response (i.e. 404,500 vs. 200,201 etc.). This is useful when looking to test negative responses and validate error messages.

Possible values are ‘<statusCode>|VALID’ or ‘<statusCode>|INVALID‘. VALID means the payload type is the one selected in the “mode” field (JSON,XML), while INVALID means the opposite. Some examples:
  • 404|VALID : 404 is expected with valid payload
  • 422|VALID : 422 is expected with valid payload
  • 500|INVALID : 500 is expected with invalid payload
Multiple status codes can be expected by adding them all (i.e. 200|302|400|500|VALID) Mode: it’s the type of the response you want to test. Params: the optional list of params you want to add to the query string. To do so, tap on ‘Add parameter’. The params can either be a String value (in that case, the value will always be the same for all the requests; to do so, just put the value in the related field and choose ‘String value’ from the drop down menu) or a Variable (in that case the value will be taken dynamically and could changed from time to time; to do so, put the name of the variable inside the field and choose ‘Variable’ from the drop down menu). Using the above example: let’s say that varName is defined as a boolean value so it can be either ‘true’ or ‘false’, in that case, there will be two requests; the first one will be a GET request to ‘https://mydomain/endpoint?firstParam=paramValue&secondParam=true’, parsing it as ‘json’ and saving it in the ‘payload’ variable; the second one, will be a GET request to ‘https://mydomain/endpoint?firstParam=paramValue&secondParam=false’, parsing it as ‘json’ and saving it in the ‘payload’ variable. When all things are set up, you can confirm it by tapping on the ‘tick’ icon in the top right corner. After that, if you need to add headers, params or a body to the request you can do it by selecting the request and then tapping on the ‘Add component’: all the available components for each operation will be visible.

Config

Name Type/Value Required
Name String Yes
Value String or Variable Yes
 

Header

Name Type/Value Required
Name String Yes
Value String or Variable Yes
 

Post Param/Put Param/Patch Param/Delete Param

Name Type/Value Required
Name String Yes
Value String or Variable Yes
 

Post Body/Put Body/Patch Body/Delete Body

Name Type/Value Required
Content-Type ‘application/json’, ‘text/plain’, ‘application/x-www-form-urlencoded’,’text/xml’ Yes
Content String No
 

Patch

The I/O operations you can do are: GET, POST, PUT, PATCH and DELETE. From the composer, choose ‘Add Component’ and then choose the type of operation you want to do.   Once done, you will have a form to fill up: Parameters:
Name Type/Value Required
Url Url Yes
Variable String Yes
Expect String No
Mode ‘json’,’xml’, ‘html’,’text’ Yes
Params String No
Url: the url of the resource you want to test. It could be the full url of the resource or a string with variables using the $. (i.e. ‘https://domain/resourcename’ or ‘https://${domain}${endpoint}’) Variable: the name of the variable that contains the response. It will be the name you will refer during the test. Expect: it is an optional field and needs to be filled only if the expected behavior differs from a positive response (i.e. 404,500 vs. 200,201 etc.). This is useful when looking to test negative responses and validate error messages.

Possible values are ‘<statusCode>|VALID’ or ‘<statusCode>|INVALID‘. VALID means the payload type is the one selected in the “mode” field (JSON,XML), while INVALID means the opposite. Some examples:
  • 404|VALID : 404 is expected with valid payload
  • 422|VALID : 422 is expected with valid payload
  • 500|INVALID : 500 is expected with invalid payload
Multiple status codes can be expected by adding them all (i.e. 200|302|400|500|VALID) Mode: it’s the type of the response you want to test. Params: the optional list of params you want to add to the query string. To do so, tap on ‘Add parameter’. The params can either be a String value (in that case, the value will always be the same for all the requests; to do so, just put the value in the related field and choose ‘String value’ from the drop down menu) or a Variable (in that case the value will be taken dynamically and could changed from time to time; to do so, put the name of the variable inside the field and choose ‘Variable’ from the drop down menu). Using the above example: let’s say that varName is defined as a boolean value so it can be either ‘true’ or ‘false’, in that case, there will be two requests; the first one will be a GET request to ‘https://mydomain/endpoint?firstParam=paramValue&secondParam=true’, parsing it as ‘json’ and saving it in the ‘payload’ variable; the second one, will be a GET request to ‘https://mydomain/endpoint?firstParam=paramValue&secondParam=false’, parsing it as ‘json’ and saving it in the ‘payload’ variable. When all things are set up, you can confirm it by tapping on the ‘tick’ icon in the top right corner. After that, if you need to add headers, params or a body to the request you can do it by selecting the request and then tapping on the ‘Add component’: all the available components for each operation will be visible.

Config

Name Type/Value Required
Name String Yes
Value String or Variable Yes
 

Header

Name Type/Value Required
Name String Yes
Value String or Variable Yes
 

Post Param/Put Param/Patch Param/Delete Param

Name Type/Value Required
Name String Yes
Value String or Variable Yes
 

Post Body/Put Body/Patch Body/Delete Body

Name Type/Value Required
Content-Type ‘application/json’, ‘text/plain’, ‘application/x-www-form-urlencoded’,’text/xml’ Yes
Content String No
 

Put

The I/O operations you can do are: GET, POST, PUT, PATCH and DELETE. From the composer, choose ‘Add Component’ and then choose the type of operation you want to do.   Once done, you will have a form to fill up: Parameters:
Name Type/Value Required
Url Url Yes
Variable String Yes
Expect String No
Mode ‘json’,’xml’, ‘html’,’text’ Yes
Params String No
Url: the url of the resource you want to test. It could be the full url of the resource or a string with variables using the $. (i.e. ‘https://domain/resourcename’ or ‘https://${domain}${endpoint}’) Variable: the name of the variable that contains the response. It will be the name you will refer during the test. Expect: it is an optional field and needs to be filled only if the expected behavior differs from a positive response (i.e. 404,500 vs. 200,201 etc.). This is useful when looking to test negative responses and validate error messages.

Possible values are ‘<statusCode>|VALID’ or ‘<statusCode>|INVALID‘. VALID means the payload type is the one selected in the “mode” field (JSON,XML), while INVALID means the opposite. Some examples:
  • 404|VALID : 404 is expected with valid payload
  • 422|VALID : 422 is expected with valid payload
  • 500|INVALID : 500 is expected with invalid payload
Multiple status codes can be expected by adding them all (i.e. 200|302|400|500|VALID) Mode: it’s the type of the response you want to test. Params: the optional list of params you want to add to the query string. To do so, tap on ‘Add parameter’. The params can either be a String value (in that case, the value will always be the same for all the requests; to do so, just put the value in the related field and choose ‘String value’ from the drop down menu) or a Variable (in that case the value will be taken dynamically and could changed from time to time; to do so, put the name of the variable inside the field and choose ‘Variable’ from the drop down menu). Using the above example: let’s say that varName is defined as a boolean value so it can be either ‘true’ or ‘false’, in that case, there will be two requests; the first one will be a GET request to ‘https://mydomain/endpoint?firstParam=paramValue&secondParam=true’, parsing it as ‘json’ and saving it in the ‘payload’ variable; the second one, will be a GET request to ‘https://mydomain/endpoint?firstParam=paramValue&secondParam=false’, parsing it as ‘json’ and saving it in the ‘payload’ variable. When all things are set up, you can confirm it by tapping on the ‘tick’ icon in the top right corner. After that, if you need to add headers, params or a body to the request you can do it by selecting the request and then tapping on the ‘Add component’: all the available components for each operation will be visible.

Config

Name Type/Value Required
Name String Yes
Value String or Variable Yes
 

Header

Name Type/Value Required
Name String Yes
Value String or Variable Yes
 

Post Param/Put Param/Patch Param/Delete Param

Name Type/Value Required
Name String Yes
Value String or Variable Yes
 

Post Body/Put Body/Patch Body/Delete Body

Name Type/Value Required
Content-Type ‘application/json’, ‘text/plain’, ‘application/x-www-form-urlencoded’,’text/xml’ Yes
Content String No
 

Post

The I/O operations you can do are: GET, POST, PUT, PATCH and DELETE. From the composer, choose ‘Add Component’ and then choose the type of operation you want to do.   Once done, you will have a form to fill up: Parameters:
Name Type/Value Required
Url Url Yes
Variable String Yes
Expect String No
Mode ‘json’,’xml’, ‘html’,’text’ Yes
Params String No
Url: the url of the resource you want to test. It could be the full url of the resource or a string with variables using the $. (i.e. ‘https://domain/resourcename’ or ‘https://${domain}${endpoint}’) Variable: the name of the variable that contains the response. It will be the name you will refer during the test. Expect: it is an optional field and needs to be filled only if the expected behavior differs from a positive response (i.e. 404,500 vs. 200,201 etc.). This is useful when looking to test negative responses and validate error messages.

Possible values are ‘<statusCode>|VALID’ or ‘<statusCode>|INVALID‘. VALID means the payload type is the one selected in the “mode” field (JSON,XML), while INVALID means the opposite. Some examples:
  • 404|VALID : 404 is expected with valid payload
  • 422|VALID : 422 is expected with valid payload
  • 500|INVALID : 500 is expected with invalid payload
Multiple status codes can be expected by adding them all (i.e. 200|302|400|500|VALID) Mode: it’s the type of the response you want to test. Params: the optional list of params you want to add to the query string. To do so, tap on ‘Add parameter’. The params can either be a String value (in that case, the value will always be the same for all the requests; to do so, just put the value in the related field and choose ‘String value’ from the drop down menu) or a Variable (in that case the value will be taken dynamically and could changed from time to time; to do so, put the name of the variable inside the field and choose ‘Variable’ from the drop down menu). Using the above example: let’s say that varName is defined as a boolean value so it can be either ‘true’ or ‘false’, in that case, there will be two requests; the first one will be a GET request to ‘https://mydomain/endpoint?firstParam=paramValue&secondParam=true’, parsing it as ‘json’ and saving it in the ‘payload’ variable; the second one, will be a GET request to ‘https://mydomain/endpoint?firstParam=paramValue&secondParam=false’, parsing it as ‘json’ and saving it in the ‘payload’ variable. When all things are set up, you can confirm it by tapping on the ‘tick’ icon in the top right corner. After that, if you need to add headers, params or a body to the request you can do it by selecting the request and then tapping on the ‘Add component’: all the available components for each operation will be visible.

Config

Name Type/Value Required
Name String Yes
Value String or Variable Yes
 

Header

Name Type/Value Required
Name String Yes
Value String or Variable Yes
 

Post Param/Put Param/Patch Param/Delete Param

Name Type/Value Required
Name String Yes
Value String or Variable Yes
 

Post Body/Put Body/Patch Body/Delete Body

Name Type/Value Required
Content-Type ‘application/json’, ‘text/plain’, ‘application/x-www-form-urlencoded’,’text/xml’ Yes
Content String No
 

Get

The I/O operations you can do are: GET, POST, PUT, PATCH and DELETE. From the composer, choose ‘Add Component’ and then choose the type of operation you want to do.   Once done, you will have a form to fill up: Parameters:
Name Type/Value Required
Url Url Yes
Variable String Yes
Expect String No
Mode ‘json’,’xml’, ‘html’,’text’ Yes
Params String No
Url: the url of the resource you want to test. It could be the full url of the resource or a string with variables using the $. (i.e. ‘https://domain/resourcename’ or ‘https://${domain}${endpoint}’) Variable: the name of the variable that contains the response. It will be the name you will refer during the test. Expect: it is an optional field and needs to be filled only if the expected behavior differs from a positive response (i.e. 404,500 vs. 200,201 etc.). This is useful when looking to test negative responses and validate error messages.

Possible values are ‘<statusCode>|VALID’ or ‘<statusCode>|INVALID‘. VALID means the payload type is the one selected in the “mode” field (JSON,XML), while INVALID means the opposite. Some examples:
  • 404|VALID : 404 is expected with valid payload
  • 422|VALID : 422 is expected with valid payload
  • 500|INVALID : 500 is expected with invalid payload
Multiple status codes can be expected by adding them all (i.e. 200|302|400|500|VALID) Mode: it’s the type of the response you want to test. Params: the optional list of params you want to add to the query string. To do so, tap on ‘Add parameter’. The params can either be a String value (in that case, the value will always be the same for all the requests; to do so, just put the value in the related field and choose ‘String value’ from the drop down menu) or a Variable (in that case the value will be taken dynamically and could changed from time to time; to do so, put the name of the variable inside the field and choose ‘Variable’ from the drop down menu). Using the above example: let’s say that varName is defined as a boolean value so it can be either ‘true’ or ‘false’, in that case, there will be two requests; the first one will be a GET request to ‘https://mydomain/endpoint?firstParam=paramValue&secondParam=true’, parsing it as ‘json’ and saving it in the ‘payload’ variable; the second one, will be a GET request to ‘https://mydomain/endpoint?firstParam=paramValue&secondParam=false’, parsing it as ‘json’ and saving it in the ‘payload’ variable. When all things are set up, you can confirm it by tapping on the ‘tick’ icon in the top right corner. After that, if you need to add headers, params or a body to the request you can do it by selecting the request and then tapping on the ‘Add component’: all the available components for each operation will be visible.

Config

Name Type/Value Required
Name String Yes
Value String or Variable Yes
 

Header

Name Type/Value Required
Name String Yes
Value String or Variable Yes
 

Post Param/Put Param/Patch Param/Delete Param

Name Type/Value Required
Name String Yes
Value String or Variable Yes
 

Post Body/Put Body/Patch Body/Delete Body

Name Type/Value Required
Content-Type ‘application/json’, ‘text/plain’, ‘application/x-www-form-urlencoded’,’text/xml’ Yes
Content String No
 

I/O Operations

The I/O operations you can do are: GET, POST, PUT, PATCH and DELETE. From the composer, choose ‘Add Component’ and then choose the type of operation you want to do.   Once done, you will have a form to fill up: Parameters:
Name Type/Value Required
Url Url Yes
Variable String Yes
Expect String No
Mode ‘json’,’xml’, ‘html’,’text’ Yes
Params String No
Url: the url of the resource you want to test. It could be the full url of the resource or a string with variables using the $. (i.e. ‘https://domain/resourcename’ or ‘https://${domain}${endpoint}’) Variable: the name of the variable that contains the response. It will be the name you will refer during the test. Expect: it is an optional field and needs to be filled only if the expected behavior differs from a positive response (i.e. 404,500 vs. 200,201 etc.). This is useful when looking to test negative responses and validate error messages.

Possible values are ‘<statusCode>|VALID’ or ‘<statusCode>|INVALID‘. VALID means the payload type is the one selected in the “mode” field (JSON,XML), while INVALID means the opposite. Some examples:
  • 404|VALID : 404 is expected with valid payload
  • 422|VALID : 422 is expected with valid payload
  • 500|INVALID : 500 is expected with invalid payload
Multiple status codes can be expected by adding them all (i.e. 200|302|400|500|VALID) Mode: it’s the type of the response you want to test. Params: the optional list of params you want to add to the query string. To do so, tap on ‘Add parameter’. The params can either be a String value (in that case, the value will always be the same for all the requests; to do so, just put the value in the related field and choose ‘String value’ from the drop down menu) or a Variable (in that case the value will be taken dynamically and could changed from time to time; to do so, put the name of the variable inside the field and choose ‘Variable’ from the drop down menu). Using the above example: let’s say that varName is defined as a boolean value so it can be either ‘true’ or ‘false’, in that case, there will be two requests; the first one will be a GET request to ‘https://mydomain/endpoint?firstParam=paramValue&secondParam=true’, parsing it as ‘json’ and saving it in the ‘payload’ variable; the second one, will be a GET request to ‘https://mydomain/endpoint?firstParam=paramValue&secondParam=false’, parsing it as ‘json’ and saving it in the ‘payload’ variable. When all things are set up, you can confirm it by tapping on the ‘tick’ icon in the top right corner. After that, if you need to add headers, params or a body to the request you can do it by selecting the request and then tapping on the ‘Add component’: all the available components for each operation will be visible.

Config

Name Type/Value Required
Name String Yes
Value String or Variable Yes
 

Header

Name Type/Value Required
Name String Yes
Value String or Variable Yes
 

Post Param/Put Param/Patch Param/Delete Param

Name Type/Value Required
Name String Yes
Value String or Variable Yes
 

Post Body/Put Body/Patch Body/Delete Body

Name Type/Value Required
Content-Type ‘application/json’, ‘text/plain’, ‘application/x-www-form-urlencoded’,’text/xml’ Yes
Content String No