
Introduction
This manual will describe a normal deployment procedure for API Fortress self-hosted/on-premises, using a Docker container. It is important to remember that the goal of this guide is to be as thorough as possible. It may seem long but the process is fairly straightforward.
Also, don’t fret as we can provide as much help and guidance as you need. We are just a video conference away!
If you do not have the following files:
/create_network.sh
/core/docker-compose.yml
/core/tomcat_conf/conf/
/core/start_all.sh
/downloader/docker-compose.yml
/data/connectors.tgz
/data/help.tgz
/data/import_help.sh
/data/import_connectors.sh
Please reach out to us at sales@apifortress.com or fill out the questionnaire here and someone will contact you with deployment files.
1. Copy the Provided Script Files
Copy the providedcore and downloader directories to the server and then type cd core/.
2. Configure the Core Services
Before anything else, let’s configure each service and prepare the environment. Most configuration keys are stored within thecore/docker-compose.yml file.
PostgreSQL
The only special configuration will be the storage on the host machine.
Create a directory that will host PostgreSQL data in the host machine, and edit configuration file with that location. Replace the “/data/postgres” with your details.
volumes:
- /data/postgres:/var/lib/postgresql/data |
volumes:
- /data/mongodb:/data/db |
adminEmail: patrick@company.com
adminFullName: Patrick Poulin
Company Creation
defaultCompanyName: Your Company
Base URL that will respond to HTTP requests
grailsServerURL: http://yourcompany.com/app
Please note that the “/app” part is required.
API Fortress Mailer
Refer below.
API Fortress Downloader
To be configured after the dashboard bootstrap. Refer below.
3. Install Docker
Install Docker on a supported Linux distribution following the official instructions: https://docs.docker.com/engine/installation/ The API Fortress stack runs successfully on Docker 1.12.4. Install Docker Compose
Docker Compose is a utility that simplifies the deployment and management of complete stacks. Follow the official instructions for installation: https://docs.docker.com/compose/install/5. Provide API Fortress your DockerHub username
For API Fortress to grant you access to the API Fortress registries, your DockerHub username is required. If you don’t have a DockerHub account, create one at https://hub.docker.com/6. Login
Typesudo docker login and input your DockerHub credentials.
7. Create the API Fortress network
The default API Fortress subnet is172.18.0.0/16. Make sure the default subnet is not in use. If it is then edit it in the create_network.sh script. Issue sudo ./create_network.sh to create a virtual subnet for API Fortress.
8. Launch the Services
Before you launch any service, we strongly recommend you to run a:docker-compose pull from the “core” and “downloader” directories to download all packages and preemptively verify any possible connection issue.
To launch all core services, just run the start_all.sh script. It will take some time, but it will ensure every dependency is up and running before launching API Fortress.
9. Verify the Deployment
At the end of the process, the API Fortress dashboard should be up and running in the host server on port 80. You can also check for errors in the logs by issuing the:sudo docker-compose logs command.
The admin user login details are as follows:
- username: the email address provided in the docker-compose configuration, in the adminEmail field;
- password: ‘foobar’, change it as soon as you log in.
10. Configure and Run the Downloader
The API Fortress downloader is the agent that retrieves the resources to be tested. Downloaders can be installed in various locations, so factors such as latency and download time can be measured by remote consumers. In this configuration path, we are deploying a downloader in the same server as API Fortress, and it will serve as the default downloader. Click here to learn more about the Downloaders.1. Edit the downloader/docker-compose.yml file and take note of the value of the ipv4_address configuration key.
2. Login to API Fortress with the admin user, access the API Fortress admin panel by clicking the “user” icon in the top right, then click Admin Panel.
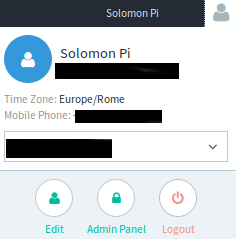
3. Choose “Downloaders” from the list of actions and click on the “Add Downloader” button.
4. Fill the fields: Name: Write a recognizable name. Location: A representation of where the downloader is. ie. Chicago Latitude / Longitude: The geographical position of the downloader. Last Resort: Check this to make it the default downloader used. URL: The address of the downloader, followed by port (default 8819) and path /api. In our example, the ipv4_address and our downloader address would result in https://172.18.1.1:8819/api API Key, API Secret: Write these two values down for use later. Assign to company: This is where you can choose which company in your instance has access to the downloader you are creating. *If you would like to use the same downloader across all companies in your instance, you can choose the option “Public downloader”.* **Note: choosing “Public downloader” does not make it publicly accessible by anyone, this just means it is accessible by all companies within your instance.**
5. Edit the downloader/docker-compose.yml file and enter the API Key and API Secret.
6. Go to the downloader/ directory and issue the sudo docker-compose up -d command.
11. Configure and run the Load Agent
If your contract includes load testing capabilities, you will need to deploy at least one load agent to use this feature. A load agent is an application that will be used by the API Fortress platform to run tests in parallel to cause higher load. This manual describes how to run the first load agent in the server running the dashboard. This setup is acceptable for testing purposes. On production, we suggest dedicating the load agent a separate machine. The directory containing the configuration for the load agent is called core-server and is part of your distribution.Step 1: Configure the maximum users per load agent
Users per agent are the maximum number of virtual users that each Load Agent can provide. It’s important to remember that large numbers of simulated users will require large amounts of hardware resources. Contact your DevOps team to develop a strategy for resource allocation.- Locate and open the file named application.conf. It is located in core-server/etc.
- Line 14 of this file (fixed-pool-size) should have it’s value adjusted to match the desired number of maximum users per agent.
- Line 48 of this file (nr-of-instances) should have it’s value adjusted to match the desired number of maximum users per agent. These two values should match.
Step 2: Configure the config.yml file
- Locate and open config.yml. It is located at core-server/etc.
- First, we have to configure the baseURL
- baseURL is located on line 3.
- If the Load Agent and the API Fortress Dashboard are located on the same server, then you can replace the baseURL with the internal address and port of the Dashboard on the server.
- If the Load Agent and the API Fortress Dashboard are located on different servers, you can replace the baseURL with the actual URL of the Dashboard. That is to say, the URL you would use to access it via web browser.
- Next, we need to provide the API Key and Secret.
- Open the main API Fortress dashboard and click the gear icon in the upper right corner to access the settings menu
- Click the “API Keys” option in the left sidebar.
- Click “+API Key”

(Click image for GIF of procedure)
- Copy the API Key to line 5 of config.yml.
- Copy the Secret to line 6 of config.yml.
Step 3: Add the engine
- The next step is to add the new Engine to API Fortress itself.
- Log into API Fortress as an administrator.
- Click the user icon in the upper right corner, and then click “Admin Panel”
- Click “Engines” on the left side of the screen.
- Click “+Engine”
- Enter the name and location of the Engine.
- The CRN value defaults to a random string. You must change it to something human-readable. This is the internal name of the engine.
- After modifying the CRN, copy the value to line 11 of config.yml
- Copy the secret to line 12 of config.yml
- Select the Owning Company of the Engine. An Engine must be owned by a single company. The default value (Public Engine) should not be chosen.
- Select “Yes” for “Dedicated to Load Testing“
- Click the green check to save the Engine settings.
(Click image for GIF of procedure)
Step 4: Run the engine
At the desired server location, use the “docker-compose up -d” command to deploy the Load Agent container. After the operation is complete, the Load Agent will be visible to your API Fortress Load Tests.API Fortress Configuration Guide
A description of each configuration field you may need to alter. API Fortress DashboardBootstrap
– adminEmail: The admin user email address, also used as login. – adminFullName: The admin’s full name. – defaultCompanyName: The company name.System
– grailsServerURL: the url the server will respond to – dbHost: MongoDB host – psqlhost: PostgreSQL host – rabbitHost: RabbitMQ host Note: in case you’re considering using an external PostgreSQL provider, the psqlUsername and psqlPassword parameters are also available. The database name is fixed and it’s apipulse.API Fortress Mailer
– twilioSid: SID, if you’re sending SMSes via Twilio. – twilioToken: token, if you’re sending SMSes via Twilio. – smsFrom: the phone number of the SMS sender, if you’re sending SMSes via Twilio. – mailFrom: the email address that will be sending notification emails. – mailUseSES: ‘true’ if you’re sending emails via Amazon SES. False if you’re using SMTP. – amazonKey: the Amazon key, if you’re sending emails via Amazon SES. – amazonSecret: the Amazon secret, if you’re sending emails via Amazon SES. – mailSmtpHost: the SMTP host. – mailSmtpPort: the SMTP port. – mailSmtpUsername: the SMTP username. – mailSmtpPassword: the SMTP password. – apifortressServerURL: the url the server will respond to.API Fortress Downloader
– apikey: the API key, as shown in the admin panel. – secret: the API secret, as shown in the admin panel. – port: the HTTP port the server will be listening to, in HTTP mode. – rabbitHost: the RabbitMQ host, when running in active mode. – rabbitPort: the RabbitMQ port, when running in active mode. – rabbitSsl: ‘true’ if RabbitMQ will need to communicate over SSL when running in active mode. – rabbitUsername: the RabbitMQ username when running in active mode. – rabbitPassword: the RabbitMQ password when running in active mode. – use_rabbit: ‘true’ to run in active mode. – use_http: ‘true’ to use the internal HTTP server (passive mode). – use_ssl: ‘true’ if the internal HTTP server has to run over SSL. The network configuration is also important as the IP address may be used for internal communication. networks.apifortress.ipv4_address: the reserved IP address in the API Fortress subnet.Appendix: Importing help tools and connectors
The API Fortress database comes free from data, but the provided package gives you the option to import the help tools and the connectors. These operations are meant to be run once the API Fortress stack is fully functional. Import Help From the /data directory, run theimport_help.sh script.
Import Connectors From the /data directory, run the import_connectors.sh script.
Appendix: Tweaking Tomcat Configuration
If you need to tweak the Tomcat configuration, you will need to mount the Tomcat conf/ directory in your system. 1. Change the configuration files you need to edit in thecore/tomcat_conf/conf directory
2. Mount the directory by uncommenting the following lines in the core/docker-compose.yml file:
# volumes:
# - ./tomcat_conf/conf:/usr/local/tomcat/conf |
core/tomcat_conf/conf directory
2. Edit the core/tomcat_conf/conf/server.xml file and uncomment the block:
<Connector port="8443" protocol="org.apache.coyote.http11.Http11Protocol" maxThreads="150" SSLEnabled="true" scheme="https" secure="true" clientAuth="false" sslProtocol="TLS" /> |
keystoreFile="/usr/local/tomcat/conf/keystore.jks"
keystorePass="thePasswordHere" |
core/docker-compose.yml file:
# volumes:
# - ./tomcat_conf/conf:/usr/local/tomcat/conf |
core/docker-compose.yml file, change the port declaration to:
ports:
- 443:8443/tcp |
4. Uncomment the following section:
<!-- <Valve
       className="org.apache.catalina.valves.RemoteIpValve"
       internalProxies=".*"
       remoteIpHeader="x-forwarded-for"
       proxiesHeader="x-forwarded-by"
       protocolHeader="x-forwarded-proto"
   /> -->
5. Tweak the configuration if needed
6. Restart the API Fortress dashboard service