Post: Multipart Upload

Note

This feature is only available on-premises, as of API Fortress version 20.2.0.
This feature also requires that you update the “remotedownloadagent” to the latest version as well.

The following instructions are to show how to make a POST call with an entire file included in the data.

Mounting a Volume

For multipart, API Fortress will look for files in the /data directory, so you’ll have to mount a volume to the /data directory. For example, if you’re using docker-compose, it’s done like this:

  • Navigate to the /core/ directory.
  • Stop “apifortress” but issuing the following command:
    sudo docker-compose stop apifortress
  • Open the “docker-compose.yml” file. 
  • There is a section labeled “#APIFORTRESS DASHBOARD”, at the bottom of this section there will be a “volumes” section.  
  • Here you will see “# – ./data:/data” you can uncomment this line by getting rid of the “#”
  • This will create a folder called “data” in the “/core/” directory.
    volumes:

- ./tomcat_conf/conf:/usr/local/tomcat/conf

# - ./bin:/usr/local/tomcat/bin

- ./data:/data
  • Now start the “apifortress” service again by issuing the following command:
    sudo docker-compose up -d apifortress

Make a Multipart POST Call

Now that we have a directory mounted we can make the POST call using a file from the “/data/” folder. 

  • You can add a “post parameter” to your POST call to load the file into.
  • Give the post parameter a name and craft the value using the following notation: “@file:filename.extension”.
  • If the name matches a file in the /data/ directory, then the whole form becomes a form-data type, and the file will be uploaded as a multipart.

Assert Valid JSON-Schema

This assertion is used to validate a JSON schema, based on the provided schema definition. Parameters:
Name Type/Value Required
Expression Expression Yes
JsonSchema JSON schema definition Yes
Assertion comment String No
Expression: Is the path to the element we want to operate on (ex: payload.ProductID). See Expression for more details. JsonSchema: The JSON schema definition. This will be used to validate the JSON passed in the expression field. Example:
Sample JSON: { "rectangle": { "a": 15, "b": 5 } } Sample Schema: { "type" : "object", "properties" : { "rectangle" : {"$ref" : "#/definitions/Rectangle" } }, "definitions" : { "size" : { "type" : "number", "minimum" : 0 }, "Rectangle" : { "type" : "object", "properties" : { "a" : {"$ref" : "#/definitions/size"}, "b" : {"$ref" : "#/definitions/size"} } } } }
Code View Example:
<set var="json_success" lang="template"> <![CDATA[{ "rectangle" : { "a" : 15, "b" : 5 } }]]> </set> <assert-valid-jsonschema expression="json_success"> <![CDATA[{ "type" : "object", "properties" : { "rectangle" : {"$ref" : "#/definitions/Rectangle" } }, "definitions" : { "size" : { "type" : "number", "minimum" : 0 }, "Rectangle" : { "type" : "object", "properties" : { "a" : {"$ref" : "#/definitions/size"}, "b" : {"$ref" : "#/definitions/size"} } } } }]]> </assert-valid-jsonschema>

GitHub – Use a File as a Datasource

This Github component is meant to simplify the process of retrieving a file from Github and use it as a data source. Some examples of files to use would be CSV or JSON files. Here is a tutorial on how to use it as part of a test. The GitHub component has the following fields: 4
  • Account is your GitHub username
  • Repository is the name of the repository that your data file is pushed to.
  • Branch is the repository branch that the desired version of the data file is in.
  • Token is the token described above, generated in the GitHub platform.
  • Variable is the variable that the payload will be stored under.
  • Path is the name of the file in the repository.
  • Mode is the filetype of the file in the repository.

Generating a JSON Web Token

In some occasions, you may be required to generate a JSON Web Token. While API Fortress does not currently have a specific component for it, this result can be achieved by using an helper class.
  1. Create a SET component, with “Language” a variable mode.
  2. Introduce the following code Groovy in the component
    def claims = ['foo':'bar','dot':'com']
    
    def subject = 'my subject'
    
    def secret = '52535d535c515d55555'
    
    return io.jsonwebtoken.Jwts.builder().setClaims(claims).setSubject(subject).signWith(io.jsonwebtoken.SignatureAlgorithm.HS512,secret).compact()
  3. The SET variable will now contain a valid JWT, built with the provided data
Notes:
  • In this example we declare the claim, the subject and the secret right within the script. This is for demonstration purposes, all the three items may come from the scope of the test, the data sets or the vault.
  • The scripts uses HS512 as signature algorithm. All the possible options are: NONE, HS256, HS384, HS512, RS256, RS384, RS512, ES256, ES384, ES512, PS256, PS384, PS512

Execution Context in API Fortress

Preamble: the nature of fields

Among the pieces of information you introduce in an API Fortress test some are:
  • Taken statically, as strings. These are ingested as they are in the system. Examples:
    • the var field in the SET component (the name of the variable itself)
    • The type field in an ASSERT-IS component
  • Evaluated as expressions. This means that whatever you put in there, it’ll be considered a “piece of code”, something to be evaluated as a logical expression. Examples:
    • The expression field in all assertions
    • The data or object field in the SET component
Most of the times, they are selectors, as in payload.person.age
  • Evaluated as string templates. These are ingested as static strings unless variables are present in it. When variables are present, these get replaced with the values taken from the scope. Examples:
    • The content of the COMMENT component
    • The body of the postBody component
They are generally used to print a string with variable content as in: {  “person”: {     “age”: ${age}  } }  

Data manipulation in evaluated fields

Every evaluated field, such as expressions and variable references in templates, allow data manipulation operations. This means that you’re not limited to just selection of data, but you can manipulate the data to make it what works for your needs. To do that, you can leverage multiple functions.

Expression language extensions

These extensions are unique in the API Fortress engine, and allow you to perform various operations that come handy in your daily work. The full reference is here: https://apifortress.com/doc/expression-language-extensions/   Here are a few examples:
  • I need to create a payload that contains a date in milliseconds, that is certainly in the future compared to the current moment. It also needs a unique ID for the request: { “futureDate”: ${D.plusDays(D.nowMillis(),3), “id”: ”${WSCrypto.genUUID()}” }
  • I need to pick one random item from an array, and store it in a variable for later use: <set var=”my_item” object=”payload.myarray.pick()”/>
  • I need to put my randomly picked item an a JSON payload, in JSON format: {  “item”:${my_item.asJSON()} }

Language specific functions

While the extensions can be seen as useful functions for API related tasks, other times you may be in need to perform less specific operations, in a more programmer-like fashion. Splitting, cutting, searching strings is quite a common thing, as much as accessing specific items in arrays, and so on. For all these general purpose tasks, API Fortress allows you to use the Groovy programming language in all evaluated fields. Note: on the cloud, just a subset of these commands are available, while on-prem you get the full language coverage, unless set otherwise in the configuration. The full semantics documentation is located here: http://groovy-lang.org/semantics.html   Here’s a few typical use cases:
  • Take a certain integer from a payload, and store it multiplied by 10: <set var=”item” object=”payload.counter+10”/>
  • Append a suffix to a variable already set: <set var=”item” value=”${item+’-foobar’}”/> But this would also work: <set var=”item” value=”${item}-foobar”/>
  • Split a string on the comma, and iterate on it with an EACH component: <each expression=”payload.the_string.split(‘,’)”>
  • Make sure that the prefix (before the – dash) of a certain piece of data is an integer (as in: “123-foobar”): <assert-is expression=”payload.id[0..id.indexOf(‘-‘)-1]” type=”integer”/> Reads: substring payload.id from index zero to the index before the first occurence of ‘-’
 

The SET lang component

The SET component also has a special mode that allows you to write a little Groovy snippet when stuff get rough. It can be accessed by choosing the “Language” mode, and it allows you to write logic like the following: def items = [] 10.times{ it->   items += it } return items The assigned variable will contain an array of integers initialized with the numbers from 0 to 9.

Appendix: string vs number dichotomy

In API Fortress, most built in data structures are strings, such as:
  • The variables from the vault
  • The variables from the input sets
  • The environments
  • The variables passed in an API Run call
But also everything generated by the evaluation of a template string, such as:
    • The comments (obviously)
    • The request payloads (obviously)
 
  • The value fields
  This is why the SET operation has both a value field and an object (Data) field. Assuming I’ve set 2 variables like this: <set var=”data1” value=”5”/> <set var=”data2” object=”5”/> And I had to create a third variable incrementing the previous variable by two: WRONG <set var=”data3” object=”data1+2”/> data3 is 52 as data1 is a string   OK <set var=”data3” object=”data2+2/”> data3 is 7 as data2 is an integer   For the very same reason: <set var=”data3” value=”${data2+2}”/> data3 would indeed store 7, but as a string, not a number. Which may be OK in most cases, unless you need to manipulate the number more.   So what if I wanted to increment data1 by 2 then? <set var=”data3” object=”data1.toInteger()+2”/> The toInteger() method is always there to help you. And if unsure whether a piece of data is already an integer or not, the toInteger() method won’t complain if the data is an integer already.

Connecting to TestRail

testrail + apif Test case managers are often critical to helping modern teams manage cases, plans, and runs. Communication of the test results is key, and that’s why API Fortress makes it easy to integrate with many leading platforms today. TestRail is one of them. API Fortress makes it easy to automate the testing of your APIs, and to trigger those tests to run automatically on a schedule, and during a build process (eg: Jenkins). That test result data can be pushed to your TestRail instance automatically. Here is a quick guide to setup of how to set it up. First, click the gear icon in the upper right corner of any view in API Fortress, highlighted in the below image. 2 Next, we’re going to click “Alerts Groups” on the left navigation bar, followed by “+ Alert Group” to create a new group, name it, and finally click the connector button. The GIF below demonstrates this procedure. AlertGroup Next, we need to add the TestRail connector to the alert group. Click “+ Connector” and select TestRail in the dropdown that appears. Screen Shot 2018-06-27 at 11.29.36 AM Next, we need to define the parameters that we’re going to pass to the TestRail connector. Click the pencil icon to edit the parameters, and then fill out the fields in the modal.   1 Username: Your TestRail Username. Password: The password for the TestRail account you’re using. Project_Id: The ID (an integer) of the TestRail project you’d like the API Fortress results to populate. Domain: The subdomain of your TestRail instance. It’s the part of the URL that comes between “https://” and “.testrail.io” Next, we need to add the alert group to the project. Go to the projects view and click the “settings” icon on the project that you’d like to use the connector for. 4a In the dropdown that appears, if you begin typing the name of the alert group in the bottom field, it will populate automatically. Select it and click the green check to complete the connection process. Screen Shot 2018-06-27 at 10.57.38 AM Your project in API Fortress is now connected with TestRail! It’s important to note that only test results that are generated automatically, either through the scheduler or an API call, will trigger the connector. Manually executed tests (Run Test button for example) will not trigger the connector. As soon as a test is triggered automatically, we will see the pass/fail result appear in the project of our choice in TestRail, with a link to the test report in API Fortress. Everything you need to know about your API test results in your TestRail instance. 5a

Key/Value Store

The Key/Value Store

The Key/Value store allows API Fortress users to create temporary key/value pairs that can be accessed across different tests. The Key/Value store is accessed via the Key/Value Store Component. Screen Shot 2018-05-24 at 1.22.48 PM An extremely important point to note is that these key/value pairs are temporary. They expire after 24 hours has elapsed since the last update to the value itself.  
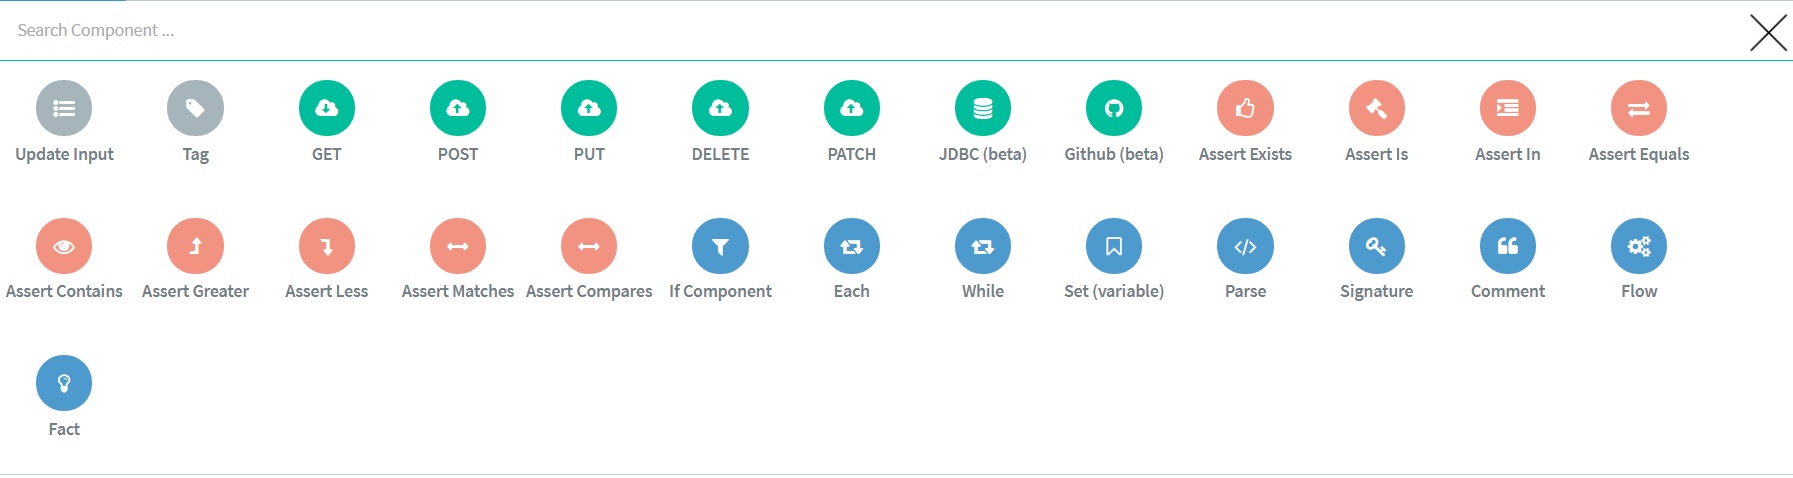
The Key/Value Store Component has 4 methods available for use. They are:
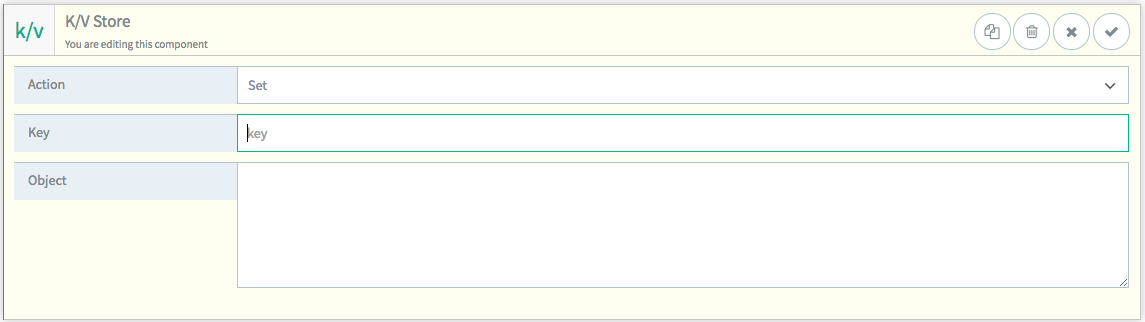
Set

Set will create a new key/value pair in the Key/Value store. The value is entered in the “Object” field. Screen Shot 2018-05-24 at 10.50.19 AM

Load

Load will recall a value from the Key/Value store when provided with a key.
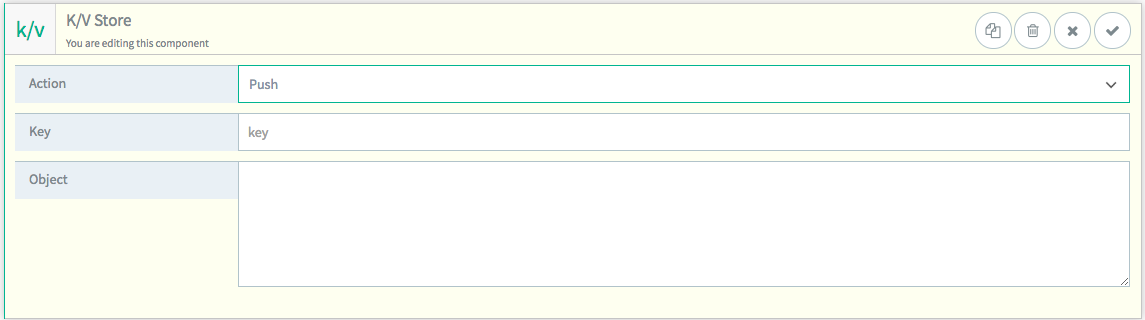
 Screen Shot 2018-05-24 at 10.50.36 AM  

Push

Push will add a value to the end of an existent value of the datatype “Array” in the Key/Value store. If no such key exists, it will create a new array containing the passed in value.  The passed in value is entered in the “Object” field. Screen Shot 2018-05-24 at 10.51.09 AM  

Pop

Pop will remove a value from the end of an existent value of the datatype “Array” in the Key/Value store. Screen Shot 2018-05-24 at 10.50.52 AM  

Basic Workflow

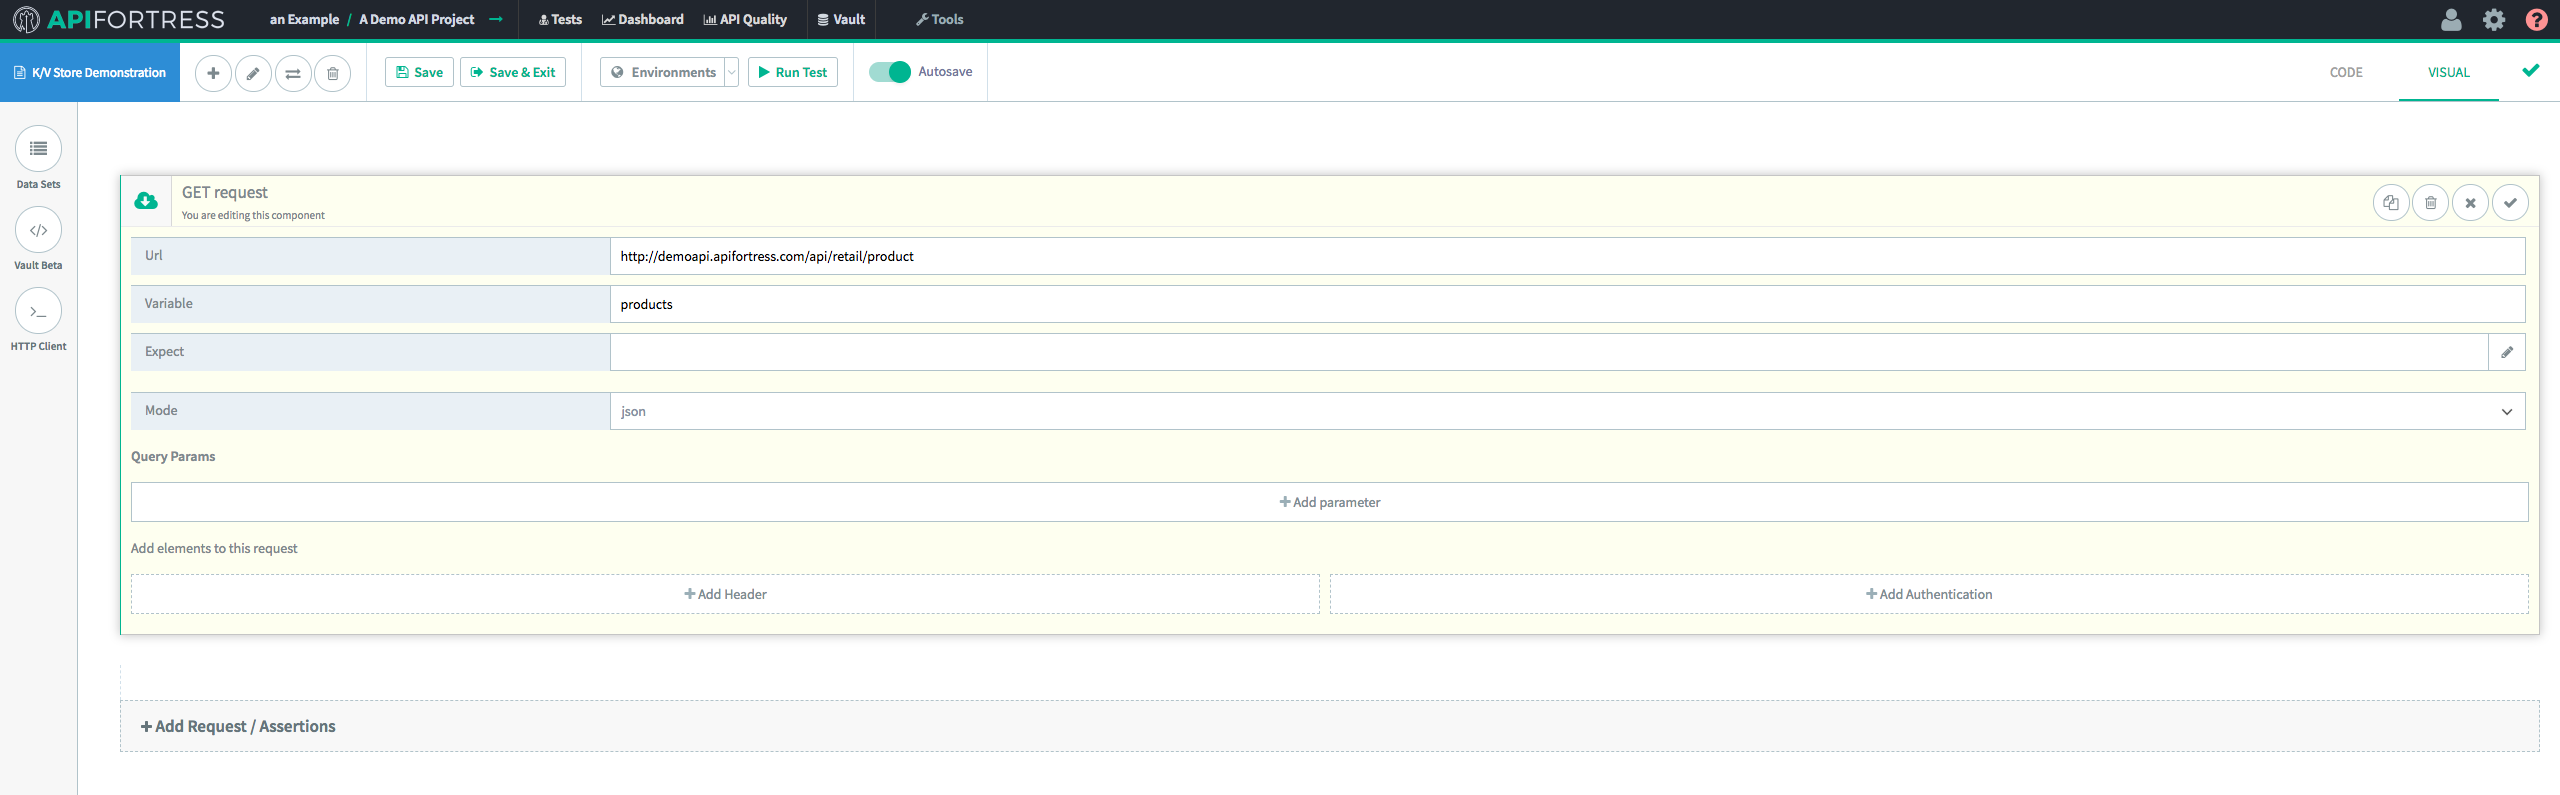
Let’s take a look at how this workflow works in a practical setting. The first example will be a simple set and retrieve of a value in the Key/Value Store. 
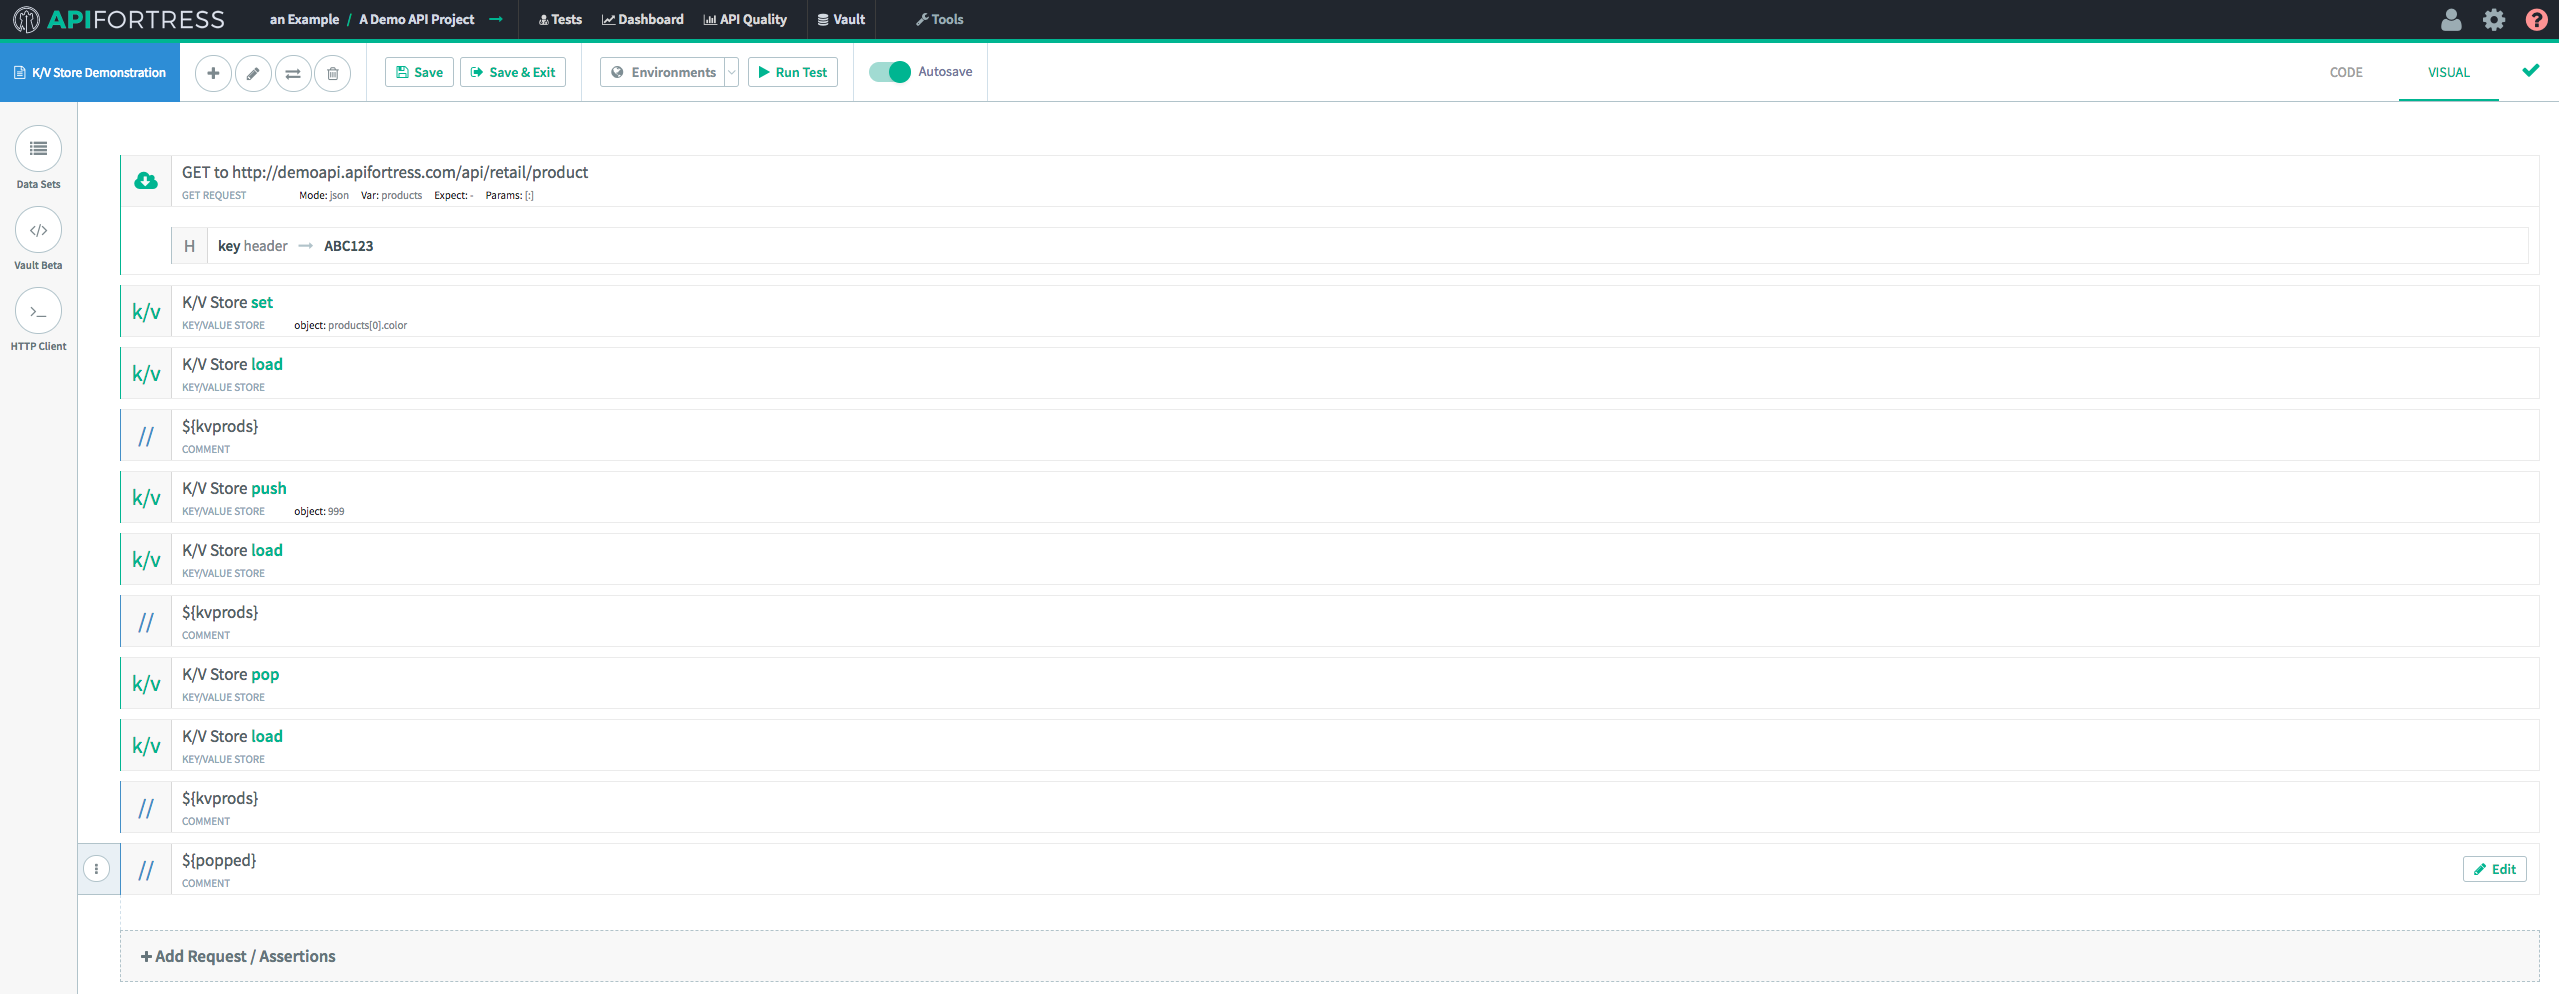
First, we’ll make a GET request to an endpoint. Screen Shot 2018-05-24 at 1.21.40 PM Next, we’ll add a K/V Store component. component 
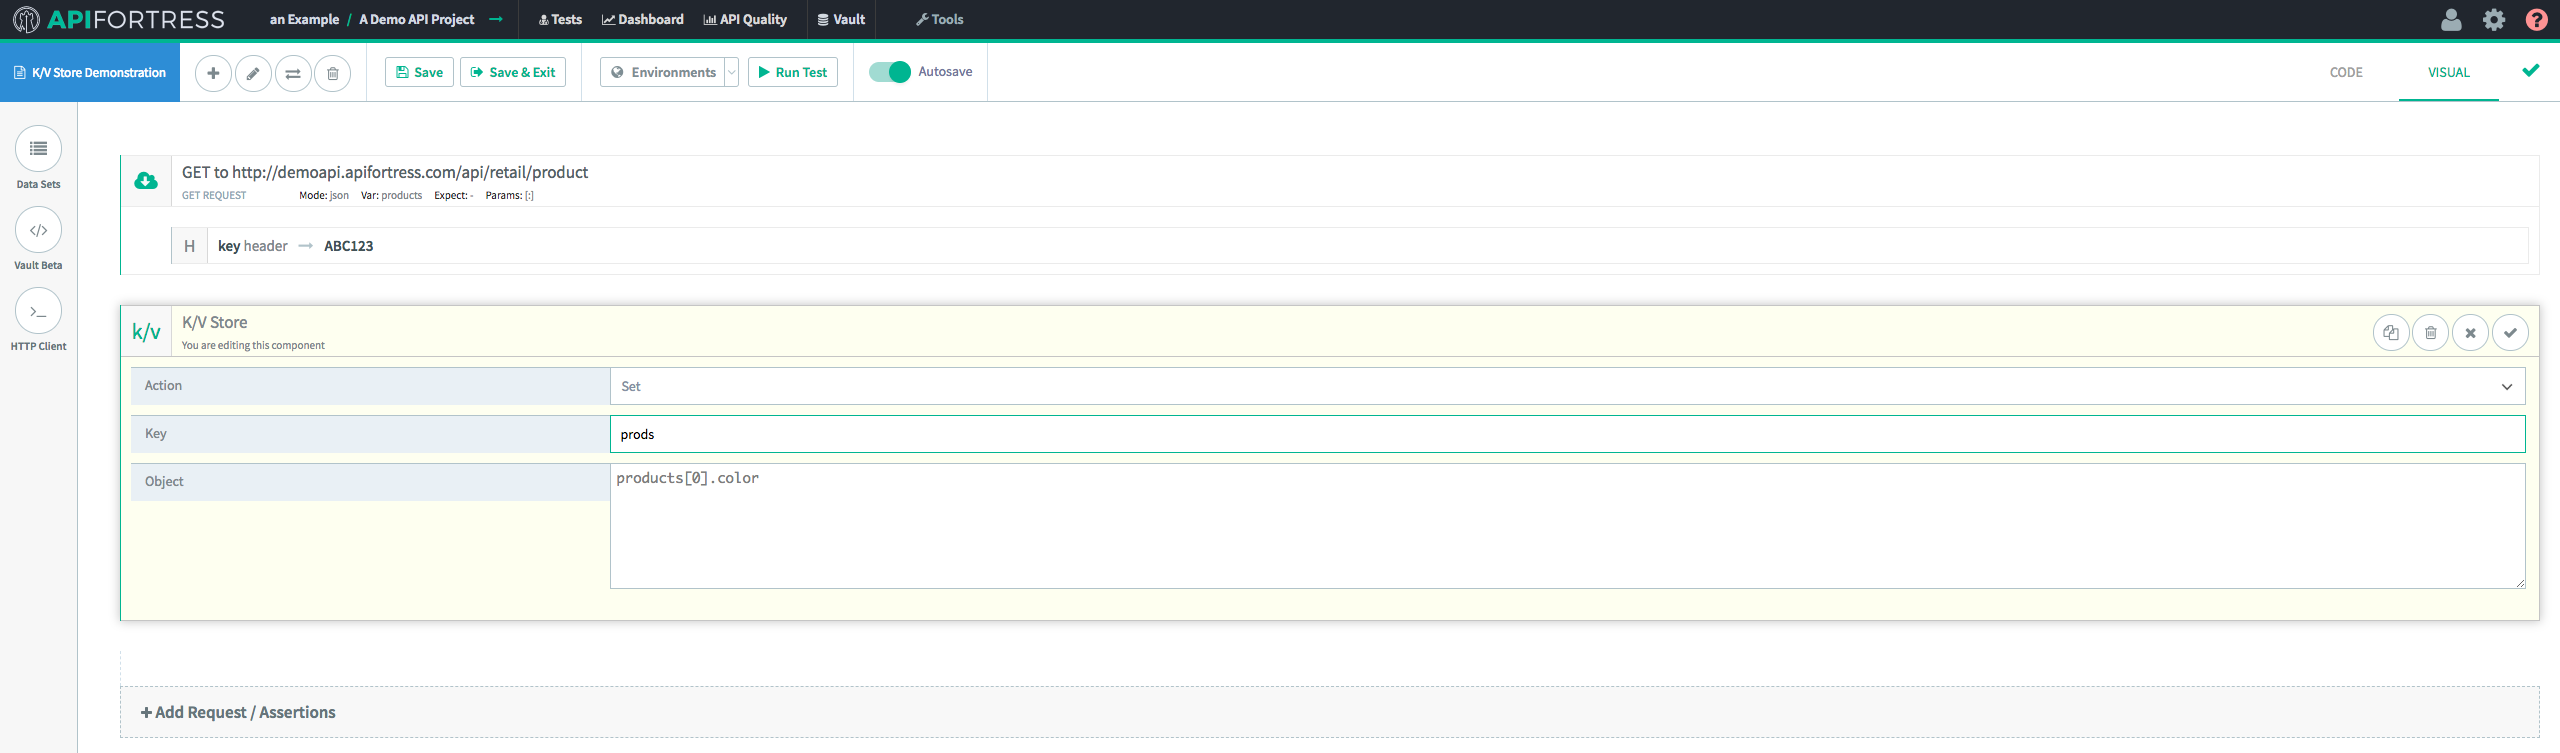
This first K/V Store component (we’re going to incorporate several) is going to set the Key/Value pair in the Store, so we’re going to use “Set.Screen Shot 2018-05-24 at 1.46.41 PM 
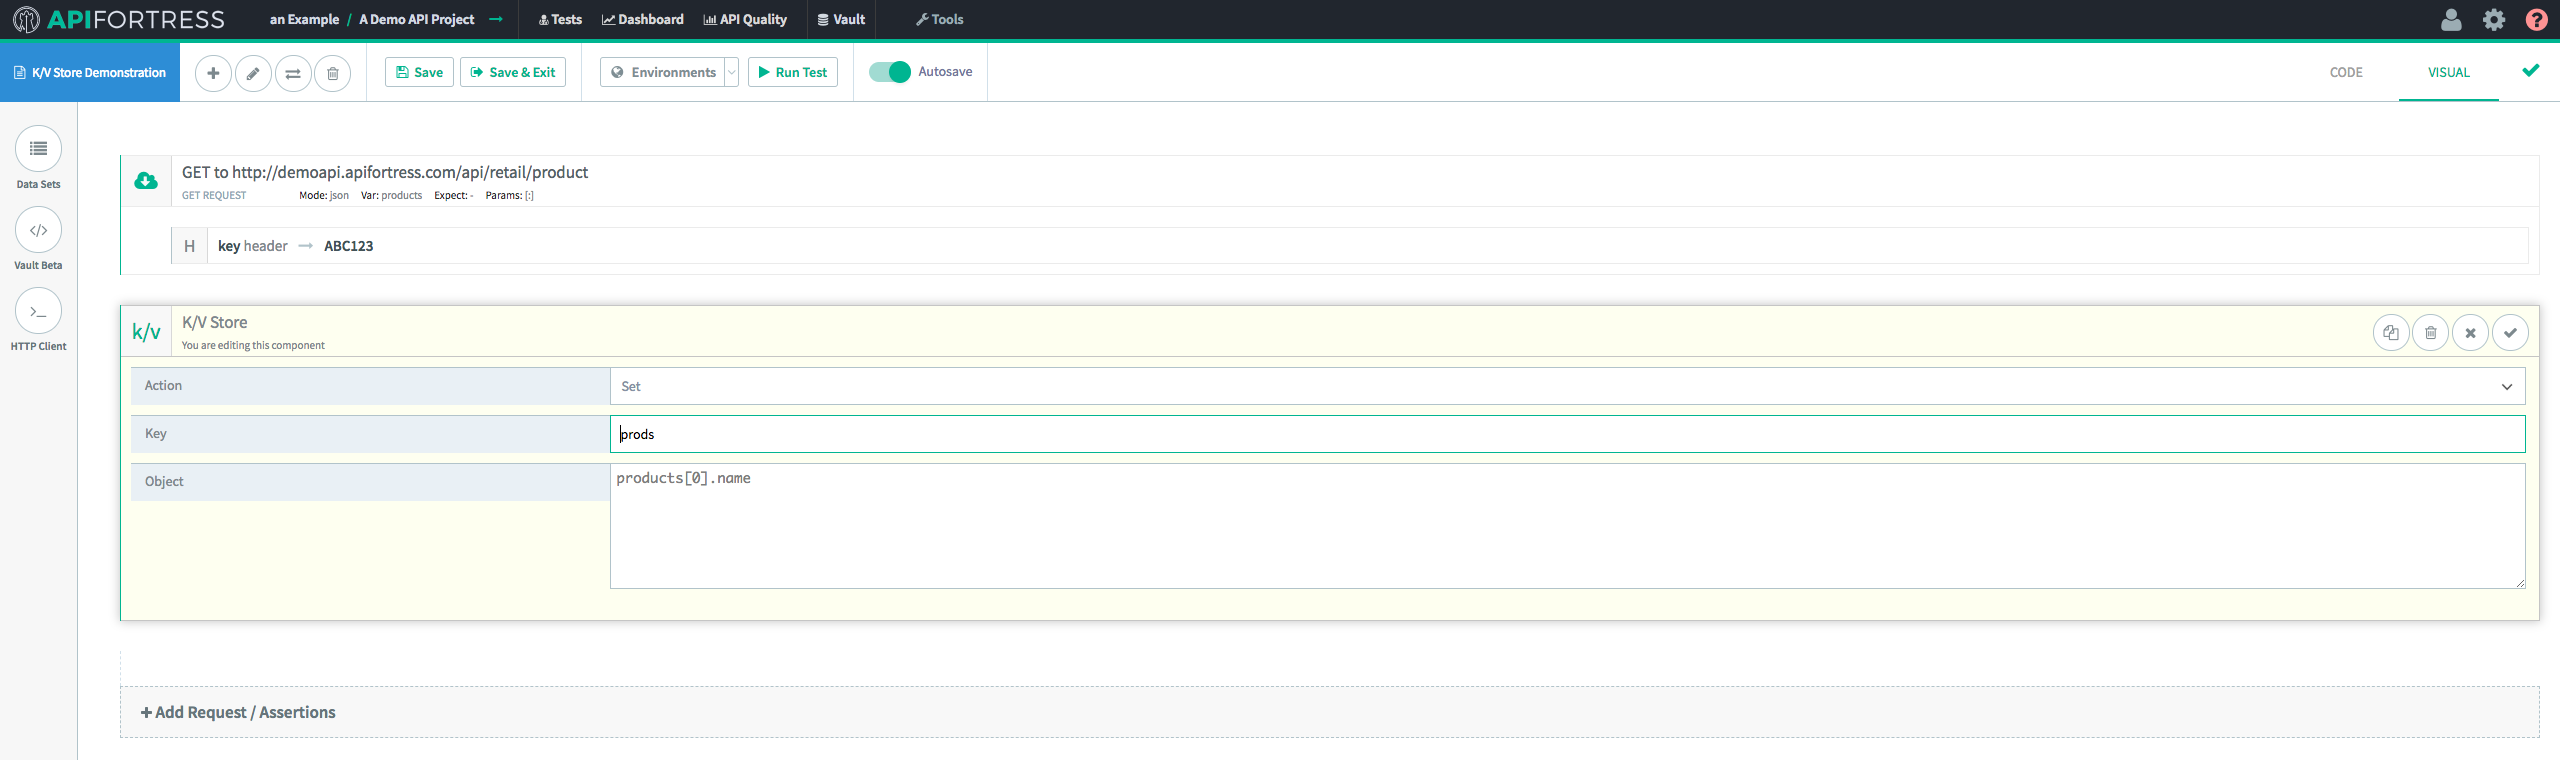
In this case we’re setting the Key “prods” equal to “products[0].name”, which in this case evaluates to “Baseball Cap.” 
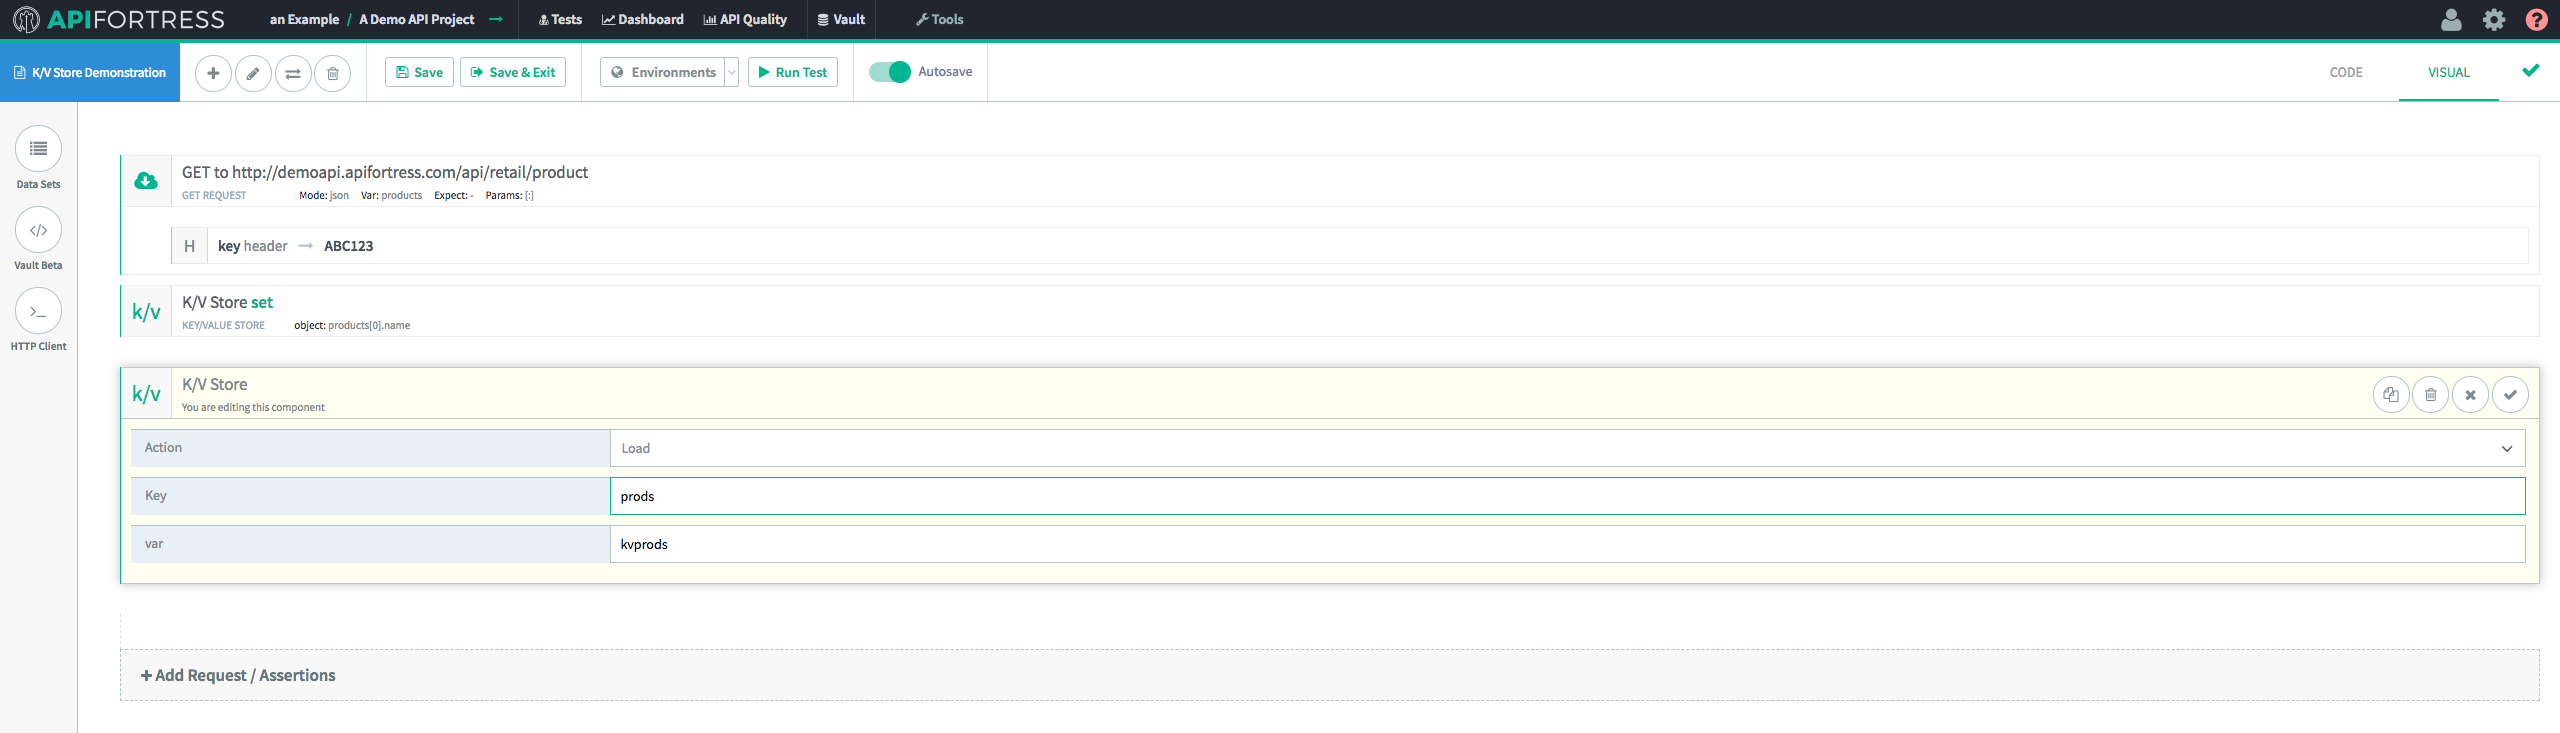
Next, we’re going to retrieve this Key/Value pair from the store with the “Load” method. In the K/V Store “Load” component, we’re going to assign the retrieved value to the variable “kvprods.” Screen Shot 2018-05-24 at 1.47.22 PM 
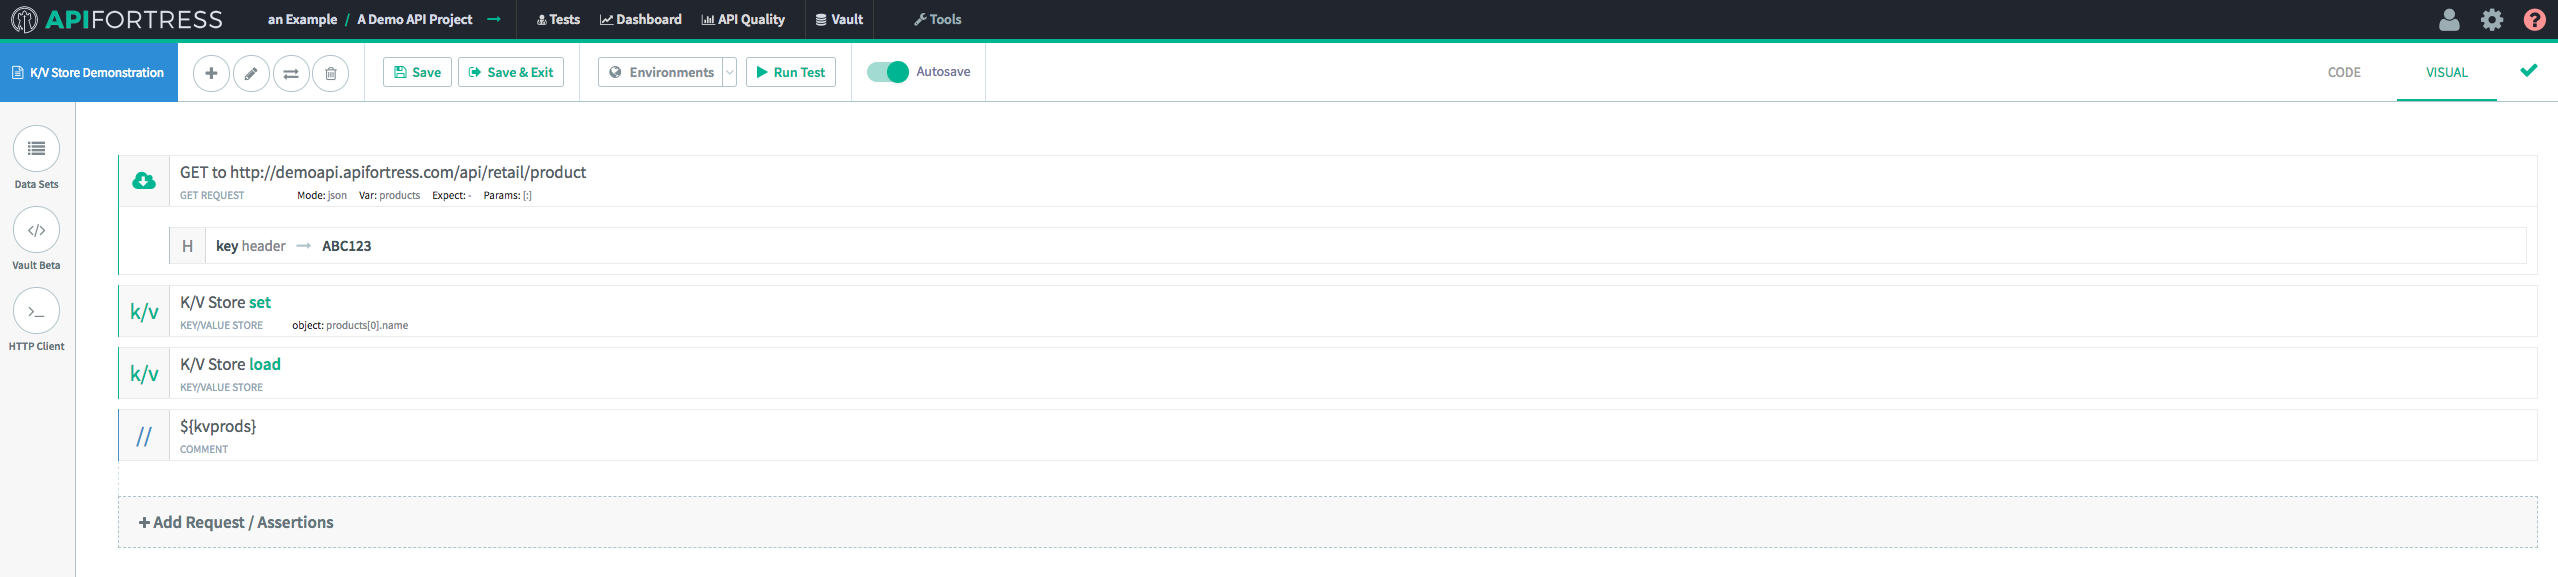
Finally, we’ll add in a “Comment” component to ensure that the data was recovered successfully. Screen Shot 2018-05-24 at 1.48.01 PM When we run the test, we’re presented with the following result:
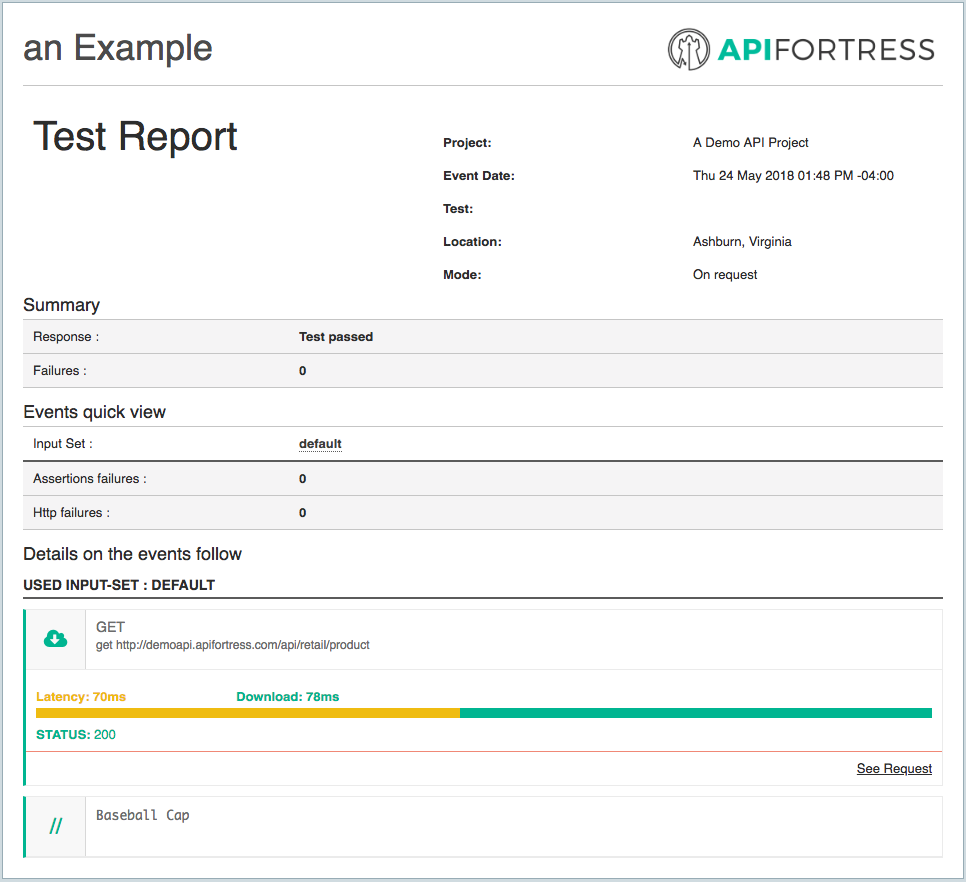
 Screen Shot 2018-05-24 at 1.48.28 PM Success!

Push/Pop Workflow

Next, we’re going to take a look at how “Push” and “Pop” work. “Push” and “Pop” are both array methods and behave as they normally do outside of this context. “Push” will append a value to the end of an array. “Pop” will remove the last value in an array. First, we’re going to use “Push.” It should be noted that “Pop” works similarly but with the opposite result. “Popalso assigns the removed value to a variable which can be used in the context of the test, but can no longer be accessed from the Key/Value Store. We’ll discuss this further when we take a look at “Pop.” First, we’re going to send a GET request and assign a key in the Key/Value Store to a value from the response body. In this case, we’re going to use “Color,” which is an array. Screen Shot 2018-05-24 at 1.49.16 PM Next, we’re going to “Load” and “Comment” this key. We’re doing that so we can actually see the change on the test report at the end of this workflow. 
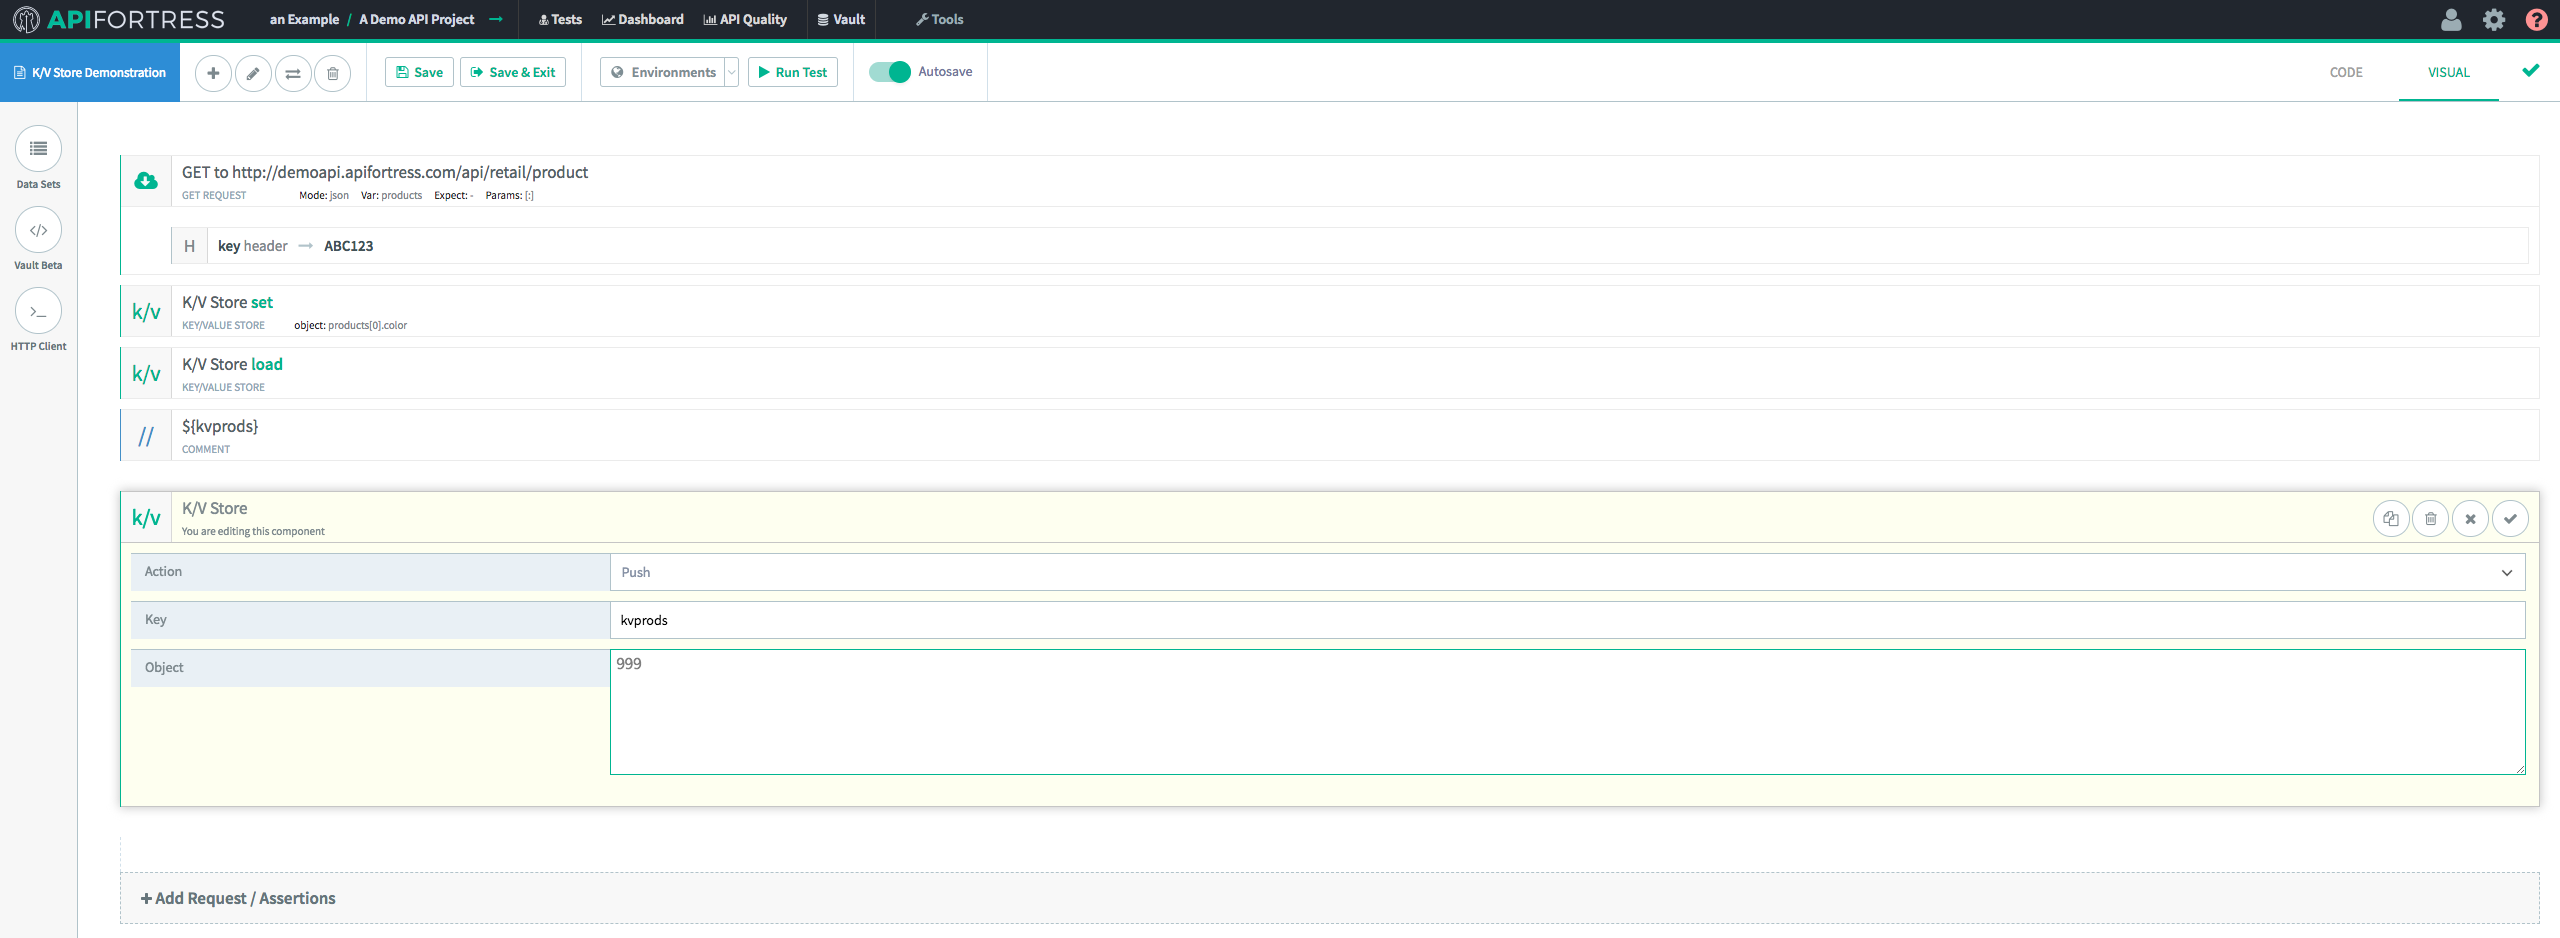
The next step is to “Push” the new data on to the end of the existing array. Screen Shot 2018-05-24 at 2.43.53 PM 
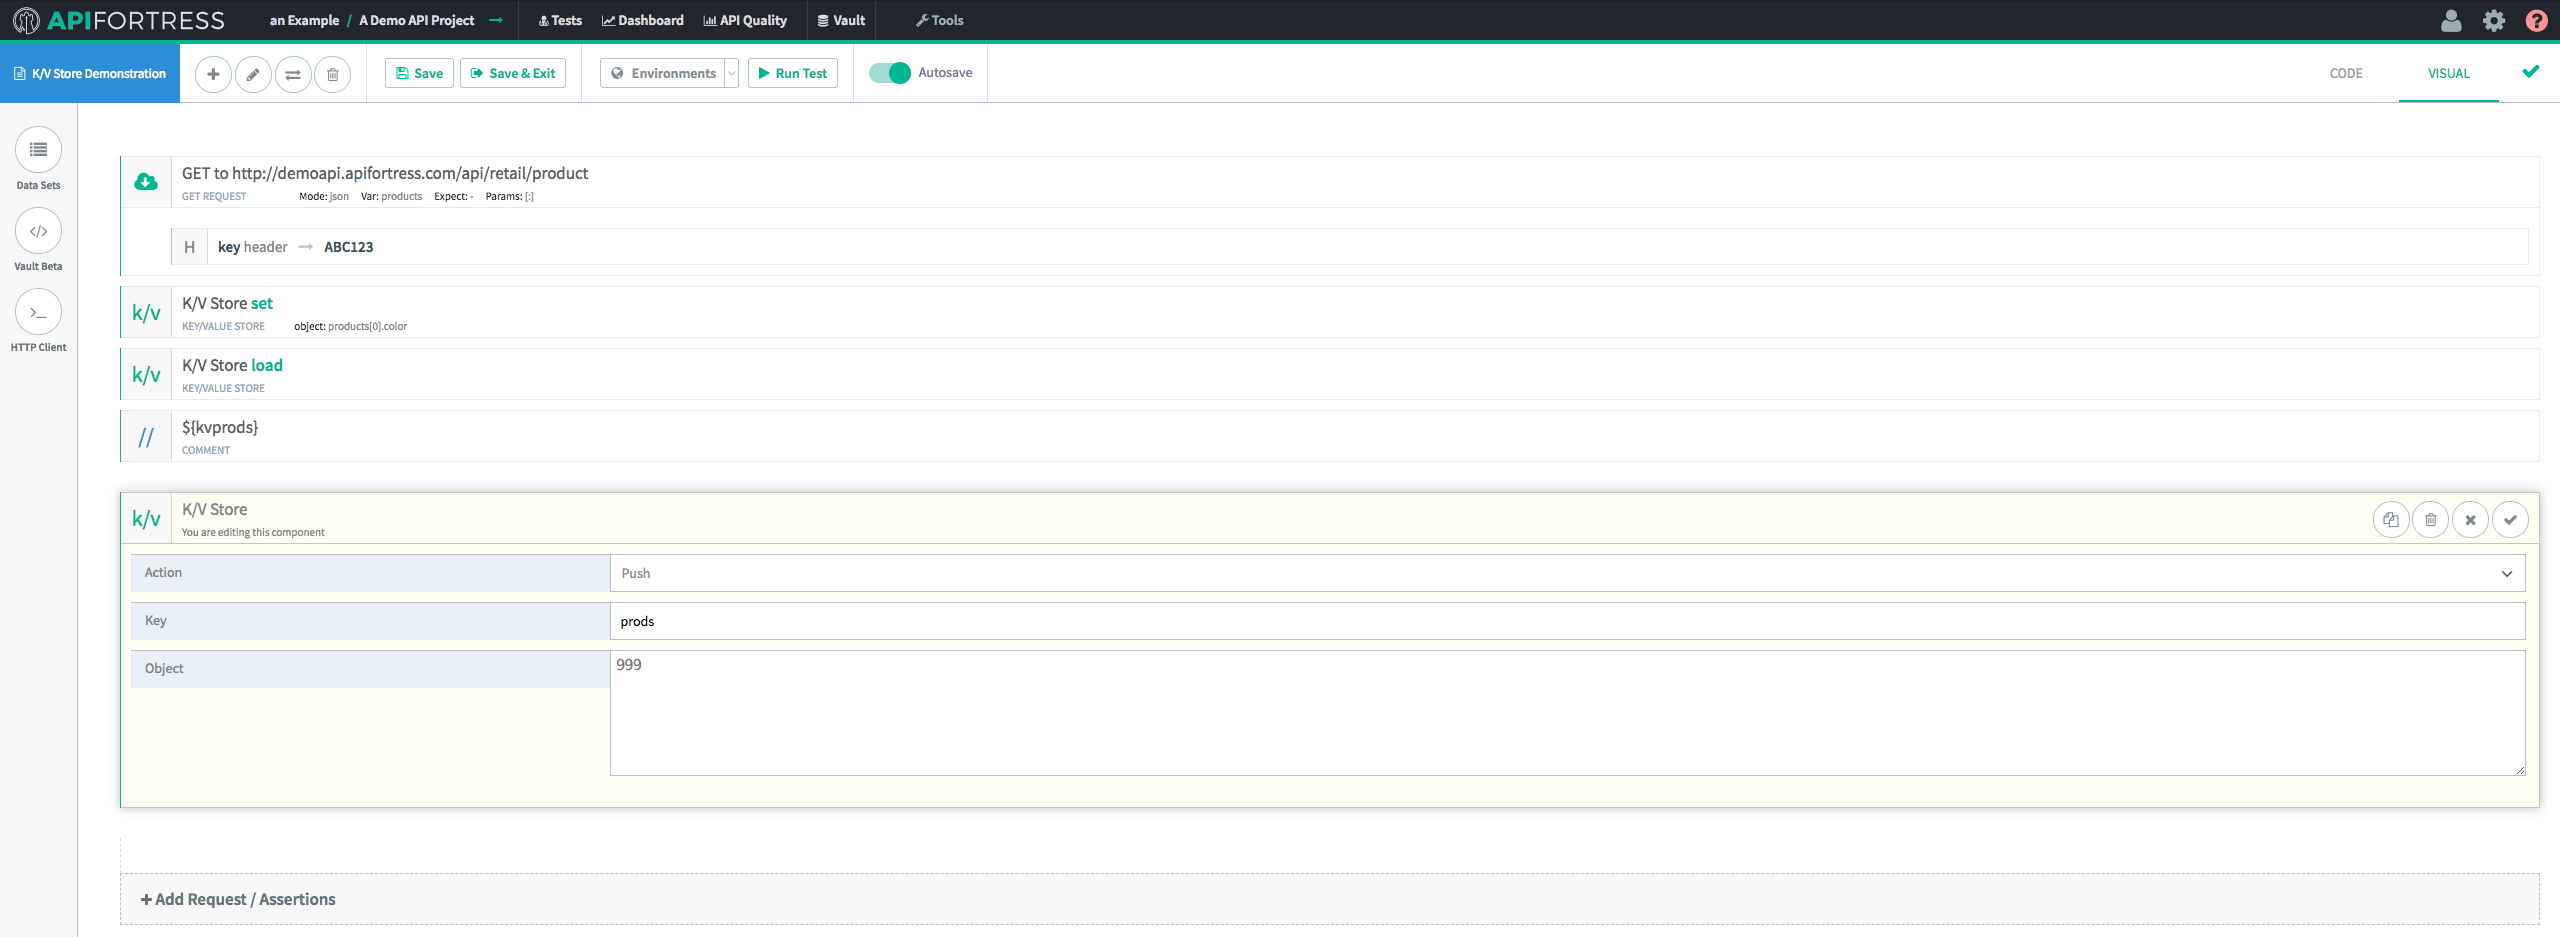
In this case, we’re pushing the integer 999 onto the prods array. Finally, we’re going to “Load” the modified data into the test from the K/V Store. Screen Shot 2018-05-24 at 1.51.48 PM When we run the test, we’re presented with the following test report. Screen Shot 2018-05-24 at 1.51.59 PM 
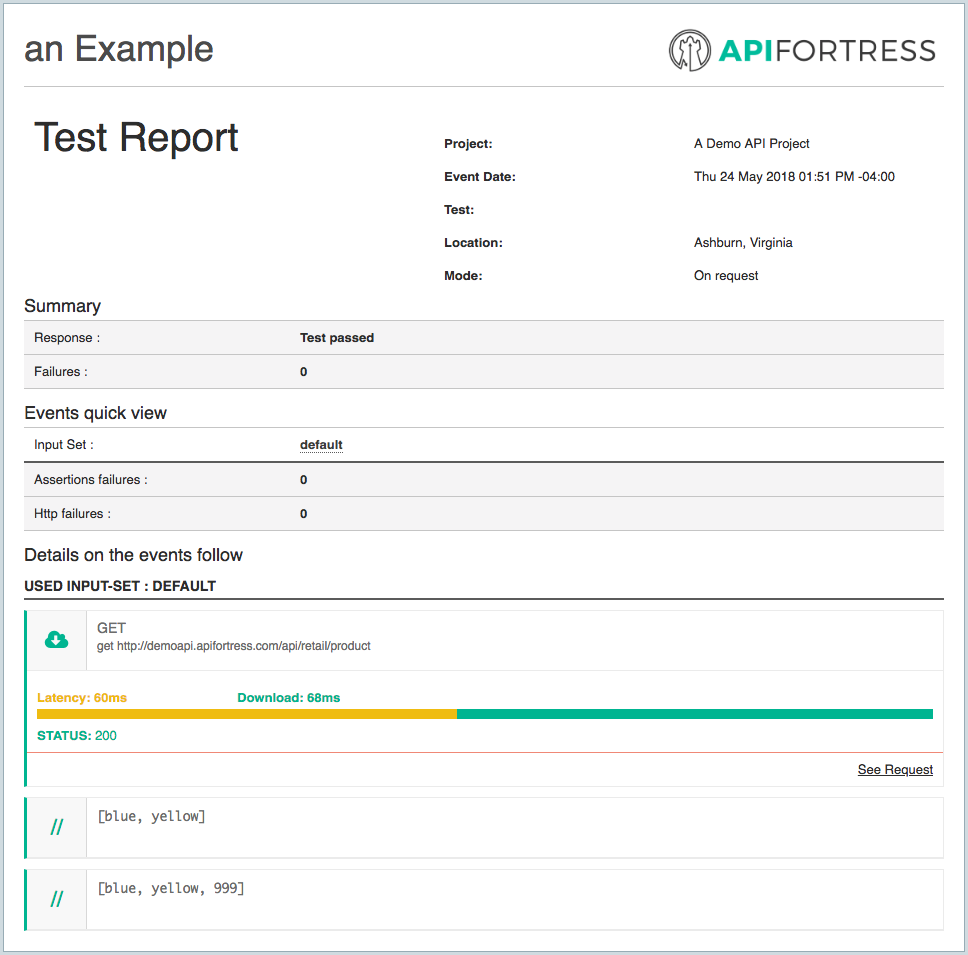
The comments show us clearly that we have pushed the number 999 onto the array stored in the key prods.  Now, we’ve added something to the array. Let’s remove it with “Pop!” The first step is to introduce a “Pop” K/V Store component. Screen Shot 2018-05-24 at 2.31.17 PM 
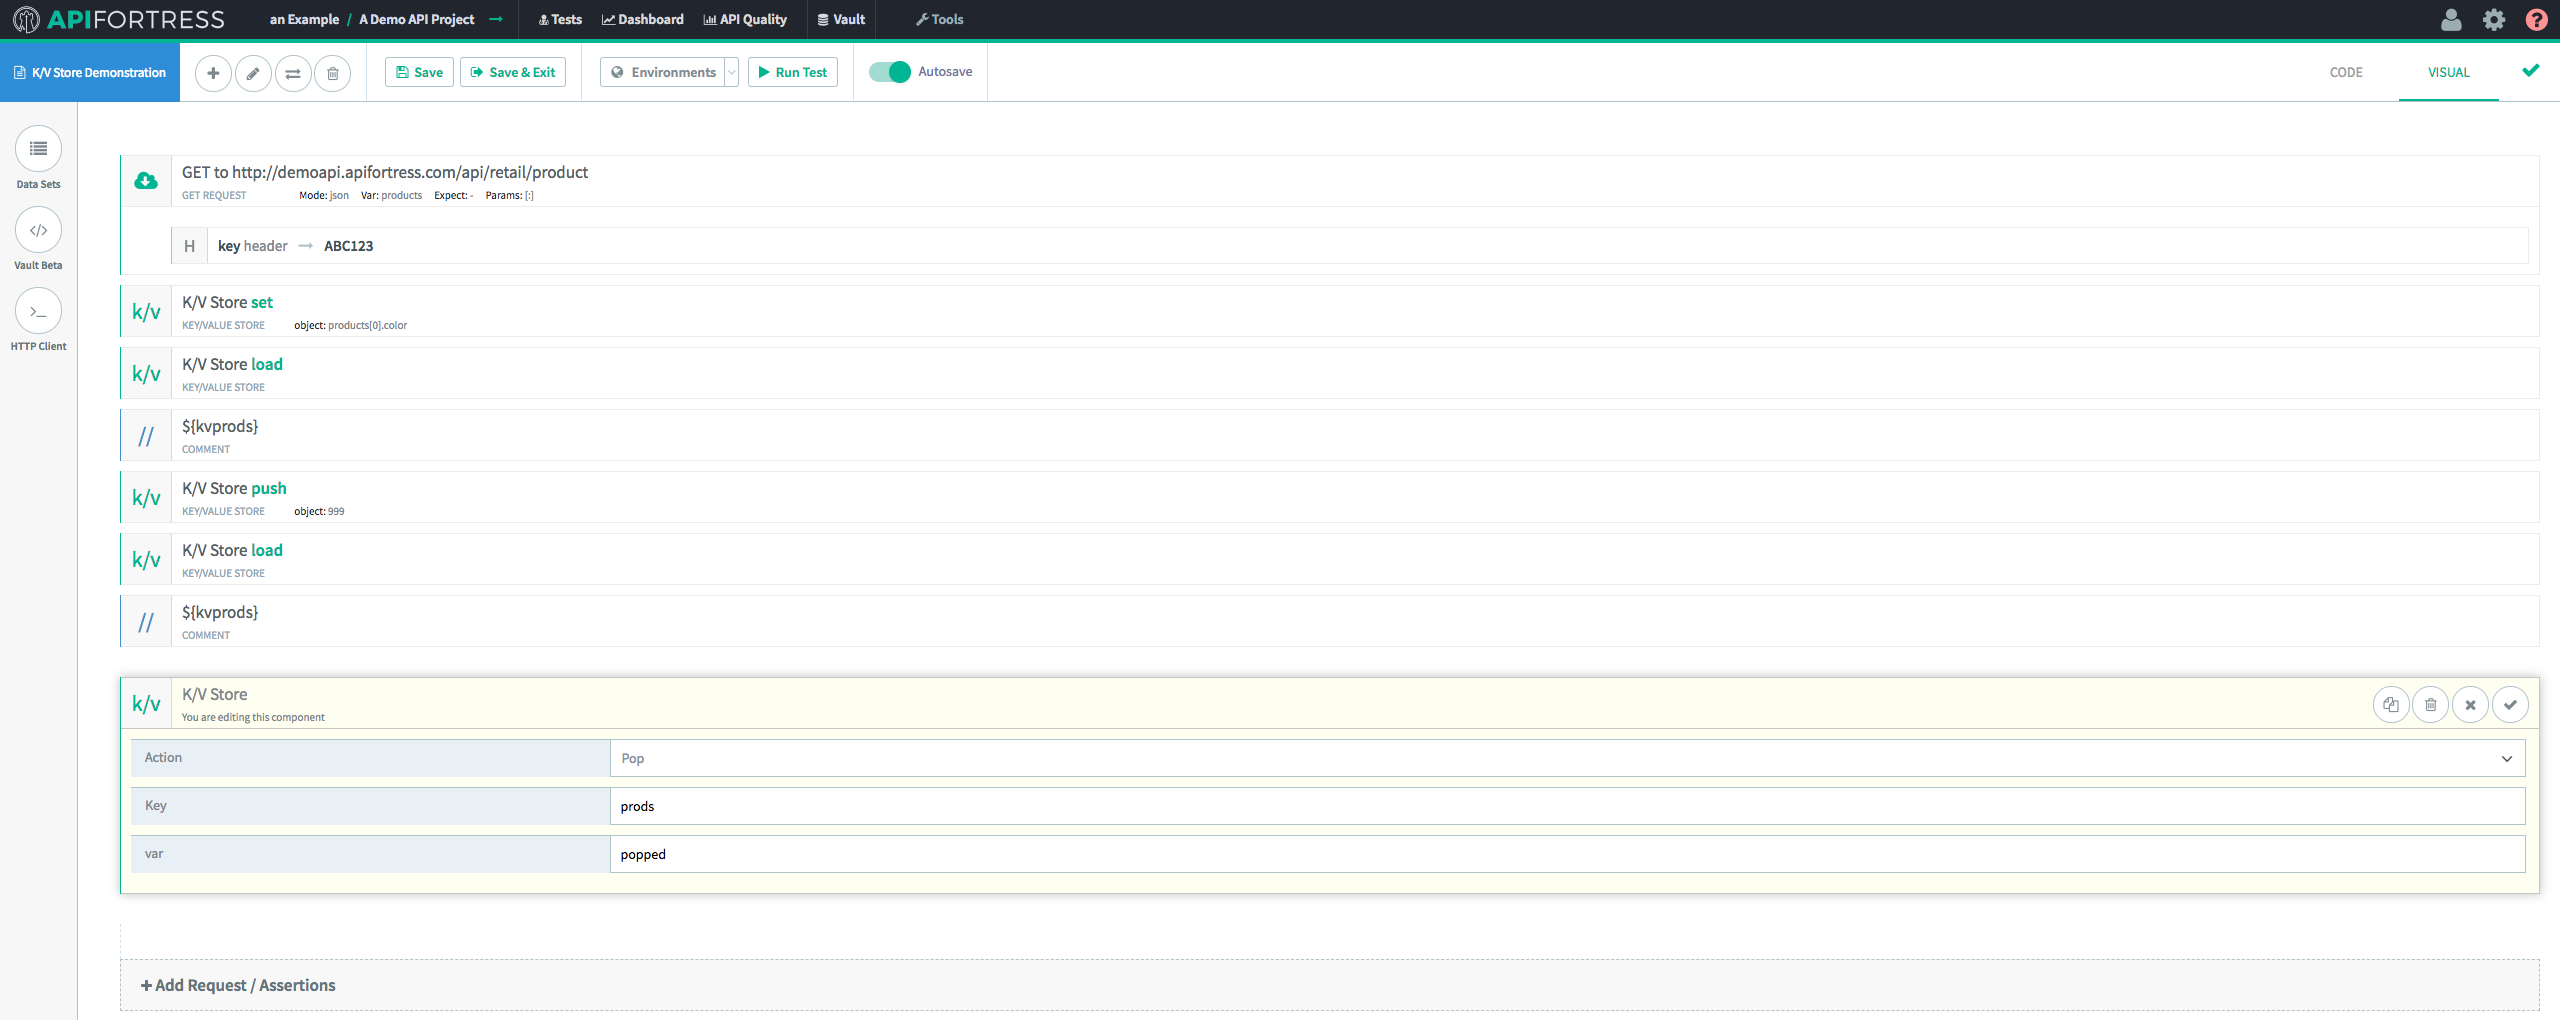
We provide the “Pop” component with the name of the key from the Key/Value Store, and the name of the variable we’d like to assign the popped value to. Remember, “Pop” removes the last value in an array and returns the value itself. In this case, we’re going to assign it to a variable called “Popped.” Next, we’re going to recall the modified key from the Key/Value Store. Then, we’re going to Comment both the recalled Key/Value Store value AND the previously popped value. Screen Shot 2018-05-24 at 2.28.58 PM In the Test Report, we can clearly see the full workflow. First, we assigned an array to the Key/Value Store with “Set.” Then, we added to that array with “Push.” Finally, we removed the added value with “Pop.” Each time we made a change, we used “Load” to retrieve an updated value from the Key/Value Store. Screen Shot 2018-05-24 at 2.29.09 PM 
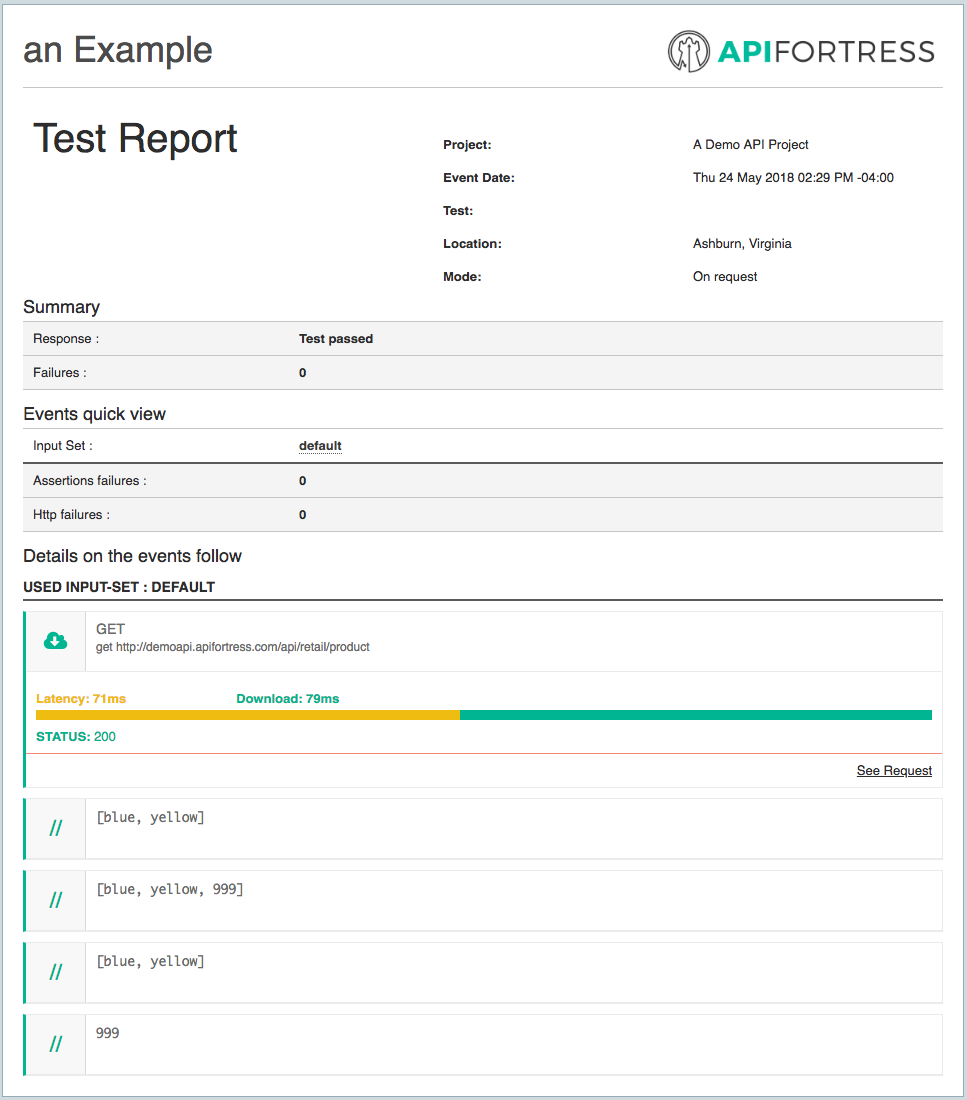
The last two comments show the final state of the array in the Key/Value Store and the popped value itself. The popped value will only be available within the scope of this test run. The array in the Key/Value Store will remain retrievable and until 24 hours after it’s most recent modification. Note: “Load” does not reset the timer. Only “Set,” “Push,” and “Pop” reset the timer. 

Update Input

The update input component allows you to persist a variable defined inside of the test so that the value will be accessible outside the current scope of the test. 
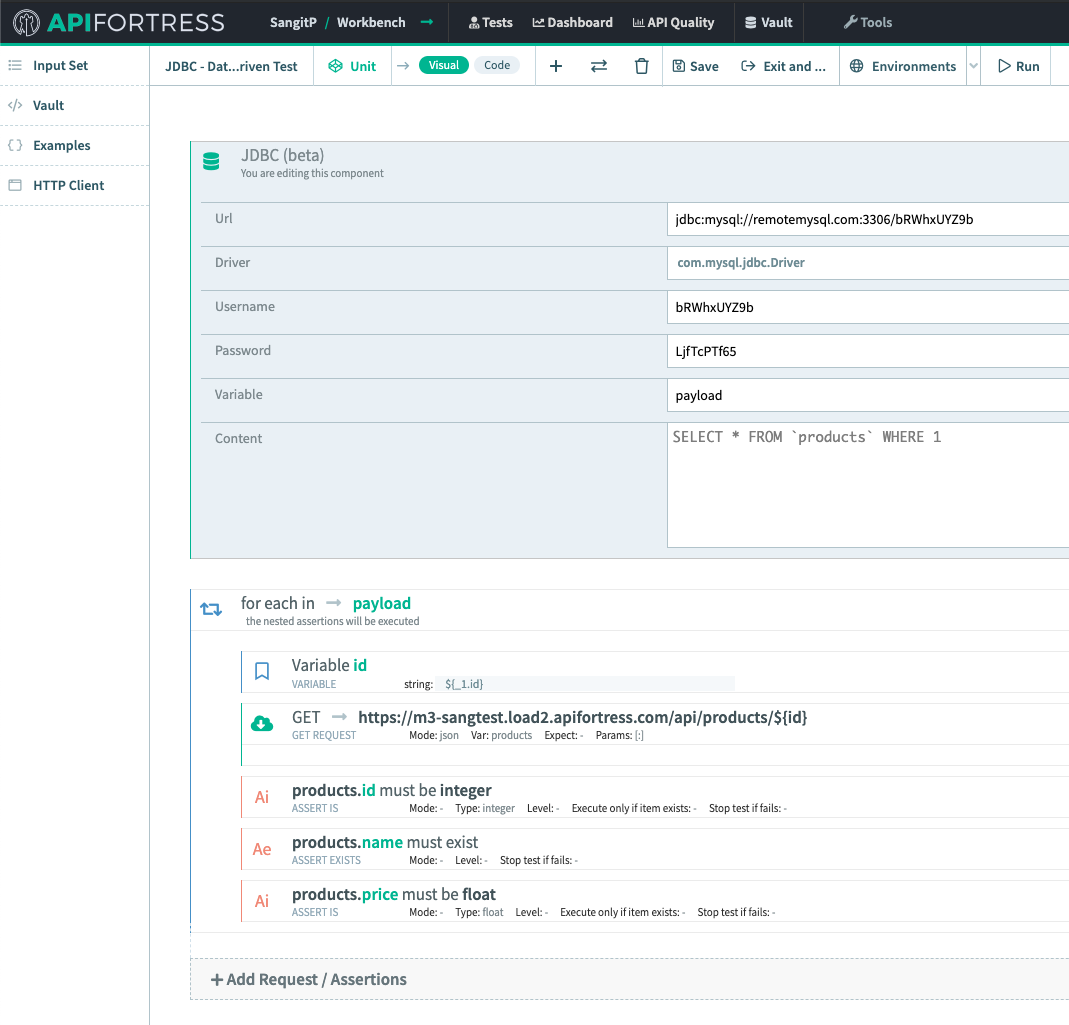
Usually, the component is used in conjunction with the set variable component. First, we set a variable. Then, we make it available outside of the current test with the update input component. We pass the update input component the name of the variable that we need to persist outside of the test. The component will first try to update a variable of the same name in the current input set. If that doesn’t exist, it will search for a global variable of the same name. If there is no global variable of the same name, it will check the vault. If the variable doesn’t exist there, it will create one with the same name. Important note: the update input component works only outside of the composer. That is to say, it will only function when a test is executed from the Test List, the Scheduler, or via the API. In the image above, after calling the login endpoint, we have created a variable called access_token with the set var component. Then, we have updated the value with the update input component. In doing so,  the value of the variable will persist throughout and the value can be used in follow-on tests.  

Databases – JDBC (direct)

The JDBC component allows a test to query data from a database. Typical use cases are:
  • to retrieve data items to use as input data
  • to perform data driven testing
The currently supported databases are: MySQL, PostgreSQL, and Microsft SQL Server. Configuration keys:
  • Url: the JDBC url to the database. Depending on the database type, URLs will look like the following:
    • jdbc:mysql://database.example.com/databaseName
    • jdbc:postgresql://database.example.com/databaseName
    • jdbc:sqlserver://database.example.com;databaseName=databaseName;
  • Driver: the type of driver; you can choose it from the options available in the drop down:
    • org.postgresql.Driver
    • com.microsoft.sqlserver.jdbc.SQLServerDriver
    • com.mysql.jdbc.Driver
  • Username: the username to access the database
  • Password: the password to access the database
  • Content: the SQL query
  • Variable: the name of the variable that will store the results
The result of the query will be represented as an array where each item is a row. Every row is a key/value map, as in:
[
  {"id",123,"first_name":"John","last_name":"Doe"},
  {"id",456,"first_name":"Annie","last_name":"Doe"}
]
Therefore, you can then iterate over the results to use them according to your needs. To see another way to connect to a database using the API Fortress Helper Utility click here!

database data base sql mysql jdbc database data base sql mysql jdbc database data base sql mysql jdbc database data base sql mysql jdbc.

Read File (Self-Hosted Only)

In a self-hosted/on-premises deployment, the read-file command allows you to read a text file from the server local storage, in the /data directory. Parameters:
Name Type/Value Required
path String Yes
var String Yes
mode “JSON”,”XML2″,”text”,”CSV” Yes
path: the path of the file, relative to the /data/ directory var: the name of the variable that will carry the read values mode: how the file has to be parsed If the file is successfully read, the variable declared in the “var” attribute will contain the structured (in case of JSON, XML2, or CSV) or unstructured (in case of text) information you can use as any other piece of data.