Keystores for Downloader

The downloader (aka: RemoteDownloadAgent) receives inbound HTTPS connections from the dashboard, encrypting everything with a self-signed certificate.

Here are the steps to install an actual certificate to a RemoteDownloadAgent.

Requirements: 

  • Java installed in your system

Facts:

  • The Downloader uses a Java Keystore to store the certificate.

Steps:

1. Follow the steps from this Oracle blog post to create a Java Keystore starting from a certificate chain: https://blogs.oracle.com/jtc/installing-trusted-certificates-into-a-java-keystoreIMPORTANT: the keystore password must be 450311aa

2. Create a derivative image starting from the provided downloader image, which will contain the newly created keystore.
IMPORTANT: the file needs to be called keystore and must be placed in:  /opt/remoteDownloadAgent/

For step 2, an example Docker file may look like the following:

FROM apifortress/remoteDownloadAgent:latest
COPY keystore /opt/remoteDownloadAgent/keystore

Email Notification Adjustments (Environments, Thresholds, Disable)

Preamble

With the introduction of stateful email notifications (version=2) the API Fortress mailer will notify you when a test starts failing, and notify you again when the test is back in full working order. The identifier of the incident that allows the system to track the events is the ID of the test itself.

However, in a multi-environment testing strategy, the ID of the test may not be sufficient anymore, as an incident may relate to different environments. Therefore, the test needs to inform the mailer which environment the execution relates too, so that the incident signature will carry the environment as well.

The FACT Component

The Fact component can be added to any test, and is meant to add some extra information (facts) about the nature of the execution, and can contain static or dynamic data.

A FACT has an ID (which should be unique within the test), a label (to help the understanding of the fact), and a value (that is a string supporting the template language ${…}). A specific FACT can be used to control the incident behavior previously discussed.

Note: the FACT component should be set as high up in the test as possible, as if the test reaches its fail limit before the FACT then it will not be set.

Use a FACT to Set Alert Environments

Assume that in the variable scope of your test you have a variable called env that contains your environment string (production, staging, qa etc.). By configuring a FACT in the following way, you can add the environment value to the incident signature:

FACT
id: environment
label: The current environment
value: ${env}

From this moment on, the signature of the incident will be id_of_the_test+value_of_environment. For example, you will receive start/end incidents for test123 in the production environment, and start/end incidents for test123 in the staging environment, as separate flow of events. You can use anything as value of the environment, such as domain names, IDs etc.

Use a FACT to Disable Emails Alerts

A second use-case is disabling email notifications for the test from within the test:

FACT id: disable_alerts 
label: whatever you want here
value: true


You can use logic within the test to set the FACT component and use that to alter the email notification. As an example, you could say “IF the env is development, then disable emails for this test”:

Use a FACT to Set Email Alert Thresholds

Another use-case of the fact component is set an email alert threshold. If you want a test to fail more than once before an email is sent, a FACT called “mail_threshold” can be set in the test:
This means the test will need to fail twice in a row before an email alert is sent.

Given that this can be configured within the test, it offers all the flexibility provided by conditional statements, such as an IF condition on the environment the test is running upon:

Executing from Cucumber

Cucumber is the most common behavior-driven development language for testers. This perfectly dovetails with the capabilities of API Fortress, as both are focused on making testing more intelligent and powerful without adding complication. The Cucumber tool, combined with API Fortress, is a great method of creating smart tests easily. With the flexibility of the API Fortress, you can easily invoke API Fortress tests within your Cucumber Automation Scripts. Simply make an HTTP request to our webhook to kick off a test from your Cucumber test. Have a link to the report printed out into your console, or print the results directly on the console. Below, we will show you how to easily integrate an API test into your Cucumber scripts.

You can find an example script on our Github. First lets walk through the files and method used in the example:
  1. config.json – This is where you will configure your API Fortress Project names and their associated webhooks. This allows you to invoke the tests by simply passing the Project name in the feature file.
  2. apifun.feature – This is where you define the scenario and the steps using the Gherkin syntax. In this file you will define the Given, When, Then steps. In this example we pass in an API Fortress Project name in the “Given” step.
  3. Stepdefs.java – In this example we are using Java, however Cucumber supports many programming languages. The example file contains a few things:
    1. Stepdefs class
      1. In this class you will define what happens in each step from your feature file (Given, When, Then)
      2. Given – will take in the inputed Api Fortress Project name and call the getProjInfo method to get the webhook for this project
      3. When – will take the url of the webhook and call the callAPI method running all the API Fortress tests contained within that project
      4. Then – will parse through the response of the API Fortress webhook to provide the amount of failures, links to the API Fortress test results, and will indicate which tests passed and which failed
    2. getProjInfo method – This method will parse the config.json file and match the Project name provided in the Given step to the Project name defined in the config file. This method will then return the associated webhook.
    3. callAPI method – This method will take the webhook url from the When step and make a call to the API running all API Fortress tests within that project. This method will return the response from the API.

Disable SSL Validation

SaaS / Cloud Customers

If you are using the API Fortress SaaS (cloud) platform you can use the downloader named “US East No SSL Check”. This downloader ignores invalid and not matching certificates.

Self Hosted / On-Premises Customers

To disable the SSL validation in the downloader do the following steps:
(We will assume you’re using a docker-compose based deployment, if you are not please reach out to support.)
  • First access the machine that runs the downloader service (likely the one that runs the rest of API Fortress as well)
  • Then navigate to the “downloader/” directory
  • Stop the downloader by issuing:
    sudo docker-compose stop
  • Next edit the “docker-compose.yml” file
  • In the “environment” section, add the following entry (mind the annoying YAML format):
    disable_ssl_validation: ‘true’
  • Save and exit the file
  • Now restart the downloader by issuing:
    sudo docker-compose up -d
This downloader will now ignore invalid and not matching certificates.

Automating 3-Legged OAuth

Does your API require 3-leg authentication? Well with the help of a small helper container you can achieve automation of 3-leg using the API Fortress platform. Thanks to the helper, your local machine can help in the automation of your tests logging in using 3-leg auths such as Facebook, Twitter, and Google. First let’s deploy the helper container, which can be found at the below link: https://github.com/apifortress/3loa Once you have the 3loa folder downloaded, navigate to that folder within a terminal window. Then run the following command to start the 3loa container: “sudo docker-compose up -d” The 3-leg helper is now live and can be access from API Fortress using the following URL: “http://3loa.apifortress:3000/oauth” Now that we have that up and running, watch the short video below to learn how to use this in API Fortress to automate your 3-leg OAuth: In the example used in the video above, we show how to call the 3loa API with details to execute the authentication and return the access token. Below are some callouts from that example: The post body of the API call will need the following details: “username”: username for logging in “password”: password for logging in “usernameField”: x-path selector for username field “passwordField”: x-path selector for password field “loginButton”: x-path selector for the login button “authorizeButton”: x-path selector for the authorize button “authorizationURL”: URL to authorization site “tokenURL”: URL used to get access token *The x-path selectors will need to match the site used for authorization.* Please note that this is an open source tool if your authorization flow differs from the example provided, you can download the source code of the tool and modify it to achieve the flow needed for your specific flow.

Generating Fake Test Data

*Introduced in API Fortress 17.1.0*

Does your API or test require random full names, valid/invalid ids, or various types of input data? Well now you can generate these random data points directly in API Fortress with the Fake Data Generator. There are a couple of ways you can generate this data: You can directly reference the method within your variable, API call, or anywhere in the test where you can type in the following syntax: “${F.zipCode()}” For example: You can use the “Fake data generation” component to generate this data. There are a few different ways this component can be used. You can use it to generate a string, array, or an object. See below for examples.
  1. Generate a String
Var – name of variable in which data will be stored (for referencing in the test elsewhere) Variable mode – String (single piece of data) String – Here you will put the name of the type of data you want. See the list below for all options. Some examples are firstName, lastName, and emailAddress. Count – How many examples of this data type would you like to generate. 2. Generate an Array Var – name of variable in which data will be stored (for referencing in the test elsewhere) Variable mode – Array (multiple data points) Array – Here you will put the name of the type of data you want. See the list below for all options. Some examples are firstName, lastName, and emailAddress. Count – How many arrays of these data types would you like to generate. (Notice that the count field has been left blank, in that case the system will generate 1 iteration of the data) 3. Generate an Object Var – name of variable in which data will be stored (for referencing in the test elsewhere) Variable mode – Object (a map of name:data point). This is often used to create JSON objects. Array – Here you will put the name of the type of data you want. See the list below for all options. Some examples are firstName, lastName, and emailAddress. Count – How many strings of this data type would you like to generate.

List of Methods

Please note that the method itself is listed below. When using the Fake data component only use the name of the method without the “()”

Addresses and Countries

  • streetName(): provides random street name
  • streetAddressNumber(): provides random address number
  • streetAddress(): provides random street and address number. If secondary specified provides apt number.
  • secondaryAddress(): provides random apt number
  • zipCode(): provides random zip code. If state provided provides proper zip code for the state **(valid only for US states)
  • streetSuffix(): provides random street suffix
  • streetPrefix(): provides random street prefix
  • citySuffix(): provides random city suffix
  • cityPrefix(): provides random city prefix
  • city(): provides random city Name
  • cityName(): provides random city Name
  • state(): provides random state/province
  • buildingNumber(): provides random build number
  • fullAddress(): provides random full address
  • country(): provides random country
  • countryCode(): provides random country code
  • countryCodeSL(): provides random country code in small letters
  • countryCodeSL3d(): provides random country code in small letters on 3 digits
  • capital(): provides random capital city

People and People identity

  • fullName(): provides random full name
  • firstName(): provides random first name
  • lastName(): provides random last name
  • profession(): provides random profession
  • timeZone(): provides random time zone
  • validID(): provides random valid ID
  • invalidID(): provides random invalid ID
  • validSSN(): provides random valid SSN
  • invalidSSN(): provides random invalid SSN
  • phone(): provides random phone number
  • mobile(): provides random mobile number

Internet

  • emailAddress(): provides random email address
    • ***It is to be noted that these email addresses are randomly generated with real domains. Please be careful if you are using this in a test and connecting to a mailer of sorts, there is a chance that some of them could be real email addresses.***
  • domainName(): provides random domain name
  • domainWord(): provides random word
  • domainSuffix(): provides random suffix
  • url(): provides random url
  • password: provides random password
    • Syntax: (<minimumLength,maximumLength,includeUppercase,includeSpecial,includeDigit>)
    • Example: password(5,10,true,false)

Credit Card

  • creditCardNumber(): provides random credit card number
  • creditCardExpiry(): provides random credit card expire date
  • creditCardType(): provides random credit card type

Products

  • productName(): provides random product name
  • material(): provides random material
  • price(): provides random price
  • promotionCode(): provides random promotion code

Companies

  • companyName(): provides random company name
  • suffix(): provides random company suffix
  • industry(): provides random industry

Currency

  • currency(): provides random currency
  • currencyCode(): provides random currency code

Random Numbers

  • integer: provides random integer number
    • Syntax: (<min,max>)
    • Example: integer(2,20)
  • decimal: provides random decimal number
    • Syntax: (<min,max,maxdecimals>)
    • Example: decimal(0,2,2)
  • uuid(): provides random unique identifier

Boolean

  • bool(): provides random boolean value

Collection/single Data

  • collection(<number_of_elements,”method”>):
    • provides a list of elements generated by “method”.
    • The single element is a simple string.
    • The size of the list is equal to the number_of_elements
  • collection(<number of elements,[“method1″,”method2”,…,”methodN2]>):
    • provides a list of elements generated by the list of methods provided.
    • The single element is a list.
    • The size of the list is equal to the number_of_elements
  • collection(<number of elements,[method1: ‘method1′,method2:’method2′,…,methodN:’methodN’>):
    • provides a list of elements generated by the list of methods provided.
    • The single element is a map.
    • The size of the list is equal to the number_of_elements
  • single(<“method”>):
    • provides an element generated by “method”.
    • The element is a simple string.
  • single(<[“method1″,”method2”,…,”methodN2]>):
    • provides an element generated by the list of methods provided.
    • The element is a list.
  • single(<[method1: ‘method1′,method2:’method2′,…,methodN:’methodN’>):
    • provides an element generated by the list of methods provided.
    • The single element is a map

Version Control

There are two primary mechanisms for version control in API Fortress. The first is the Publish Test feature, which allows for the pushing of updated test-code to a live version of the test. The second mechanism for version control is the API Fortress-Git integration. The integration is powered by the API Fortress Post-Receive Git Hook, which can be found here. Documentation is located here.

Testing GraphQL

GraphQL is a fantastic tool for creating versatile, eminently flexible servers. With API Fortress, testing GraphQL queries is as easy as testing regular REST endpoints. API Fortress provides a demonstration GraphQL environment at: GraphServerlet The query and mutation below are formatted for this environment.

Testing a Query:

If the server has GraphicQL enabled, creating your queries through that tool and then copying the generated URLs into an API Fortress GET component is an acceptable process. However, this process does not lend itself to either readability or replicability. The preferred method is passing the query as a POST body. 
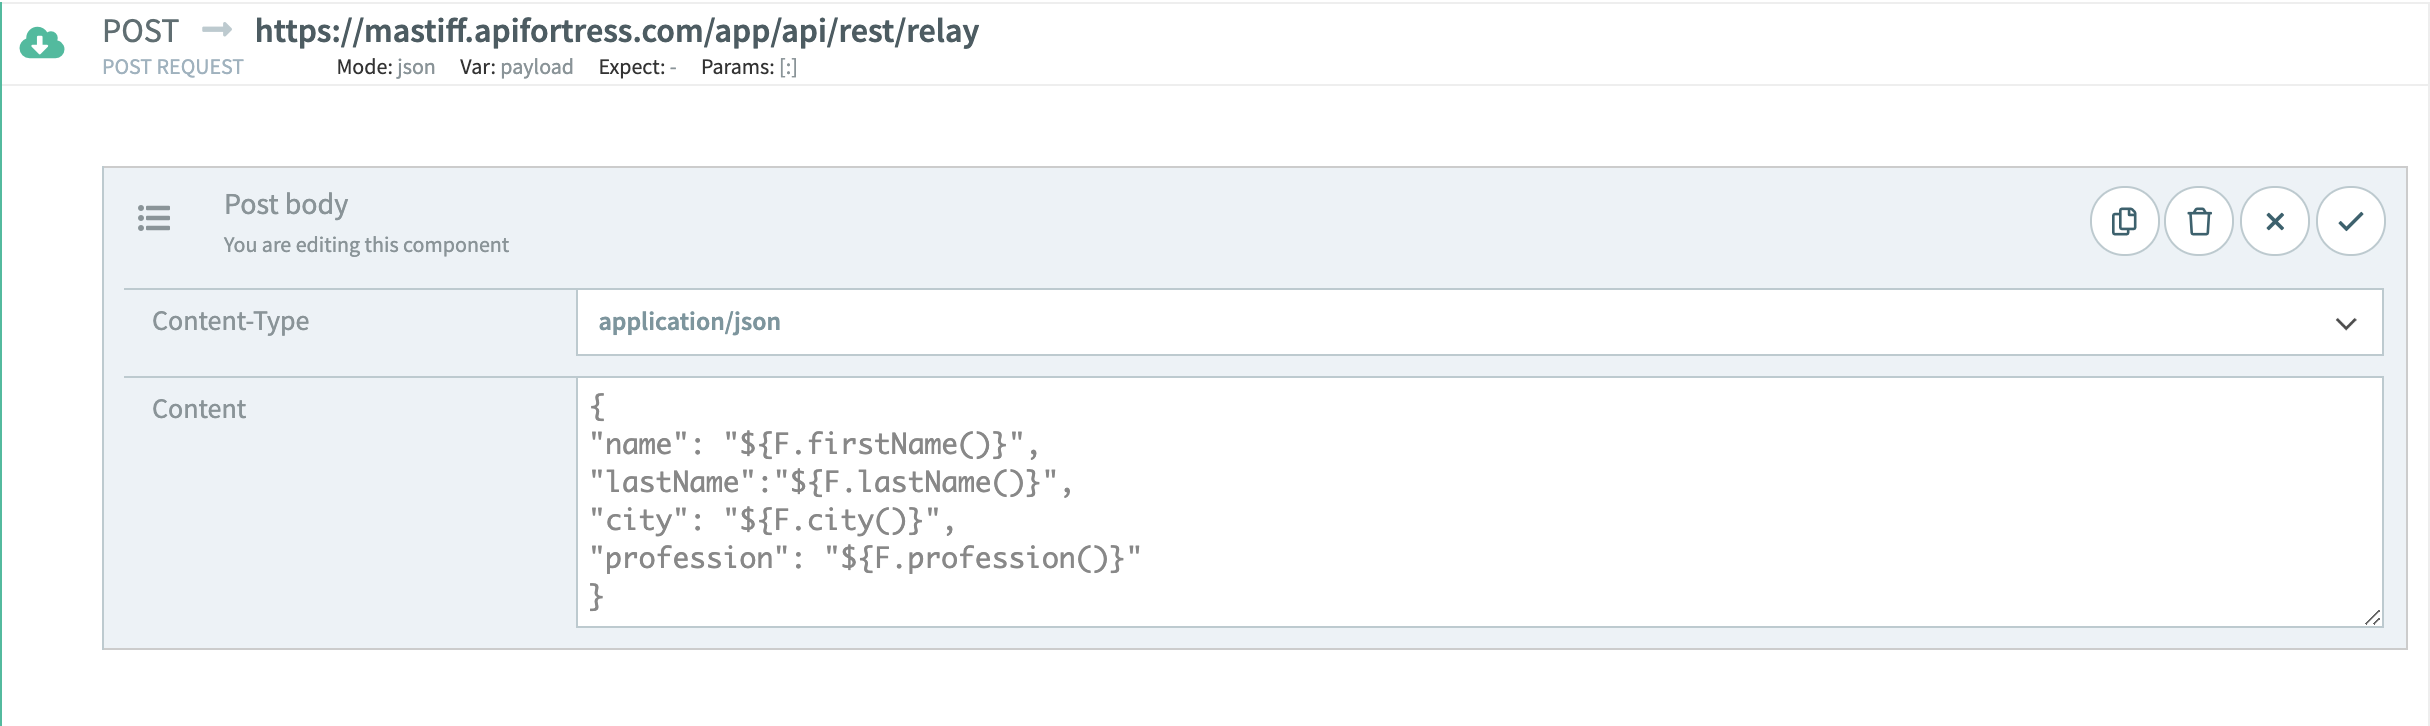
If we’re sending a query request to our GraphQL server, we would format our POST body as follows:
{
 "query": "query (\$id: Int!) { course(id: \$id) { id, title, author, description, topic, url }}", 
 "variables": { "id": 1} 
}
The above object says the following: we are querying for a specific course by ID, and wish our response body to contain the ID, Title, Author, Description, Topic, and URL of that entry. If we send this body as a POST to our test GraphQL environment, our response will look like this:
{
 "data": {
   "course": {
   "id": 1,
   "title": "The Complete Node.js Developer Course",
   "author": "Andrew Mead, Rob Percival",
   "description": "Learn Node.js by building real-world applications with     
    Node, Express, MongoDB, Mocha, and more!",
   "topic": "Node.js",
   "url": "https://codingthesmartway.com/courses/nodejs/"
    }
  }
}
Since our response is a JSON body, API Fortress is fully capable of automatically generating  a test to validate future responses from this query.

Testing a Mutation:

A mutation is a GraphQL operation that makes a change to the data being provided. Whereas a GraphQL Query that performs a READ, a Mutation performs a CREATE, UPDATE, or DELETE, rounding out our CRUD operations. A Mutation is also passed as a POST body to the GraphQL endpoint in question:
{
 "query": "mutation (\$id: Int!, \$topic: String!) { updateCourseTopic(id: \$id, topic: \$topic) { title, topic }}", 
 "variables": { "id": 1, "topic" : "Ruby" } 
}
This Mutation is executing the ‘updateCourseTopic’ operation on the database entry with the ID of 1 and changing its ‘topic’ value to ‘Ruby’. Note the ‘mutation’ keyword in place of the ‘query’ keyword from the Query example. This Mutation would return the following response from our test GraphQL environment:
{
 "data": {
    "updateCourseTopic": {
    "title": "The Complete Node.js Developer Course",
    "topic": "Ruby"
    }
  }
}
Again, as this is a valid JSON response body, API Fortress is able to generate a test automatically to validate its schema in the future.

Import / Export Tests

API Fortress makes it very simple to import and export your tests. This is useful when moving tests to another project, making another API Fortress deployment, or sharing with our support team for help.

Export Tests

After you login to the platform, the flow is as such:
  1. Click Tests for a Project (folder) of your choice
  2. To download click the circles to the left of the test name
  3. Click Export Selected Tests
This will download a zip of the tests you exported. See below for a GIF of the process.
Export Tests
Export Tests

Import Tests

To import a test is as easy as clicking the +Import Tests button next to the +New Test button. See image below.
Import Tests
Import Tests

Using the Local Engine (APIF-Local)

apif-local-Local is the API Fortress local engine. The objective of this program is to allow developers to run API Fortress tests on their computers, and to validate the tests being developed locally.

Requirements

  • A modern Linux/Mac/Windows computer
  • Java 8

Installation

  1. Make sure Java 8 is installed and is present in the command line path
  2. Unzip the file provided by our team in a location that is convenient to you

Configuration

The only essential key in the configuration is the license. Everything else can be provided on the command line. We do, however, suggest you configure the tool properly once you get accustomed to it and start using it regularly. Example:
license: 'abcabcabc'
hooks:
- key: examples
  url: https://mastiff.apifortress.com/app/api/rest/v3/abcabc-123-123-123
  credentials:
    username: info@example.com
    password: password1

- key: local
  url: http://mydeployment.com:8080/app/api/rest/v3/abcabcabc-123-123-123
 credentials:
    username: john@doe.com
    password: password1
In this example, we configured two different hooks, related to two different API Fortress instances. The value of the “key” can be used to reference a profile without the need to explicitly introduce the hook URL and credentials every time in the command line. The configuration file can be placed in multiple locations, based on your preferences. The priority check is the following:
  1. A path provided in the command line
  2. The current working directory
  3. The directory where apif-local.jar resides
  4. A .apifortress sub-directory in the user’s home directory

apif-local – Download

java -jar apif-local.jar download [hook] <options>
This mode allows you to download full projects, or, selectively, tests, vault and environments, from an API Fortress platform instance. See apif-local.jar help for details about the possible switches. Examples:
java -jar apif-local.jar download examples -l /tmp/stuff
Will download the full project represented by they key “examples” in the directory /tmp/stuff.
java -jar apif-local.jar download examples -l /tmp/stuff -v
Will download just the project’s vault.

apif-local – Run

java -jar apif-local.jar run [path] <options>
Runs an API Fortress test, located in the local file system. See apif-local.jar help for details about the possible switches. The expected file system should look like the following:
\any_directory
  \api_fortress_tests
     \simple_test_1
         | unit.xml
         | input.xml
     \advanced_test_2
         | unit.xml
         | input.xml
Every test is represented by a directory, containing an input.xml and a unit.xml file. This exact format is also followed by apif-local – Download. Examples:
java -jar apif-local.jar run any_directory/api_fortress_tests/simple_test_1
Will run the test simple_test_1.
java -jar apif-local.jar run any_directory/api_fortress_tests -r
Will run all the tests contained in the api_fortress_tests directory.